Welcome to Nic's Fix!
When HomePod first released, it seemed total destruction was required to get inside, and there was no way to repair it.
Thanks to ouitmenick's guide, a clean, non-destructive way to get in was found! Still, actual issues were unsolved, and no one offerd a repair service. My goal at first was to solve and share as much as I can, but a bigger demand could not be ignored.
Launched in 2021 as the world's first Live HomePod service, thousands have been sent in from all over for successful repairs, with countless more saved by sharing our work!
"I kept dreaming of a world I thought I'd never see.
But then one day,
I got in."

Worry-free Warranty!
All repairs include my unbeatable 1+ year warranty, including free U.S. shipping back and forth if issues arise within the first year, and discounts on future repairs thereafter.
Not Just A Repair Service, a Repair Experience
"I must say your “repairs” are work of arts, poetry in motion even" - Chishing, Jan 2025
"Not a single motion of the hand unwasted. absolutely incredible to watch!" - Paul, Jun 2024
"This was hands down the best experience I have ever had fixing anything in my life" - Matthew, Jul 2022
What can you fix?
Apple HomePods are my specialty. Anything from no power, no sound, distorted audio, death farts, failing to setup or configure, blinking volume buttons, boot loops, custom colors, or just maintenance. It can be fixed, by Nic's Fix! Repairs for common issues cost $50, and only go up to $70 for rarer, more involved repairs!
I may also be able to fix your other electronics... let me know what you broke!
My repair guides brings everyone to my site.
And they're like, "Where's ipsw?"
I can fix you, but I'll have to charge.
Don't settle for another shop that doesn't understand what they're fixing or why something needs replaced... Send it to the source of Apple HomePod repair info itself!
Apple HomePod Cleaning and Customization.
All HomePods get a thorough power dusting, and a brief cleaning. More intense deep mesh cleaning, & replacement cosmetics start at $10 with any repair.
Custom colors are also available! See the Mesh section for examples.
I've seen it all...so can you.
What sets Nic's Fix apart is simple; Do it live! It's all streamed on my YouTube channel.
Watch my latest repair livestream below...
Visit my YouTube channel for videos showing how to diagnose and repair many of the issues covered here, or catch a live stream repair!
You're also invited to my discord server to get help, share your results, and anything else.
The Known Issues section covers all of the known repairs and parts needed.
Mail-In Repair Service
Want me to fix your HomePod, or maybe something else? Here's how!
1:
Fill out a HomePod Repair Request using the form below, and I'll follow up within 2 business days. Feel free to reach out directly if you don't hear back, and check your spam folder (in email and iMessage!)
* For repair inquiries that aren't about HomePods, please contact me directly at [email protected]. I will also buy your broken / unwanted HomePods and provide shipping.
If you're having issues displaying the form, you can open it in a new tab here
2:
Send your stuff in! If you use your own shipping, please let me know your tracking number or include contact information inside! *You must include "Unit #341" in the address! Repairs will cost more if damage occurs during shipping, so pack it well!
Nic's Fix
12819 SE 38th St, Unit #341
Bellevue, WA 98006
My UPS mailbox is a real store front with employees that can sign for and keep your package secure until I can pick it up. Your tracking will show it as delivered before I have it! I'll let you know when I've gotten your gear.
3:
I'll shoot you a message with a link to watch the repairs live on YouTube! Most are done and shipped back within 0-2 business days.
If repairs are successful, payment can then be made by PayPal, CashApp, Zelle, Venmo or Apple Cash. If you opt to not have repairs done or it can't be fixed, there's no charge! You can donate, or cover return shipping.
4:
Let me know how I did (or see what others think) on my TrustPilot!
*I normally reply within 2 business days, but it may take up to a week during busier seasons to keep up with present repairs! Check your spam folder, and feel free to try contacting me again if you don't get a response.
If you live outside the US:
Repairs from all over the world are accepted, whether you want to send in your whole pod, or just the component that needs repair...though shipping may get expensive.
Click below to see a list of others who have reached out offering repairs. Feel free to contact me to be added! *I provide no promises or guarantees for others' work, only my own!*
ElectricalHybrid Ltd
[email protected]
Ebay
Howard Conrad Repairs
[email protected]
https://howard-conrad.com/apple-homepod-repairs/
Wills Gledhill
[email protected]
France:
Quentin
https://www.sauvemonmac.com/
[email protected]
Céladonie
https://fixpod.fr
[email protected]
Denmark:
DUCKSHOUSE MAC SERVICE
https://duckshouse.dk/
[email protected]
Netherlands:
RefurbNoob (Robin)
https://refurbnoob.nl/pages/apple-hompod-reparatie
[email protected]
Australia:
Nathan B.
TBA
[email protected]
Germany:
Moon Repair
https://www.moonrepair.de//
[email protected]
PMobiles
https://pmobiles.de/
[email protected]
Spain:
Fernando P.
[email protected]
Czech Republic:
Martin @ AWC
https://awc.cz/
[email protected]
Prague:
Nazim @ Pajecka.cz
https://www.pajecka.cz/
https://www.instagram.com/pajecka.cz/
Slovakia:
Martin Trojan
[email protected]
South Korea:
Alex.P ()조민준)
Bunjang (번개장터)
Bosnia / Croatia:
Stanko - Can3Fix
YouTube
[email protected]
Delhi, India:
Avneesh - RebuildApple.com
Website
[email protected]
Singapore:
Electron Repair Service
Don't Just Fix It, Improve It!
All Apple HomePod repairs include my signature maintenance items. As I find more common faults, they will be added.
1: DC filters are always replaced. These are the leading cause of bass issues and/or Death Farts. Even though all cermaic capacitors naturally decay every 5-15 years (depending on use,) I found these failing as early as a year after the HomePod's original production run, and was the catalyst for a dedicated "maintenance" service.
2: SB Diodes dated 1746k-1748k are replaced. These are the leading cause of no power, and is permanently fixed / prevented with our high quality, higher rated replacements.
3: The foam subwoofer gasket can break down over time and become prone to failure, or a lazier bass response. These are replaced with a new rubber nitrile gasket. This results in a tighter, and longer lasting bass response.
4: The mesh can allow a significant amout of dust to build up around the subwoofer, and main board. Don't worry about breaking out the air compressor, I'll give it a thorough blast to blow the dust away, and briefly wiped down, with options for deeper cleaning and cosmetic fix-ups and customization.
Packing and Shipping Pods
Pack your HomePod well enough that it doesn't shake around, to prevent more damage like this. If you care about cosmetics, avoid wrapping the cable around the pod as it can leave imprints, and wrap the AC plug to keep it from scratching things.
I've found that the original HomePod boxes do not, in fact, protect HomePods well during shipping. It can lead to small cracks in the top glass, and power cables wrap around the mesh leaving indents.
Instead, I recommend no smaller than an 8x6x6 inch box with some lacking all around. If your box is buldging, it's probably too small.
You can remove and hang on to your power cable on your HomePod for simpler, safer packing if desired. To remove the power cable, first disconnect from power, then place the HomePod on a solid surface. Hold the HomePod down with one hand, then firmly grasp and pull or yank the power cable with your other hand. To reinstall the power cable, simply re-insert it the correct orientation, and push the connector into the HomePod until it makes a loud click.
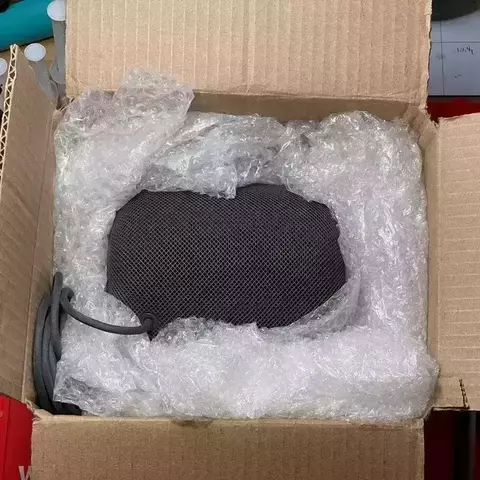
Pack it Well, All Around
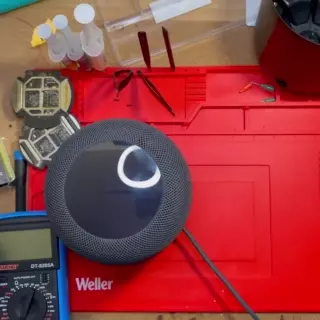
How to Disconnect & Reconnect Cable
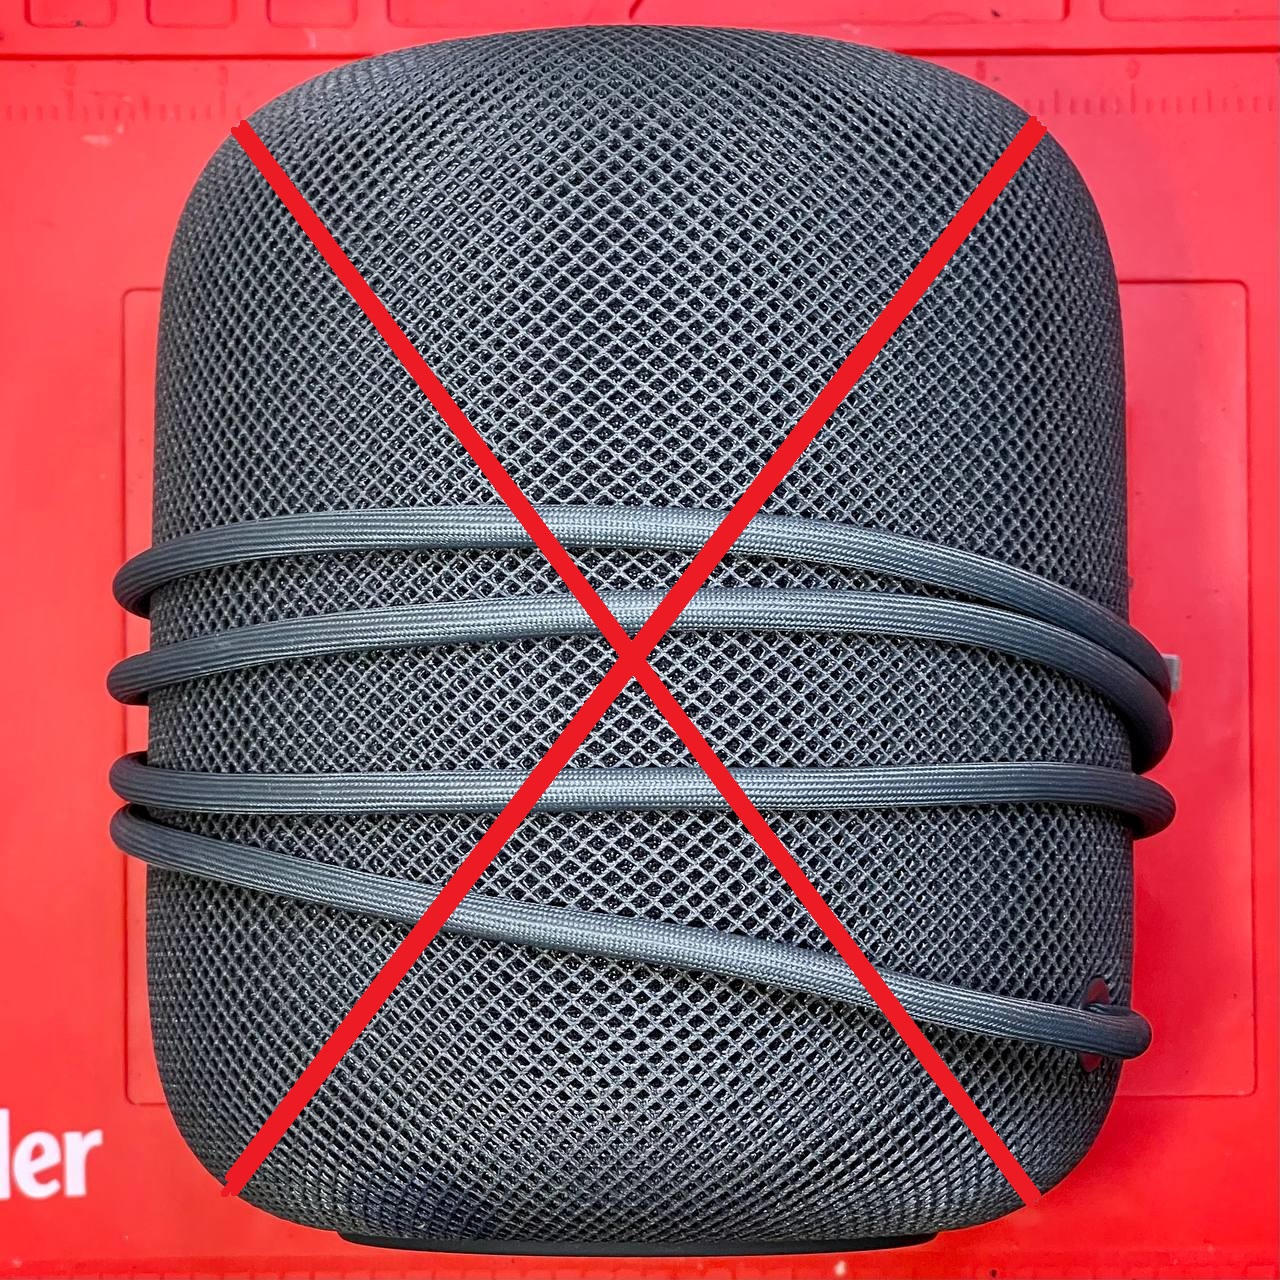
Avoid Doing This
Known Issues
A collection of what I've learned, found, and fixed over the years and thousands of homepod repairs. Check back as I am always adding new issues and fixes, and soon a new section for the 2nd Gen.
If you think you found a new issue or fix, you can let me know and I'll put it here with your name on it!
The same symptoms do not always mean the same root cause, and physical damage can be tricky to spot. If you are going to attempt your own repairs, it would behoove you to have a spare set of HomePod parts to diagnose and troubleshoot.
For HomePods that have never been repaired or taken apart before, start with the Common Issues, then Less-Common.
If you diagnosed a known issue, made repair attempts, and now experience a new / different issue, it's probably your fault. Check the Common Mistakes section for some tips.
Most images have larger versions available if you right-click -> open them in a new tab.
Common Issues
Issues that can occur with untouched HomePods. Click each issue to expand it for details!
Symptoms: HomePod will power on, but ends up with flashing / blinking volume lights, or boot loops. Won't factory reset with traditional methods.
Root Cause: Many are caused by failed software, or failed / interrupted software update. Some are hardware issues, usually on the logic board, usually the NAND or it's BGA. In rare cases it is caused by other faulty hardware, like physical damage to the display. It is typically not possible to tell if yours is h/w or s/w without connecting to it via USB and attempting to restore.
Hardware Repair: The most common hardware-related cause is the NAND's BGA on the logic board. While this is a fairly intensive repair, it can be reballed with an iPhone 6 NAND stencil, since they are identical. No way known currently to reprogram a new NAND chip if your old one dies.
Repair video coming soon!
Software Repair: You will need to download the latest .ipsw, fashion USB access to your HomePod, and restore with specific software tools.
The scripts / tools to accomplish this are FREE to use and linked below, do not pay anyone for them!
18.3 IPSW || Restore Guide || Live Demo || Print Your Own Adapter || Buy My USB Adapter
Check back for updates as old versions become unsigned, and thus, unrestorable!
Credit is due to tihmstar and David Ryskalczyk for making this happen! All I did was provide a bricked pod, then test, and document their process. Consider donating to them, especially if you've successfully restored your HomePod.
tihmstar's github || tihmstar's patreon || tihmstar's 3d printable adapter
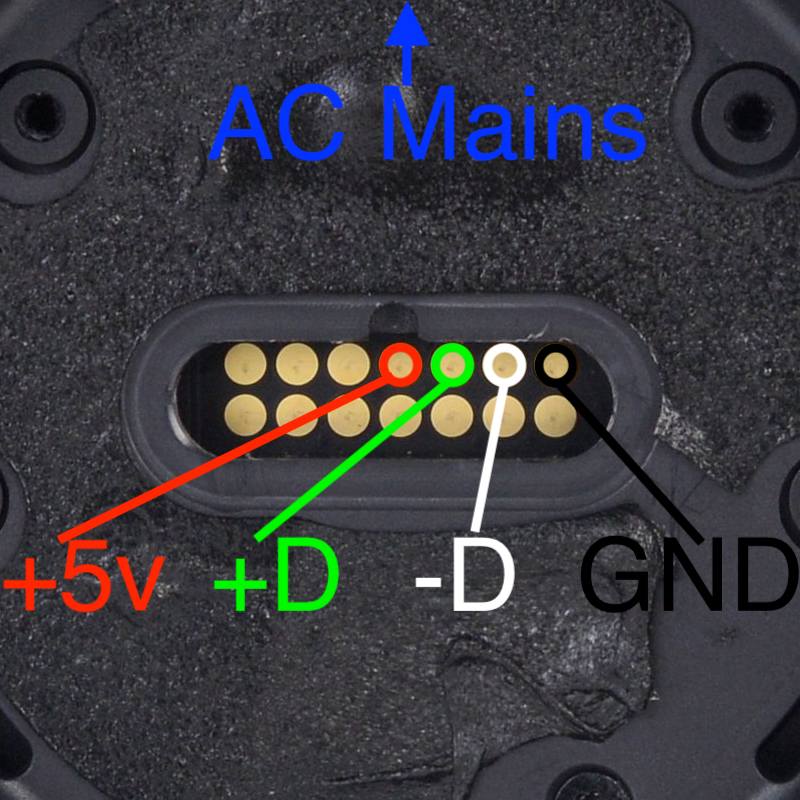
USB Pinout
Symptoms: No power, no lights, and no response. Power draw at the outlet will typically be around 2-10 Watts. If left plugged in for some time, the side of the HomePod may feel slightly warmer.
Diagnosis: Diode is located on the amplifier board. Use a multimeter in continuity test mode to test if diode is shorted by placing one probe onto the larger pin of the diode, and the other probe on one of the two smaller pins of the diode. If meter shows it's shorted, move probe from first small pin to other small pin. If you still see a short, remove the diode and test with the diode off the board. If just the diode shows shorted and not the board, replace the diode.
If your diode tests OK, check for less-common no power issues.
Repair: Replace shorted diode or any diode with date code 1746k-1748k with a newer date and part number PDS560-13, PDS560-13Q, PDS760-13, or any other 60v 5a schottky barrier diode of similar specs to permanently repair Video guide available on YouTube.
Root Cause: Diodes manufactured between week 46 and week 48 of 2017 (date code 1746k-1748k) have apparent QA issues with incredibly high failure rates. No other date codes have been found to fail, despite a wider date range used. Apple used a large date range of diodes during manufacturing and there is no correlation to a diode's date code and a HomePod's serial number, so there is no way of telling what diode your homepod has without disassembly.
All first-generation HomePods, whether factory-new, factory "refurbished", or out of warranty replacements, will have the same chance of having this diode. Second generation HomePods have a bigger, newer diode and won't have this same failure.
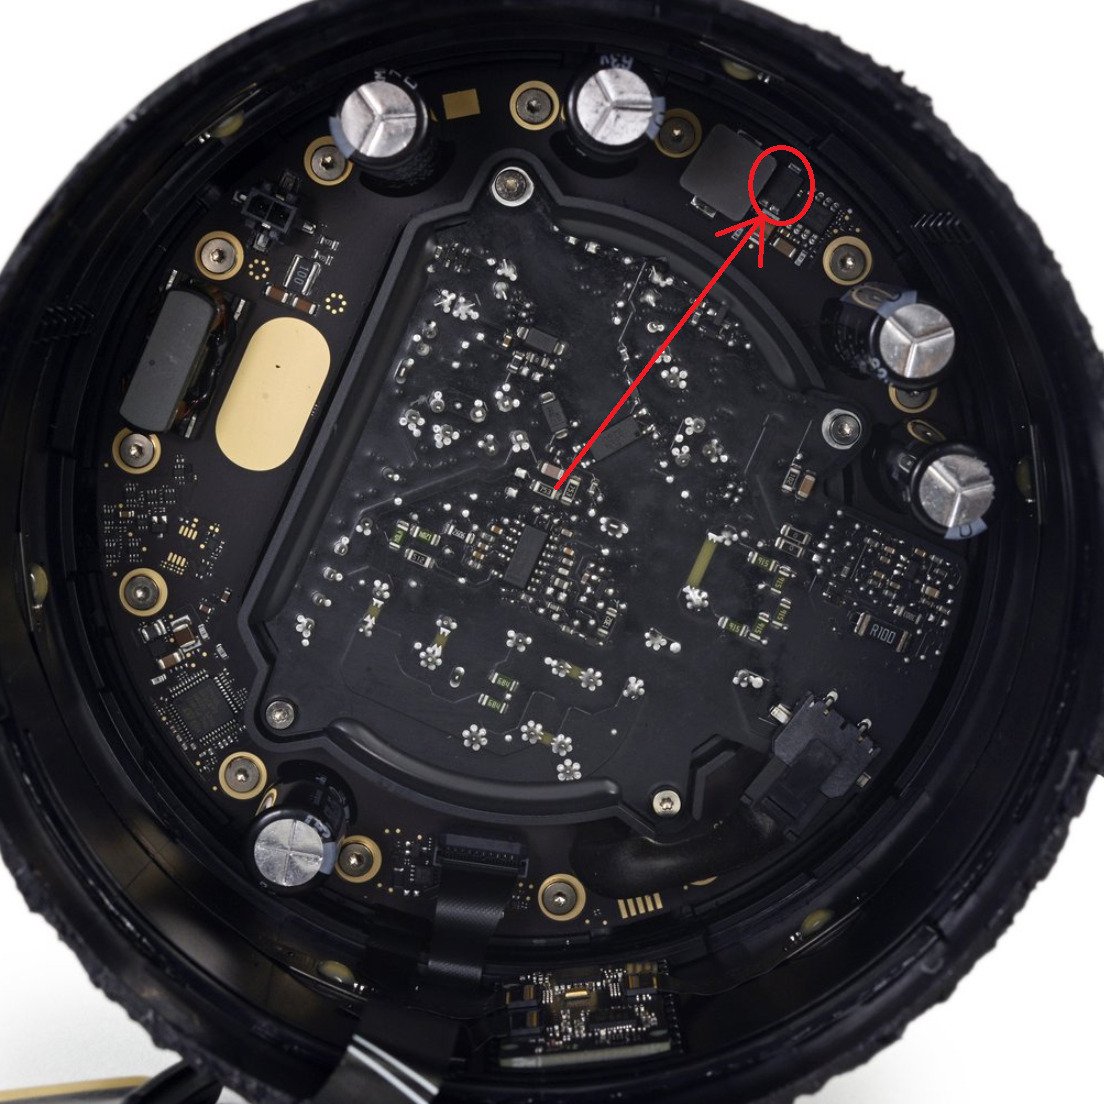
Diode Location Inside HomePod
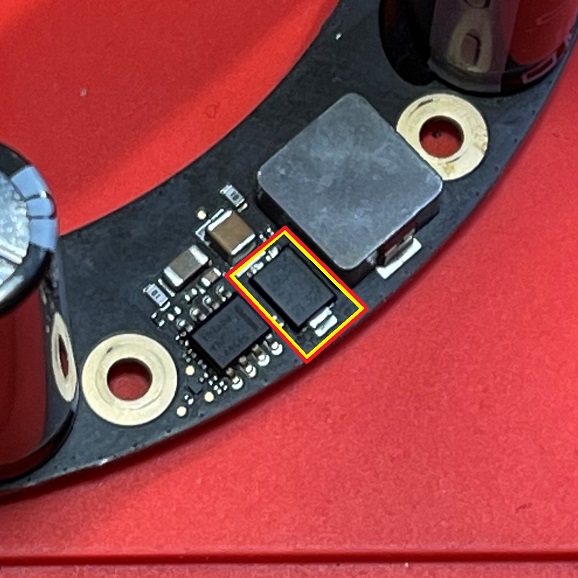
Diode Location On Removed Amp Board
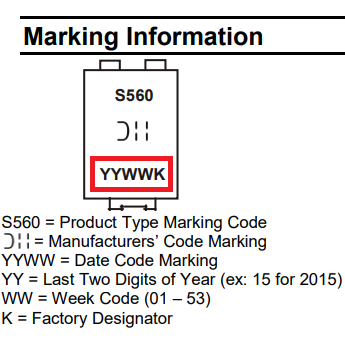
Diode Date Code
Diode: PDS560-13. Can also use PDS760Q-13
Symptoms: Very loud popping, lack of bass, and / or a loud buzzing sound followed by a restart, AKA "Death Farts". See below for sound samples to compare. Not to be confused with software / wifi issues where music crackles and becomes delayed.
Diagnosis: 1: Remove the subwoofer and place it to the side, carefully reconnect everything and power on the HomePod.
2: With the HomePod powered on, not in standby but not playing anything, and subwoofer connected, measure the DC voltage with a multimeter from the subwoofer speaker terminals. You can probe with the pads under where the subwoofer cable goes into the subwoofer, see Figure 1 below.
TIP: Polarity does not matter when measuring DC offset, you are simply looking for how far from 0mV you are. The warmer these capacitors get when they have failed, the worse they filter DC voltage, so be sure to measure for at least a few seconds and watch for any significant growth in DC offset beyond tolerance.
The amp IC's input is rated for up to +/-18mV DC, which means up to +/-200mV DC can be seen at the subwoofer. More than this is what triggers the amp to "Death Fart", can cause damage to components, and should warrant replacing the DC filters, so we recommend a more aggressive 50mV maximum tolerance seen at the subwoofer.
Repair: There are four capacitors that filter this DC in the audio signal before it's amplified and sent to the speaker. They are located on the amplifier board, between the DAC and AMP chips. If you measured a significant amount of DC, you need to replace them with new capacitors of 10uF, size 1206, X7R, 5-10%, rated for 35v or better. I have been using CL31B106KBHNNNE rated for 50v. Only use quality replacement capacitors from reputable brands / resellers. I have a repair video replacing these capacitors on YouTube.
There is a big black resistor on the amp next to the subwoofer connector you should also inspect...on occasion I have found these to be damaged when there are Death Farts. It is a 10Ohm, 1Watt, 1% Tolerance, 200V rated, 1218 size resistor, and can be replaced with part number RCL121810R0FKEK. It's resistance can be measured while still installed on the board to confirm.
You will also want to inspect your subwoofer speaker for damage to the voice coil from too much DC, see the next Common Issue below for more detail on that.
Root Cause: MLCC capacitors naturally decay over time and lose their effectiveness at filtering DC voltage, and this is exacerbated the warmer they are. High quality capacitors used properly should last many years, but eventually all will still need reconditioned or replaced again. I can only speculate the ones used in HomePods have QA issues and / or the amp doesn't have a great design to account for primary filter failure.
The amplifier inside the HomePod turns itself off after ~10 minutes of inactivity. Any activity or percieved "Hey Siri" trigger will turn the amp back on. During the change in power, there may be a popping sound. This popping sound comes from DC voltage changes being heard in the speaker. It's fine and normal for a small temporary DC spike when the amp turns on or off, resulting in a pop. It's also hard to tell the difference between that and a pop that comes from a dangerous constant DC offset that is growing over time. It's usually OK to ignore any popping issues if that's all it does. Typically HomePods will Death Fart to indicate it's enough of a problem, at which point you can and should pursue repairs.
How Did I Figure This Out? At first, it was believed that death farts were caused by a failing amplifier IC that powers the subwoofer's audio signal. It was also believed that this amp IC was propietary and irreplacable. Eventually, I found the family of ICs it was based on, along with suitable replacements and even OEM replacements. This didn't fix the issue! Researching DC Offset more, I learned that most class D audio amplifiers have DC Offset and it must be filtered somehow, usually with ceramic capacitors. The more progressed their failure, the worse they are at filtering DC Offset the hotter they are too! This was my lucky break. All I had to do was pointmy heat gun at various areas of the amp until I saw a sudden spike in my DC Offset readings, and voila, filters found! With the first-half of the battle won, the next is figuring out what to replace them with. Since these are filtering DC voltage down to less than a couple mV, it's critical to pick the right replacements and not just match the capacitance. I once again got very lucky, when researching any products that used the same family of amp IC for schematics, the manufacturer themselves have an evaluation amp board with schematics published! Boom. 10uF, rated X7R, 10% tolerance, but only 16 volts?? That seemed wrong. For the voltage, I see at least 20-22v across these caps while installed and operating on the amp, so perhaps this may be contributing to premature failure. This is why I decided to use 50v replacements.
I have a livestream of a repair where it needed all new capacitors, resistor, and subwoofer here.
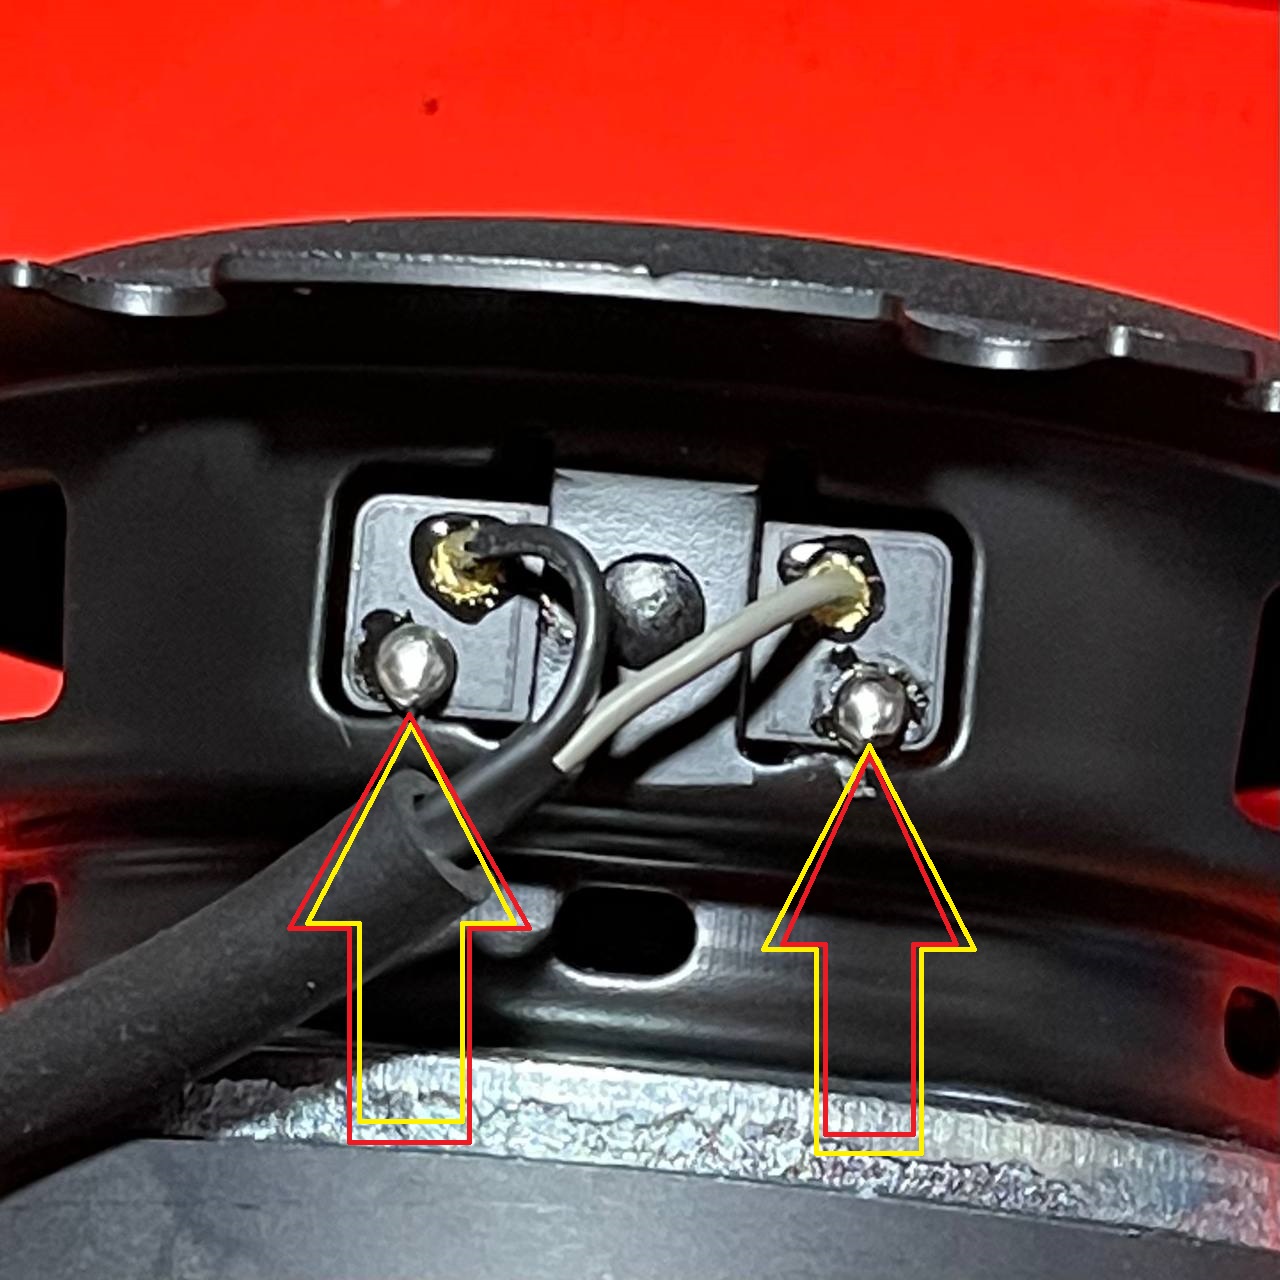
Subwoofer Probe Points
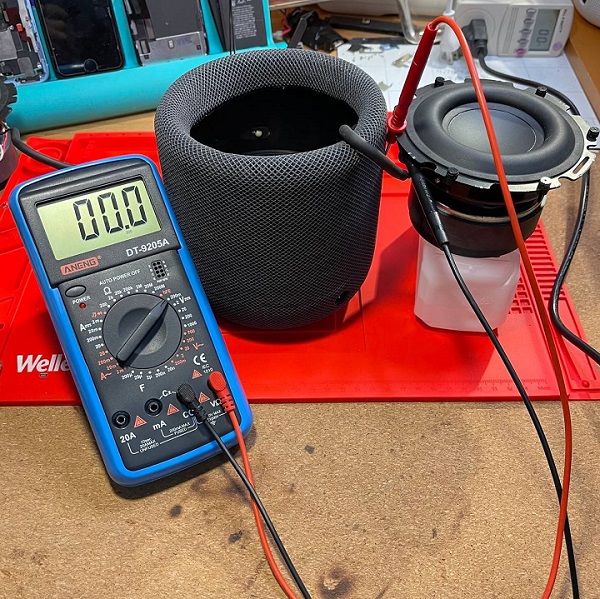
Testing for DC Offset
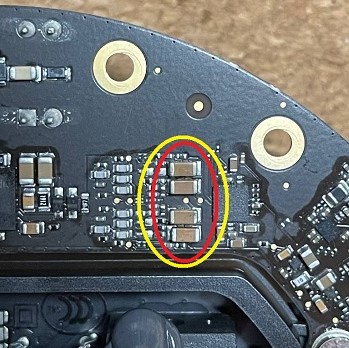
Capacitors Location On Amp Board
Capacitors (x4): 10uF, size 1206, X7R, 5-10%, rated for 35v or better
Example, Part # CL31B106KBHNNNE
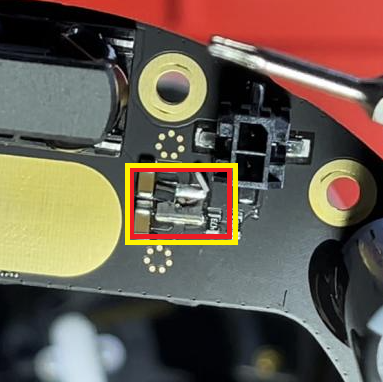
Blown Resistor on Amp Board
Resistor: 10Ohm, 1Watt, 1% Tolerance, 200V rated, size 1218
Less-Common Issues
More issues with unopened / untouched HomePods.
Symptoms: May include low, missing, or dirty sounding bass, clicking, or ticking sounds.
Diagnosis: Two easy tests to tell if your subwoofer speaker is bad;
1: Gently push the speaker straight in, not too much, and release a few times; This should feel perfectly smooth, and make no sound, otherwise your speaker is almost certainly dead.
2: Inspect the condition of the voice coil through the hole in the side of the subwoofer speaker basket; A vibrant, uniform copper color is a sign of a healthy voice coil!
If your subwoofer is damaged, it is likely from DC Offset / Death Farts, which should also be diagnosed per the Common Issue above.
Repair: I'm not aware of any off the shelf replacement speakers, you will likely need to source one from another broken homepod. Be sure you diagnose and repair any DC Offset before replacing your subwoofer.
Root Cause: Most often a result of too much DC Offset! Sometimes they can also just fail on their own eventually, but it is rare.
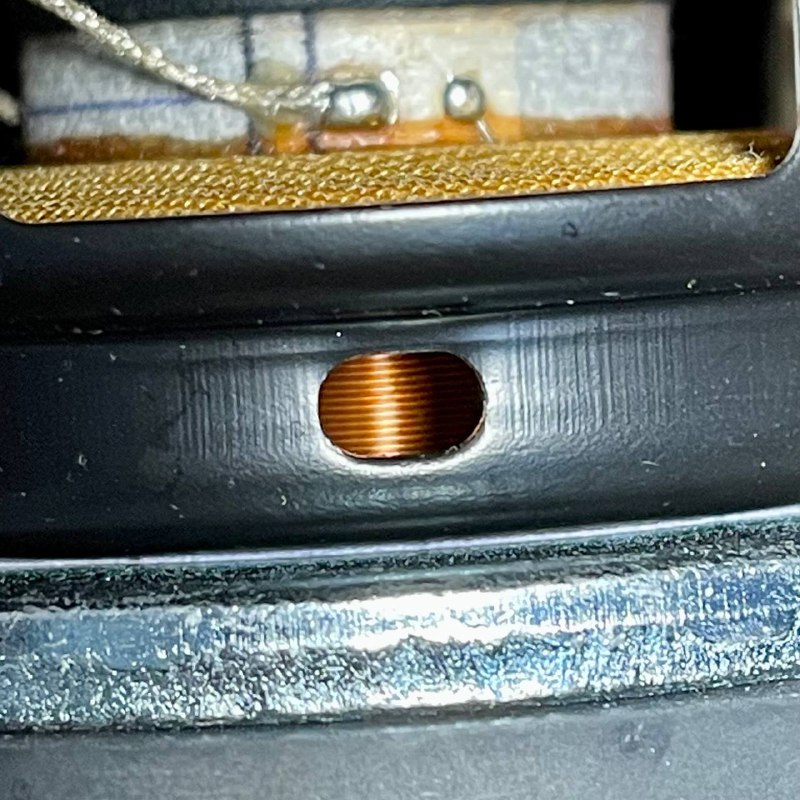
Good Voice Coil
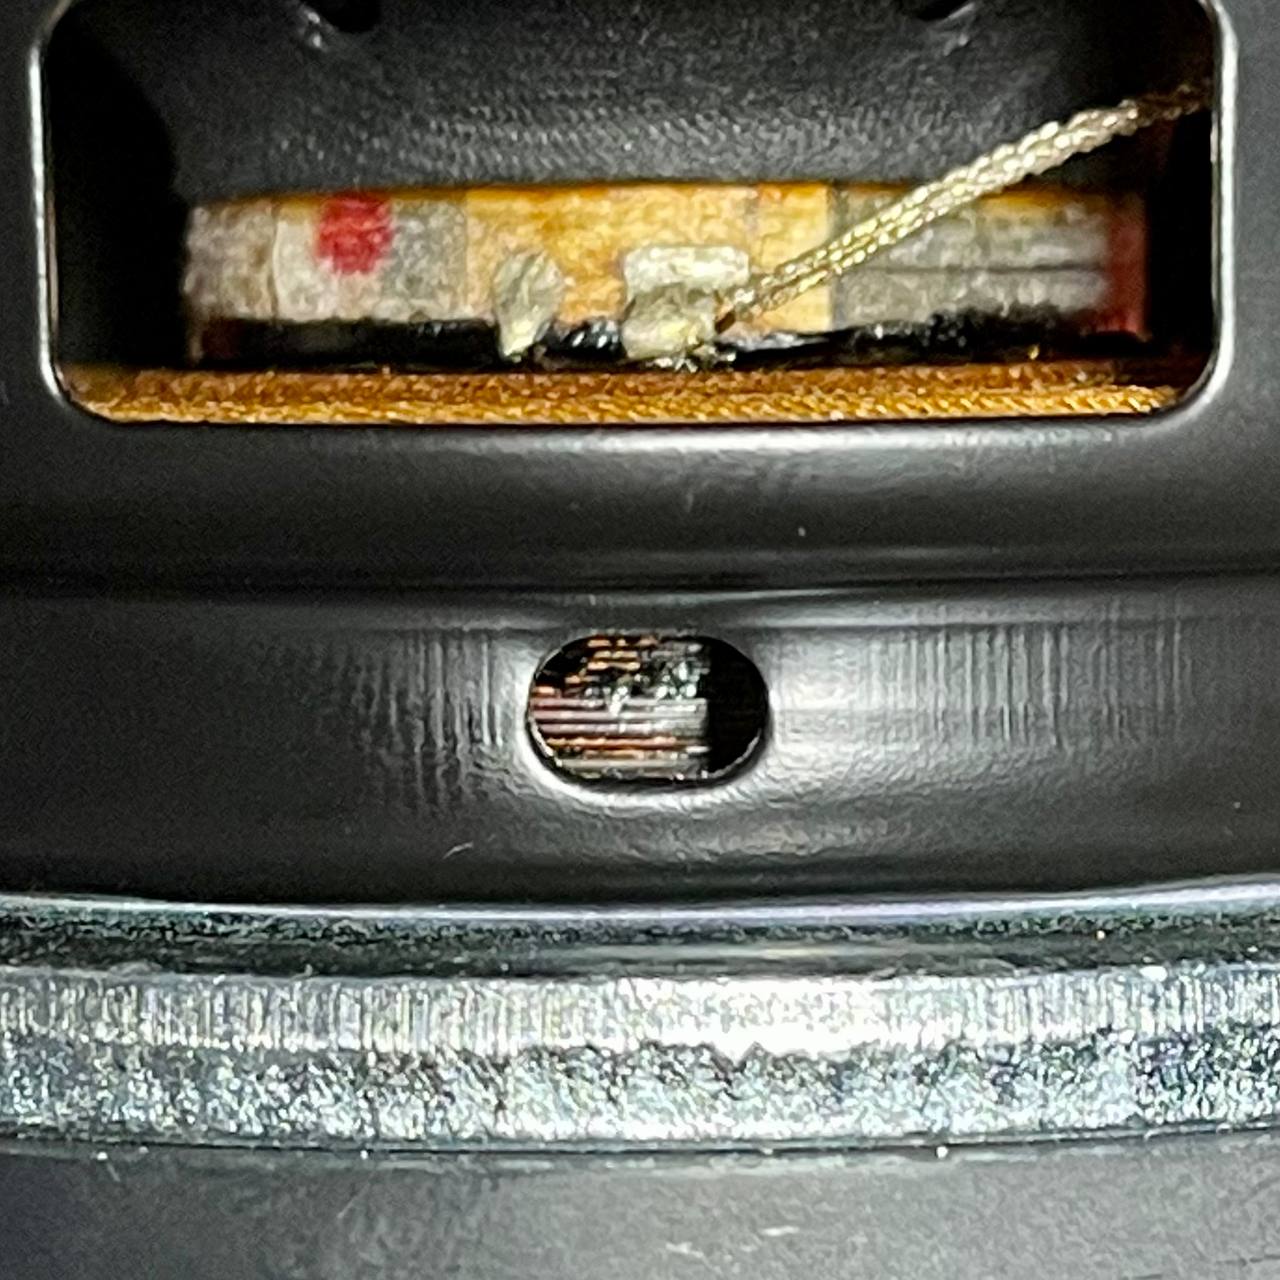
Burned Voice Coil
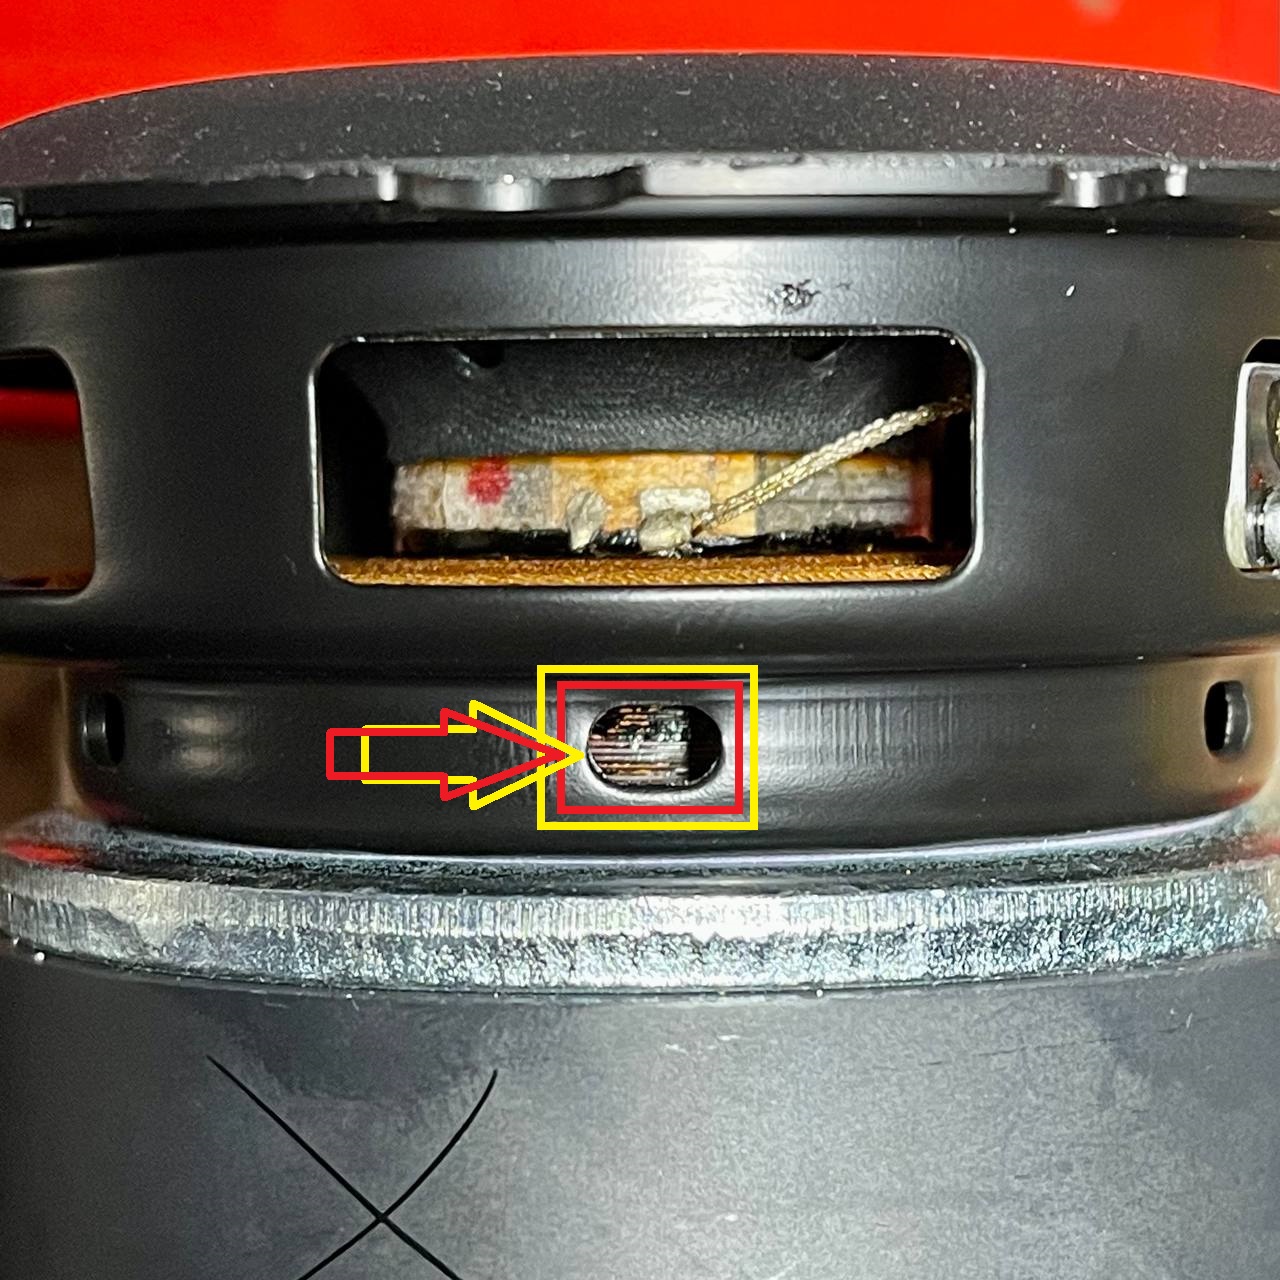
Voice Coil Inspection Port on Woofer
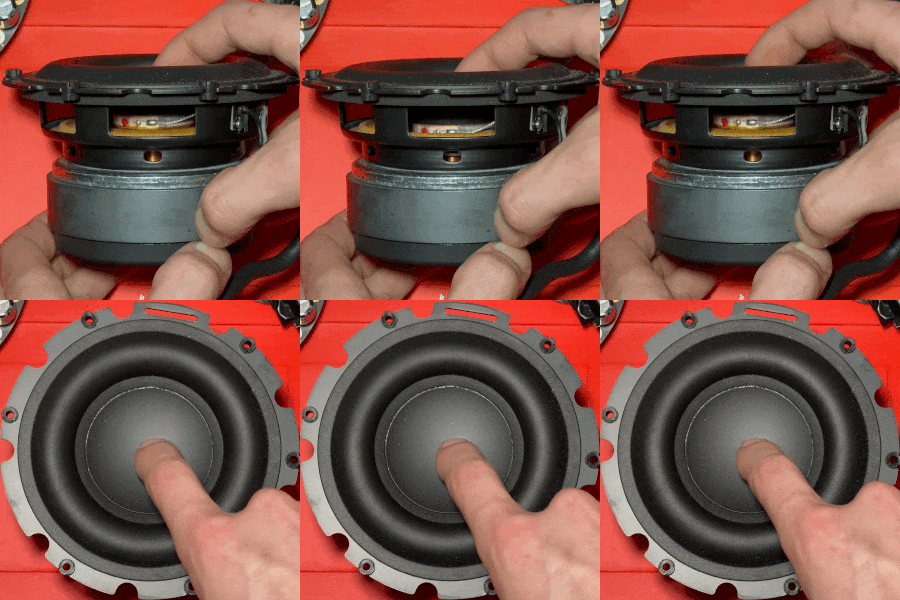
Do the Doof Test
Symptoms: No Bass whatsoever.
Diagnosis:On a few no bass amp repairs, I've found the same component shorted out, see photo below.
Repair: Check if you have the same shorted capacitor, and if so, replace it with 22uF, 0802, 25v (or greater), 10%, X5R capacitor. These are what I use.
Root Cause: Unknown.
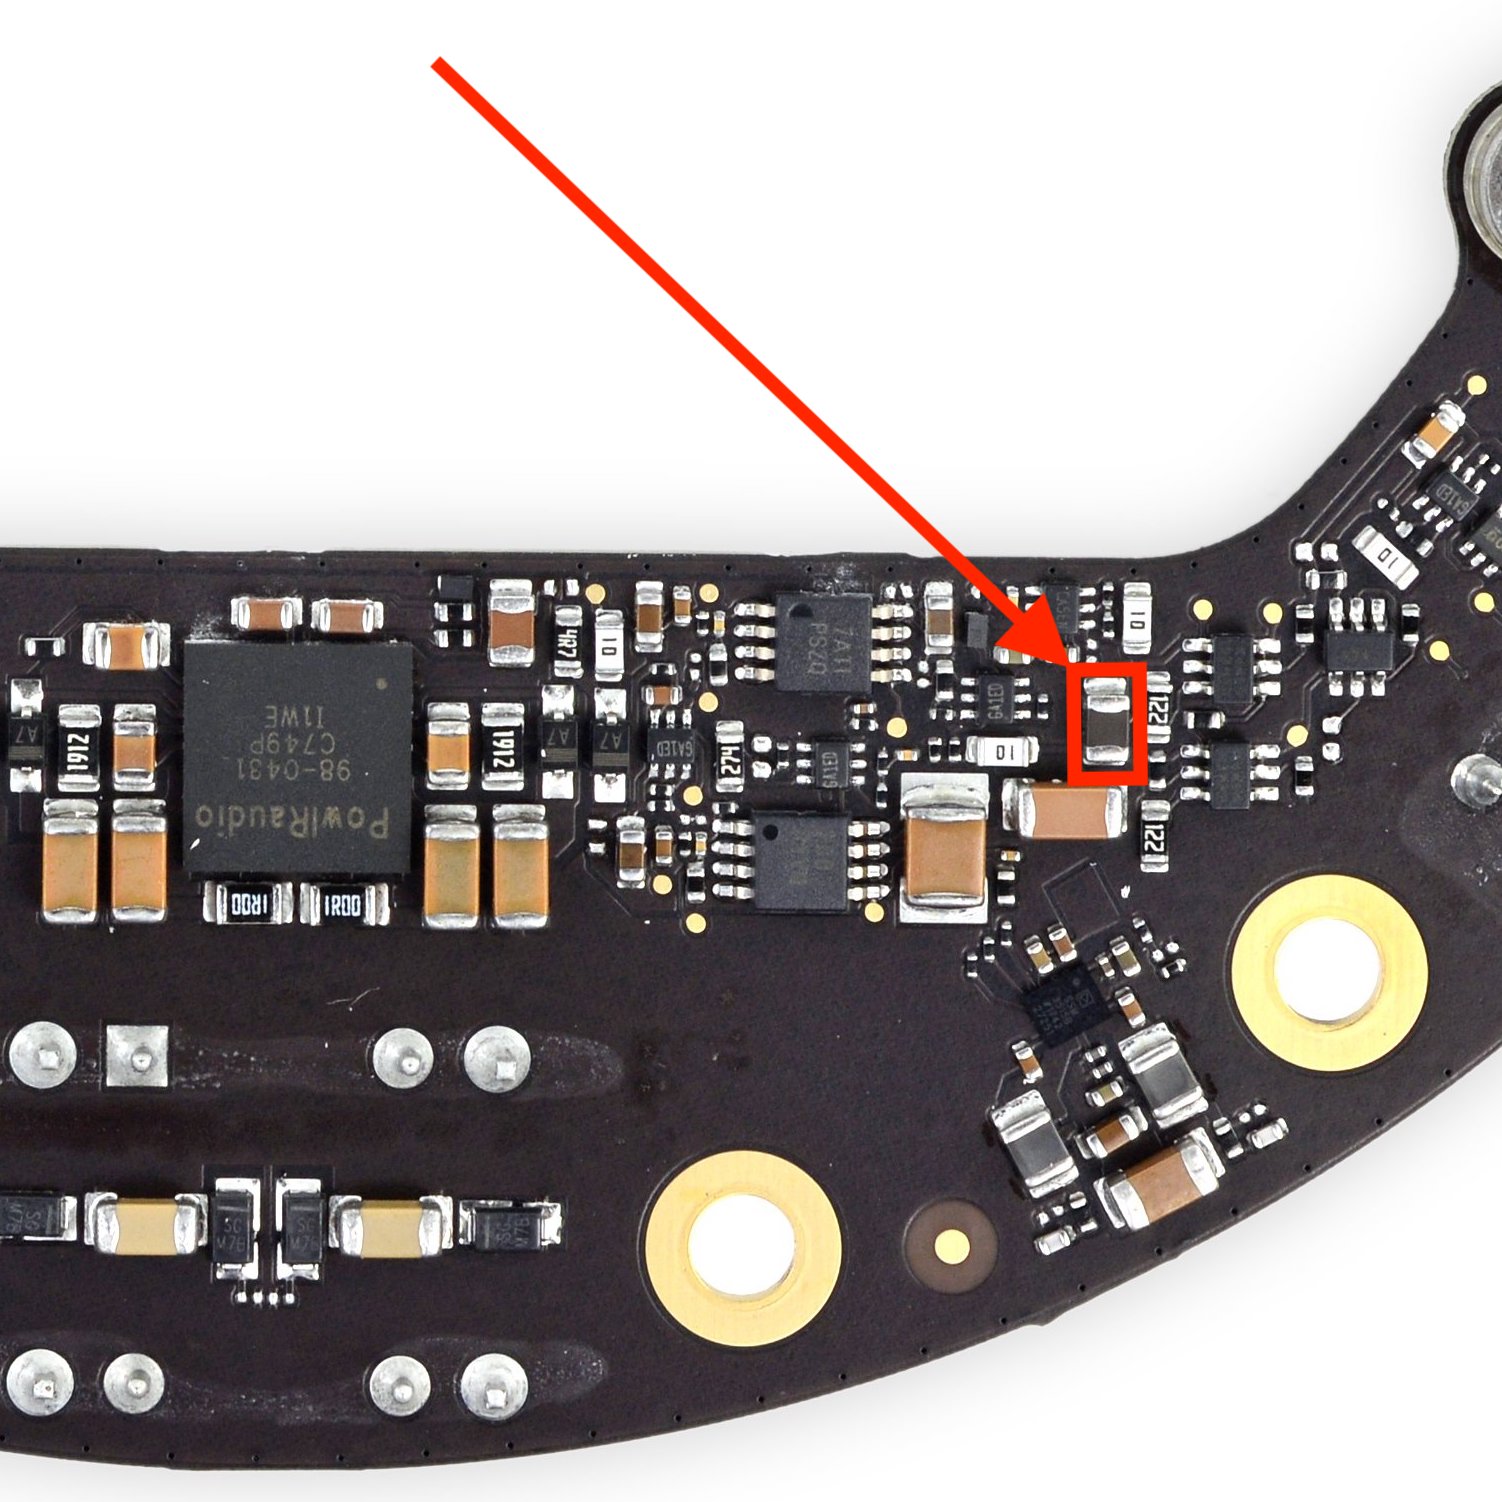
WHO WEARS SHORT SHORTS
Capacitor: 22uF, size 0802, 25v (or greater), 10%, X5R
Symptoms: No Bass whatsoever.
Diagnosis:On a few no bass amp repairs, I've found a few other components shorted out at the same time, see photo below.
Repair: Check if you have the same short, and if so, replace shorted 0.1uF size 1206 capacitor, and IC. The circled IC is a mosfet, part number
DMG1029SVQ-7. See datasheet for mosfet specs. Replacement part numbers to come soon.
Root Cause: Unknown.
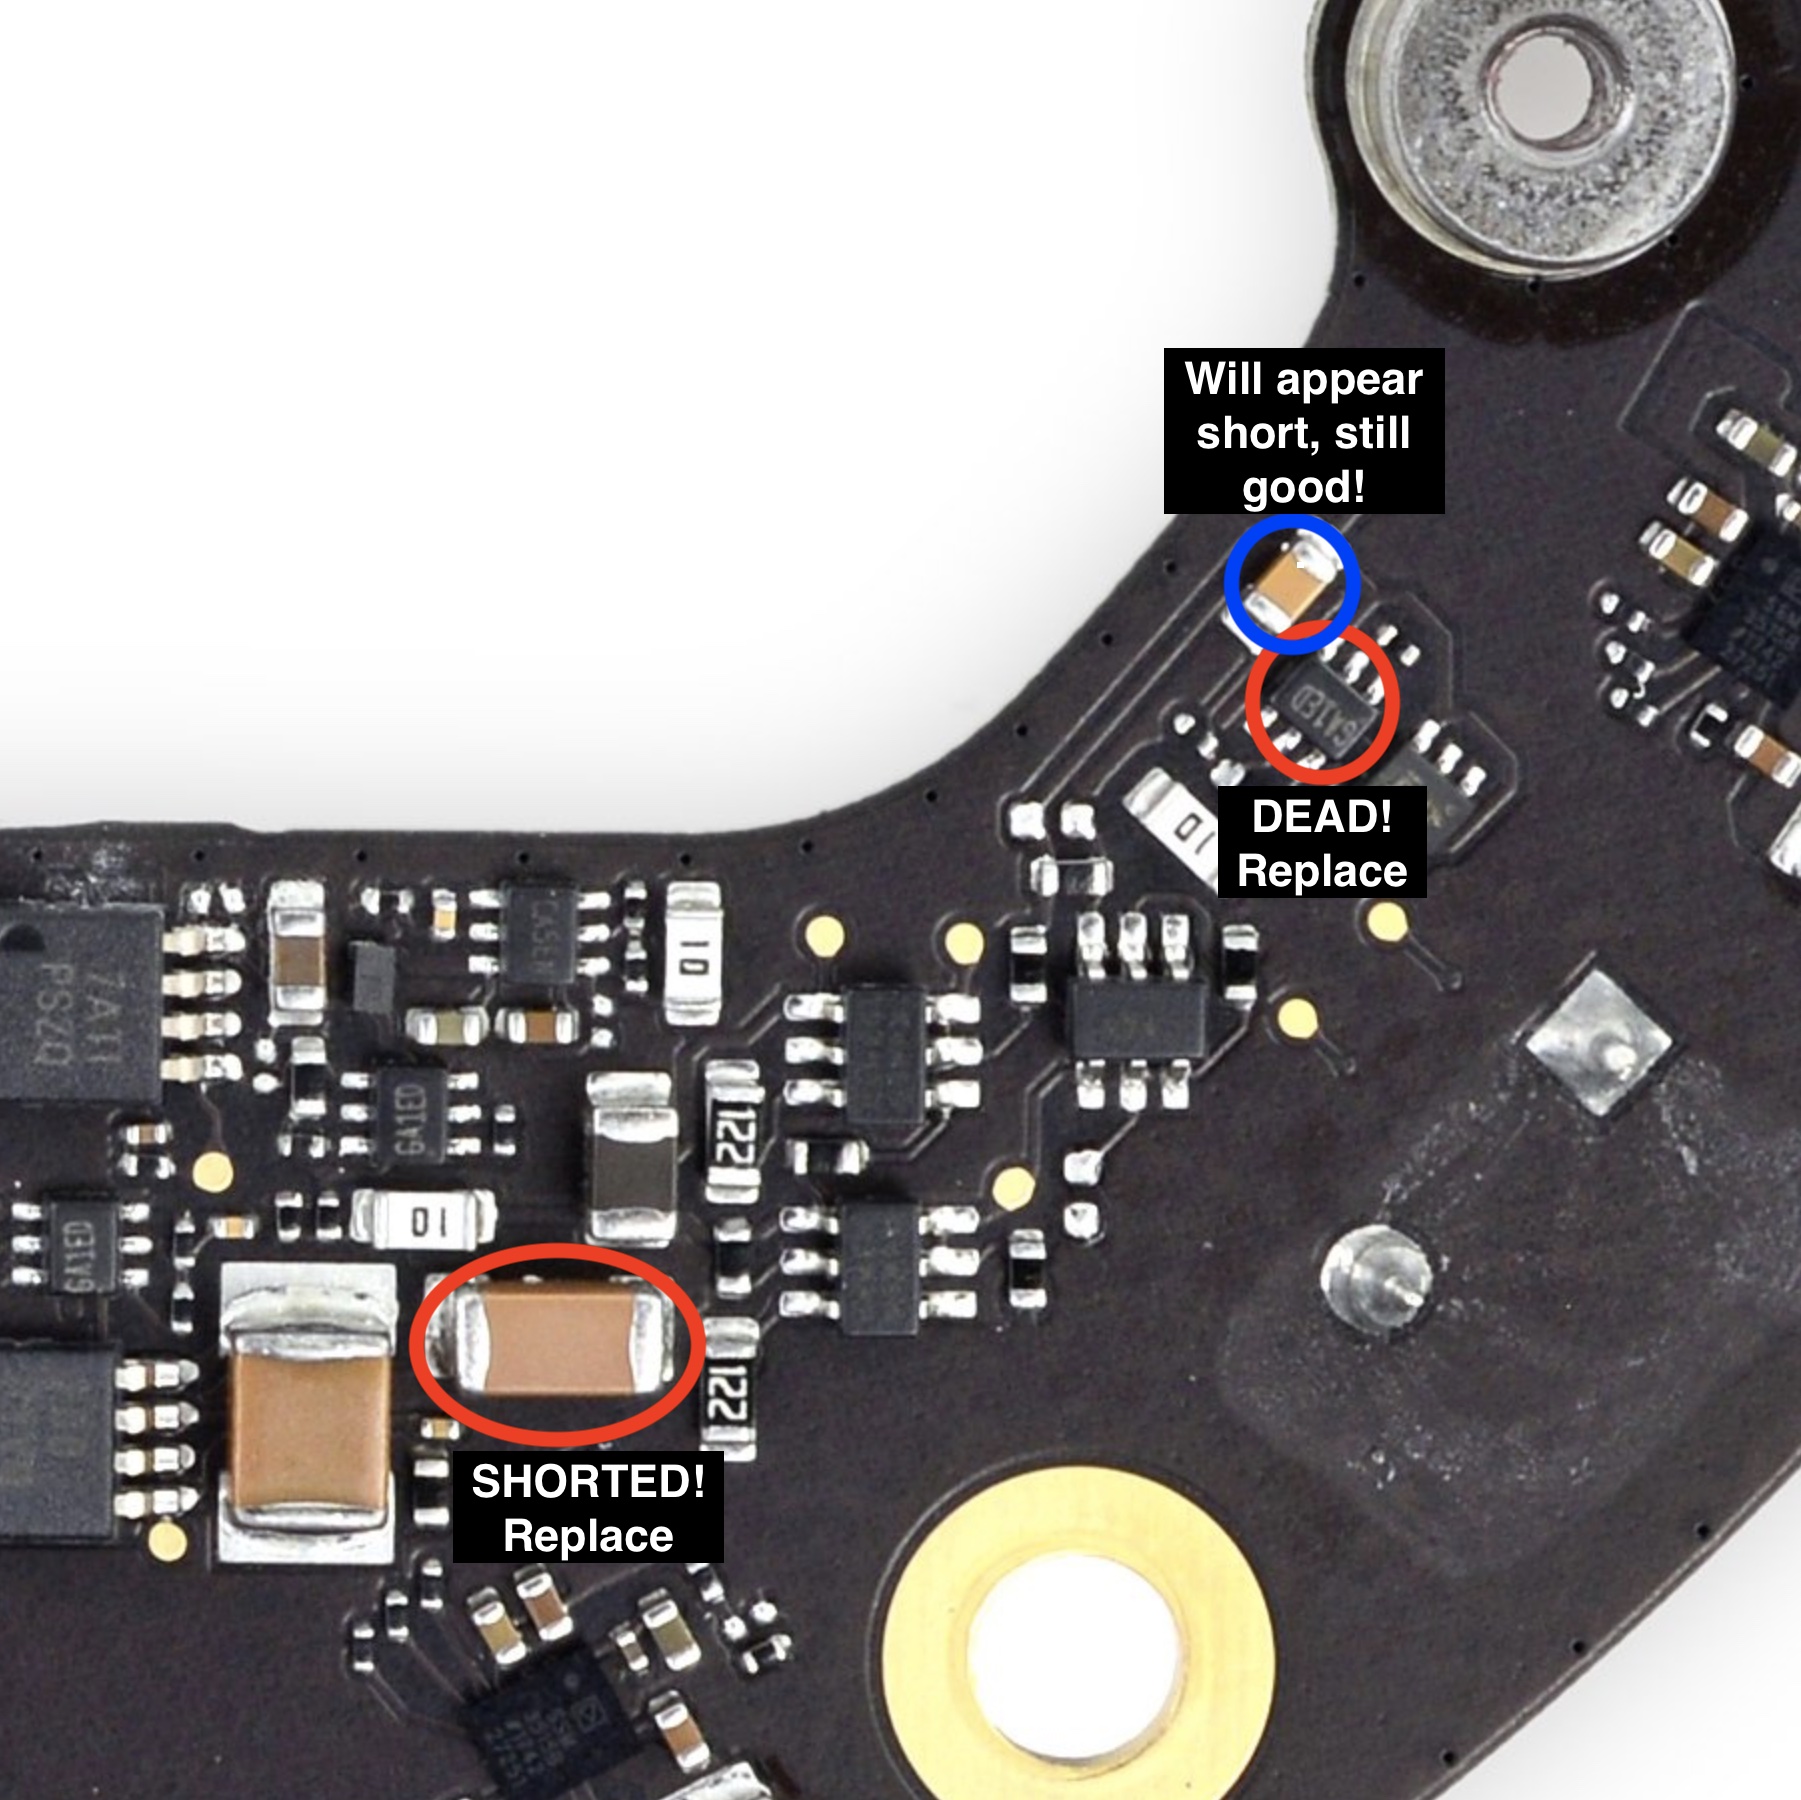
I WEAR SHORT SHORTS
Capacitor: 0.1uF, size 1206
Mosfet: DMG1029SVQ-7
Symptoms: It's rare for the amp IC to be the source of any problems, unless it is obviously damaged, you should first diagnose for other issues described above.
Diagnosis: Amp IC is located on the bottom side of the amp board. The amp IC may or may not have obvious visual damage. Image coming soon that shows which pads to check for a short to ground, indicating a dead amp chip. HomePods will power on with the amp IC removed! Do not be fooled by the PIN1 identifier mark in the bottom left corner of the chip.
Repair: The OEM amp IC (part number 98-0431) is available on Aliexpress for a limited time. Part number IR4312M is available from multiple component sellers and is also a suitable alternative, but is being discontinued.
Root Cause: The amp IC can fail on it's own, or if it's subject to too much DC voltage as a result of failing capacitors. More info on that in the DC Offset Common Issue above!
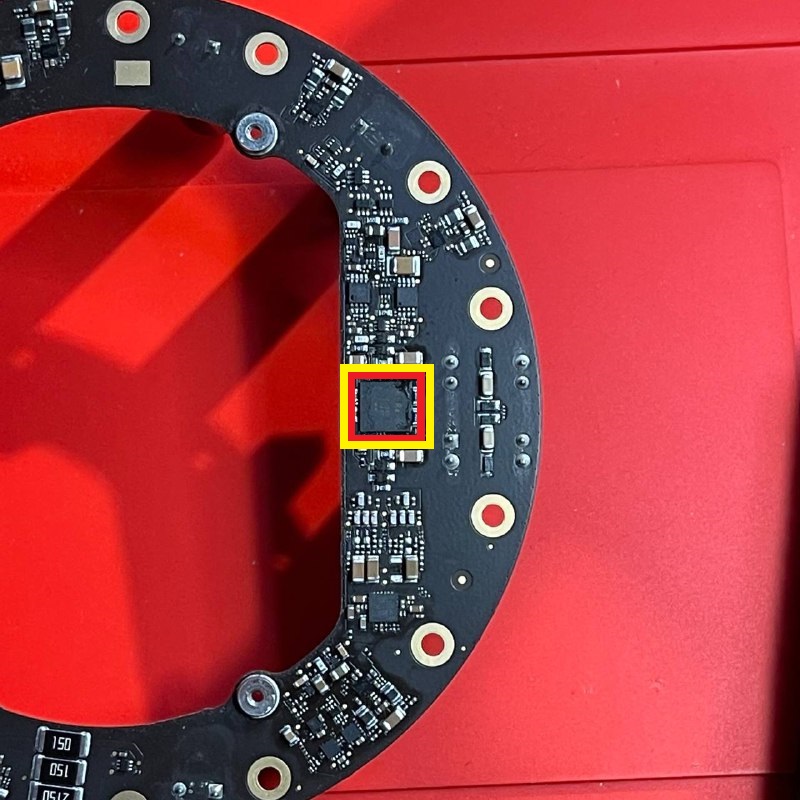
Amp IC Location on Amp Board
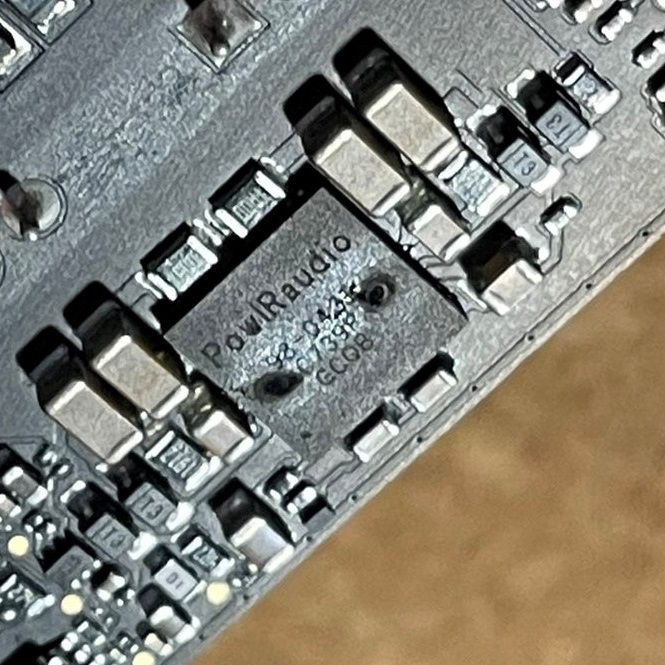
A Clearly Dead Amp IC
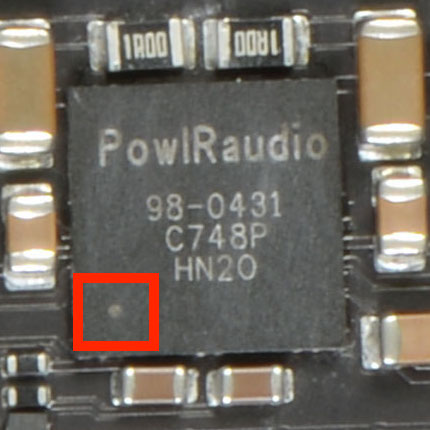
Amp IC Pin 1 Identifier
OEM Part: 98-0431 (can also replace with IR4312M)
Symptoms: HomePod may or may not be working fine. You may hear rattling when you shake it, or have touch / display issues, even making it appear that the HomePod isn't powering on or only briefly powers on and bootloops.
Diagnosis: For rattling / dirty sounding bass, check that your subwoofer is not bent and properly sealed. Pull your logic board out and check for broken loose plastic. You can try to glue or plastic weld the broken parts back together, or replace the top basket entirely. Thoroughly inspect logic cable, display cable, and connectors for any damage.
Repair: Not recommended to ignore this otherwise the logic board can shift enough to push the display cable into the frame and cut into it, causing weird power / display / touch issues.
Root Cause: Usually this is from some of the frame holding the logic board breaking off as a result of drop damage. Ensure you pack your Pod properly whenever shipping it!
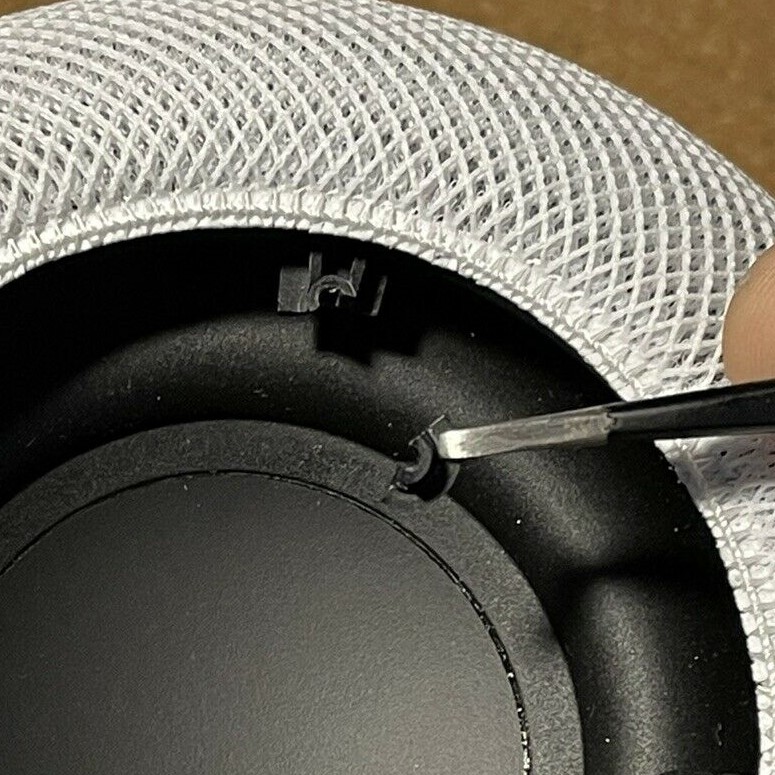
Broken Plastic From logic Board Frame
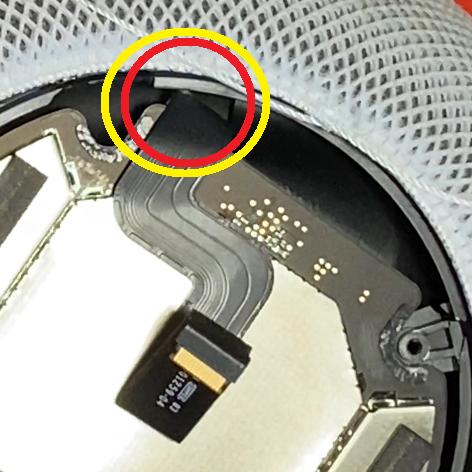
Display Cable Cut From Board Shift
Symptoms: No power, no lights, and no response. Power draw at the outlet will be 0 Watts.
Diagnosis: Fuse is located on the underside of the power supply board. EU/UK power plugs also have a fuse in the power cable. Use multimeter in continuity mode to test if fuse was blown open.
Repair: If fuse is blown you should replace it with another "T3.15AH250V" fuse.
Root Cause: The fuse will blow as a result of a surge from the AC power source. A quality surge protector should help prevent this. Power strips alone provide no protection.
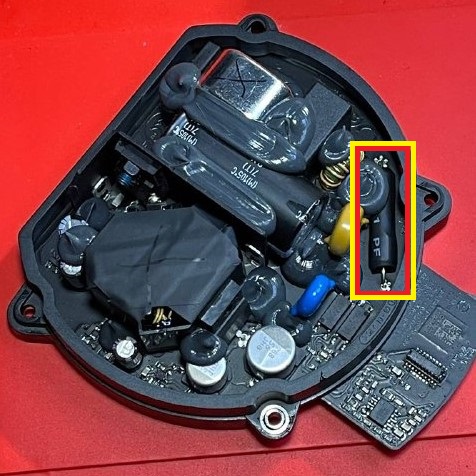
Fuse Location On Power Supply
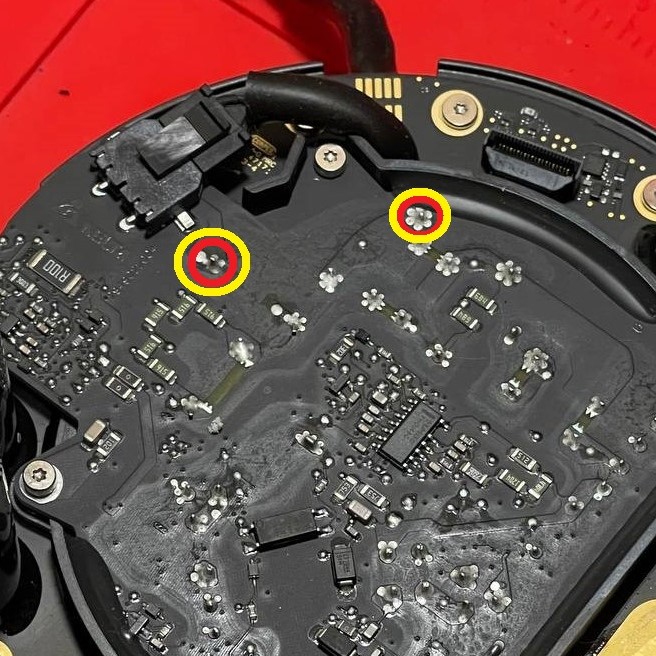
Probe Points While Installed
Symptoms: No power, no lights, and no response. Power draw at the outlet may be a few Watts. You may hear a quiet ticking / squealing sound from the logic board. Logic board may start to warm up.
Diagnosis: I have only seen two HomePods with No Power caused by this...in both cases, there was a shorted capacitor on the logic board. Both logic boards shorts were in different locations. You should be able to locate them with traditional short-finding methods like a thermal camera or applying flux or alcohol to the board and looking for smoke or bubbles.
Repair: Replace any shorted components! Since there are no schematics, the exact replacement components are unknown. You can harvest them from a bricked logic board, or ask me to check with a parts board! I have a brief repair video showing diagnosis and repair for one on YouTube.
Root Cause: Given that I've only seen this issue twice, both times from different shorts on the logic board, I'm guessing this is simply a case of capacitors just going bad. It happens.
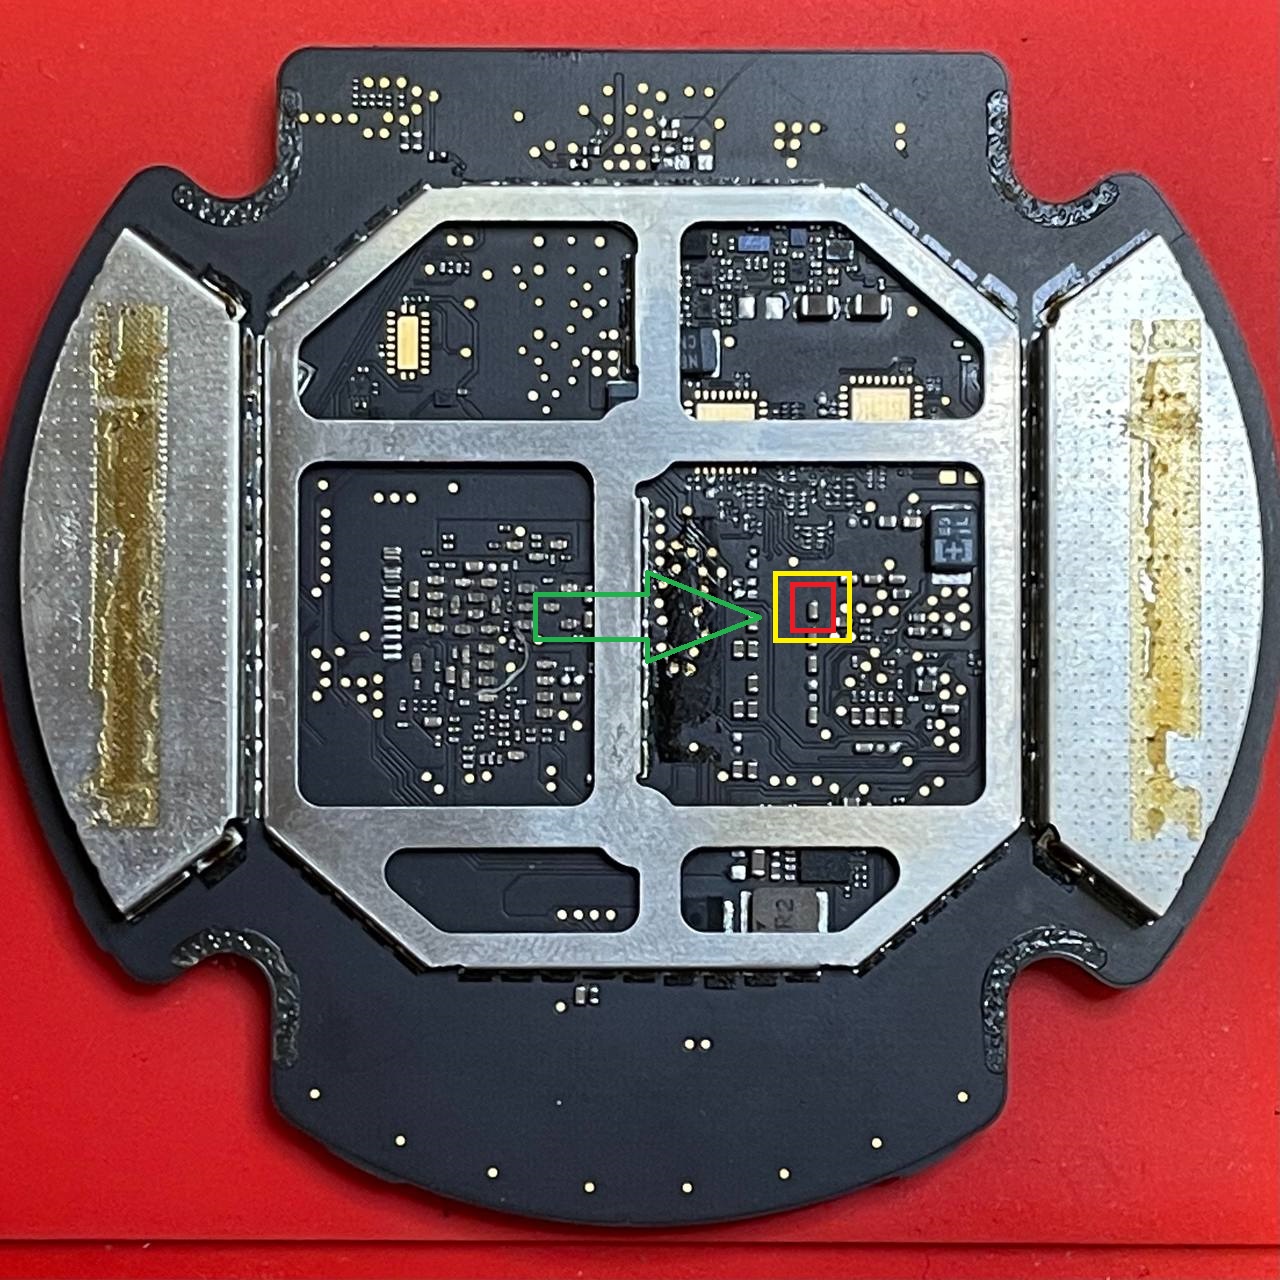
Bad Cap Location on One Logic Board
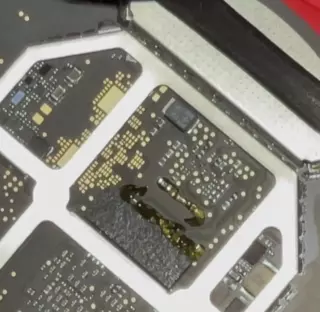
Flux Smokes When Applied to Shorted Cap
Symptoms: No power, no lights, and no response. Power draw at the outlet may be a few Watts.
Diagnosis: Check for short to ground on the pin pictured below in red, on the TPS. Confirm short on TPS is gone with component in purple removed.
Repair: Replace shorted mosfet with "DMN2300UFB4-7B".
Avneesh is credited with helping me find the cause of this one during a Youtube Livestream,. and "nighthawk_94191" for finding the part number.
Root Cause: Unknown.
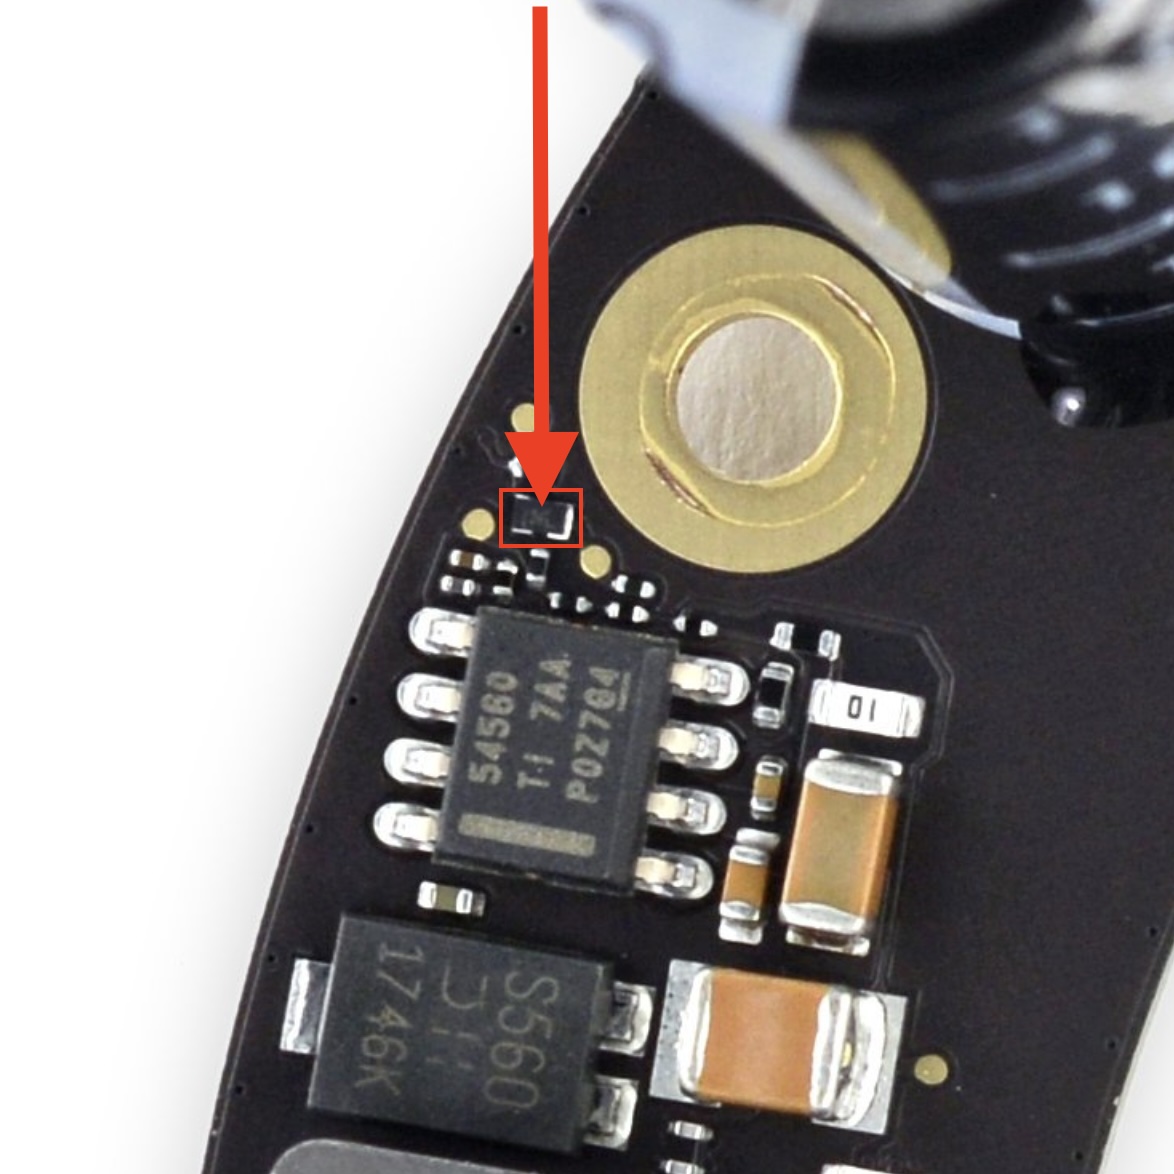
Shorted!
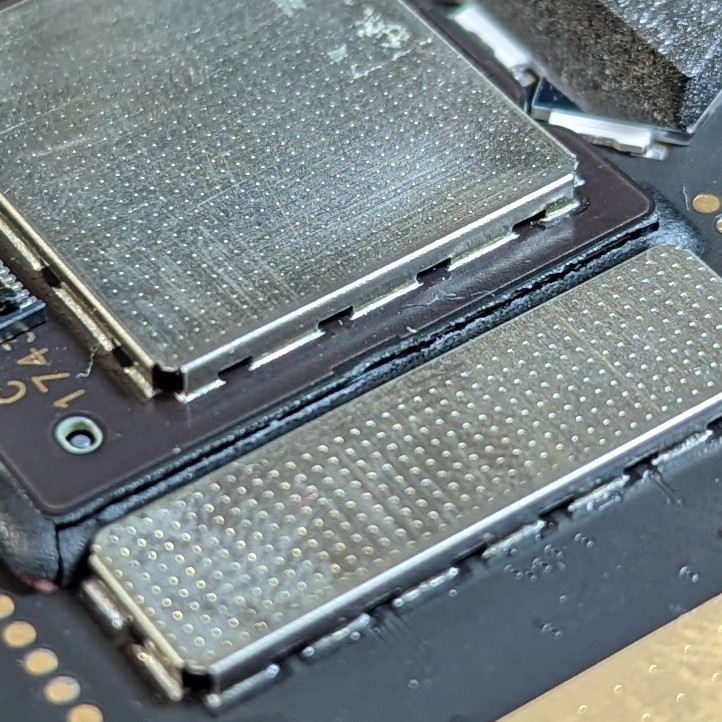
Symptoms: I've seen damaged displays cause differing symptoms ranging from no power at all, to flickering or boot loops, to flickering volume buttons.
Diagnosis: Thoroughly inspect the display for any damage, especially around the LED PCB on the backside. It's common when a HomePod is dropped for the display to get smashed in and start separating as pictured below. Sometimes damage is visually undetectable and you will need to sanity check with known good parts.
Repair: Damage like this usually warrants replacing the whole display.
Root Cause: Usually from being dropped. They don't just break like this by themselves
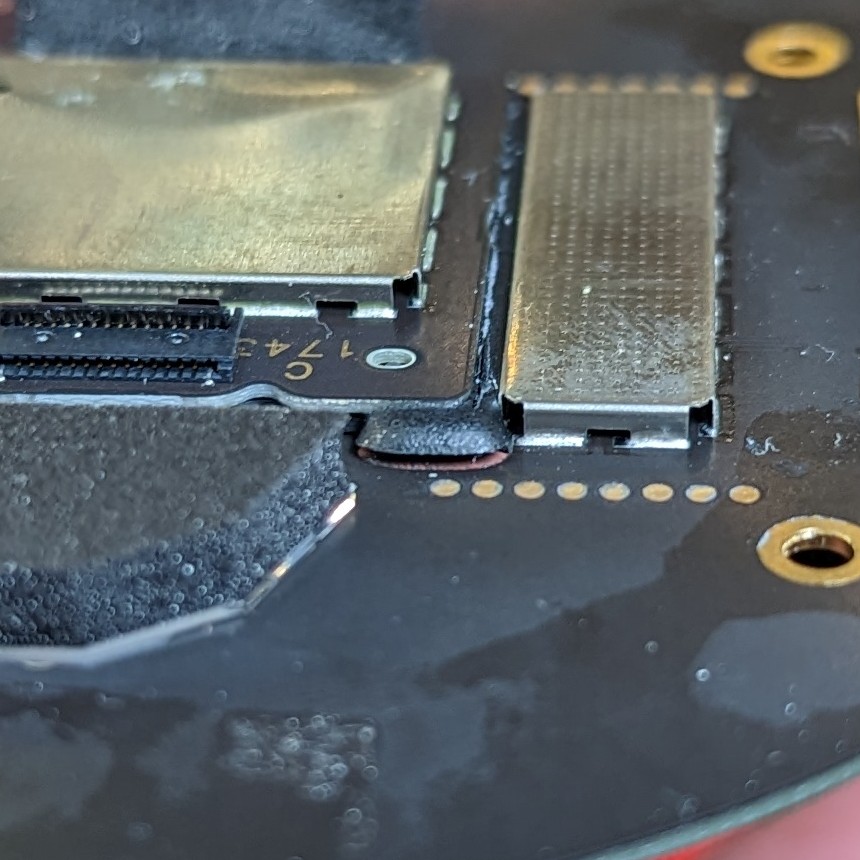
PCB for LEDs coming off
...
Symptoms: Powers on, but there's no sound from any of the speakers.
Diagnosis: If you did your own repairs and suddenly no longer have sound, suspect improper ribbon cable installation, accidental damage, or a short / debris on the amp. On rare occasions, I found the main amp controller had failed. The letters on the "STM32L051C8T7" chip were unevenly worn, note however this isn't always a reliable way to judge condition. I'll add a better way to diagnose this soon.
Repair: "STM32L051C8T7" is available from AliExpress, but we're currently unsure if it needs to be reprogrammed! It's available here. Currently on backorder from mouser and digikey.
Root Cause: Unknown. Pretty rare for the controller to die anyways.
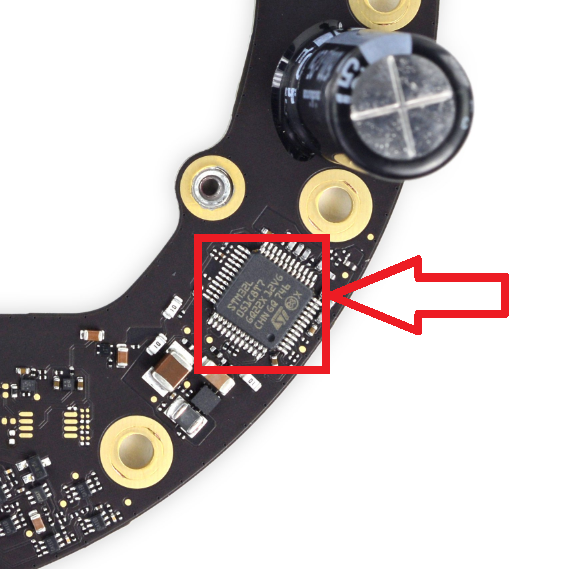
Controller Location on Amp Board
Symptoms: Powers up and briefly stays on fine, but then makes a loud POP and restarts. Not the same as death farts...
Diagnosis: Inspect amp near cooling pad for damaged / missing resistor
Repair: Either resistor can be replaced with a 10k Ohm resistor (thank you Omanyd#1538) size SMD 0201 (thank you myxomatosis
#1766).
Root Cause: Seems like another QA issue?
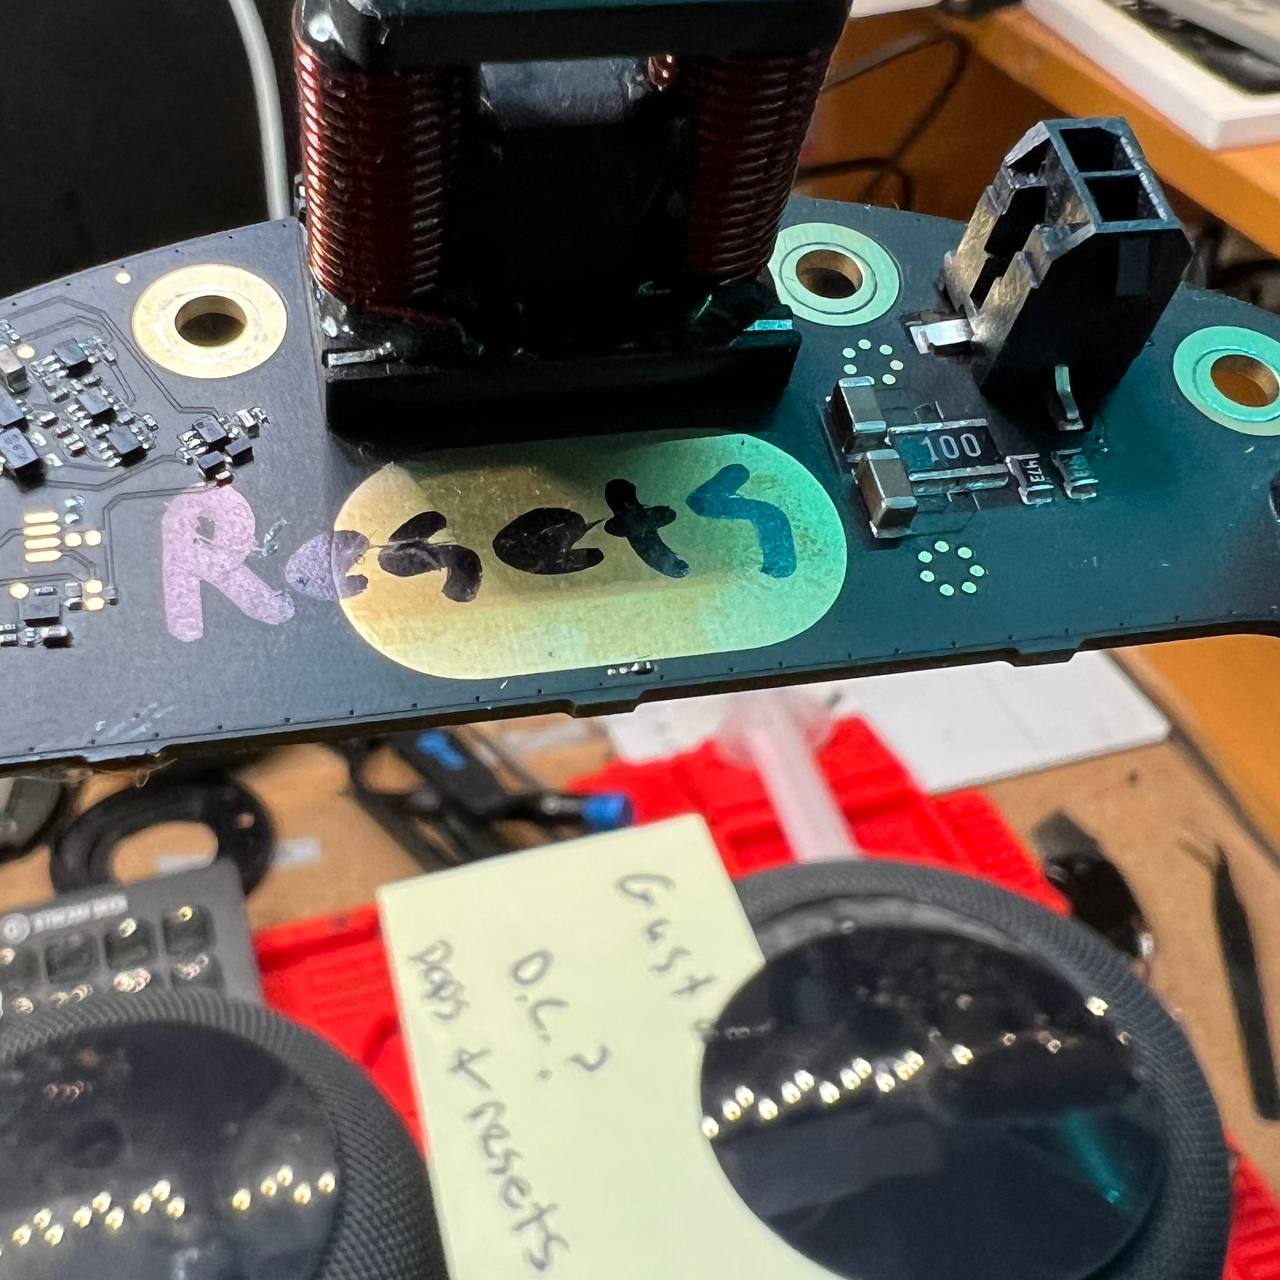
Where they at
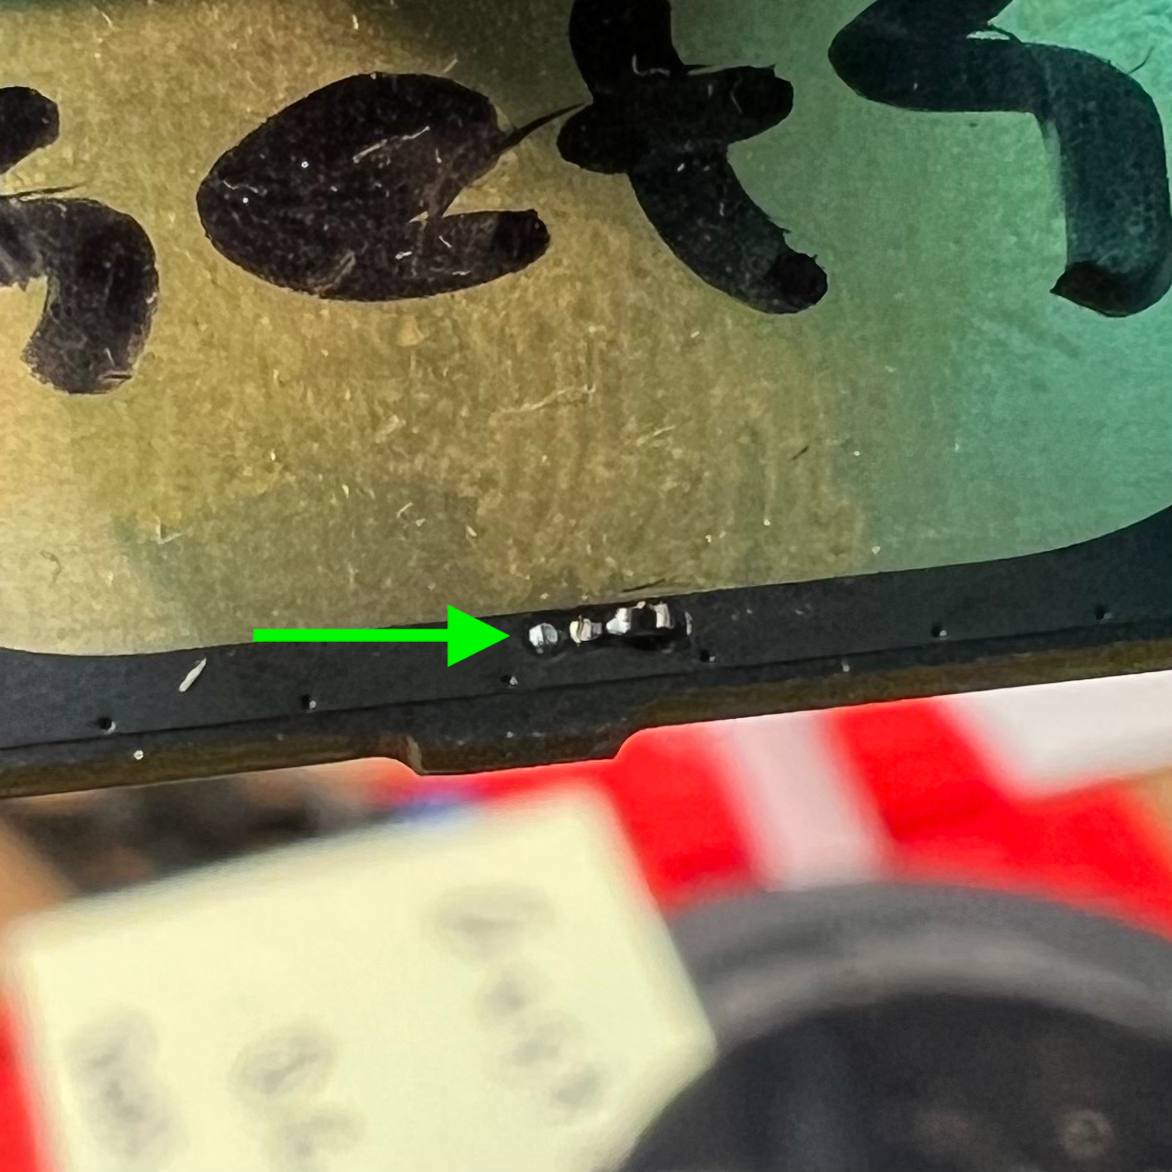
MISSING
Common Mistakes
Stuff to look for if you are having issues after attempting your own repairs.
Damaged or improperly reinstalled ribbon cables can cause no sound, no power, boot loops, and more.
Damage: Thoroughly inspect the entire ribbon cable for any tears, cracks, or other damage. This cable is commonly damaged from rough handling when disconnecting the logic board, where the end of the cable connecting to the logic board will crack / tear. Another common mistake is accidentally damaging the ribbon cable while trying to pry the top basket off.
Improper Installation: The most common mistake made when reassembling your HomePod is an incorrect installation of the main ribbon cable. On the amplifier board connector, the locked position will actually look open, and unlocked actually looks closed! Verify you have properly locked the cable in by pressing the locking clip down, and that the white line on the cable is level with the top of the connector! Improper installation may lead to permanent damage resulting in no sound or power. I've even done this once myself and lost both the amp and logic board's sound, and have yet to figure out how to repair it.
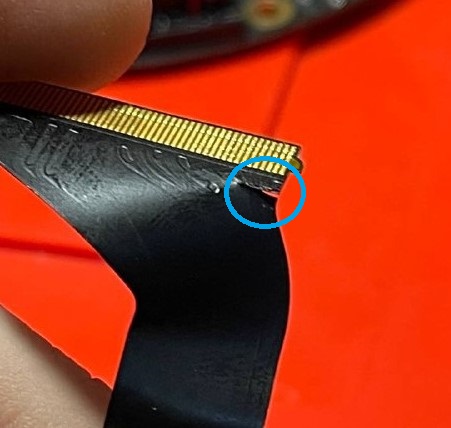
Torn Cable From Pulling on Logic Board
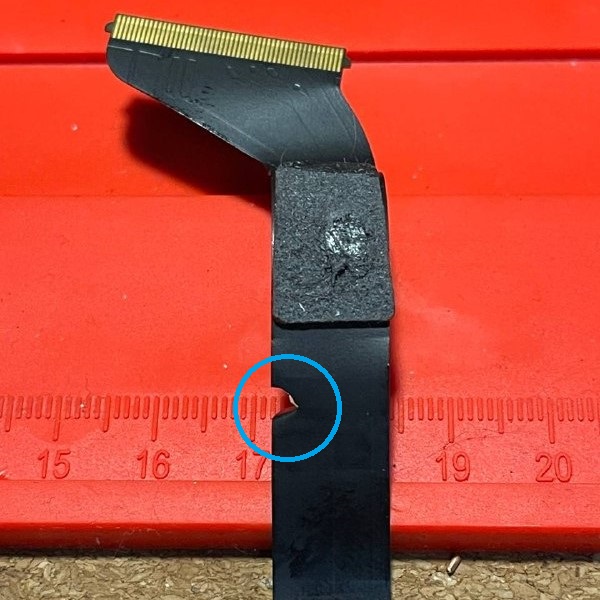
Damaged Cable from Prying Top Basket
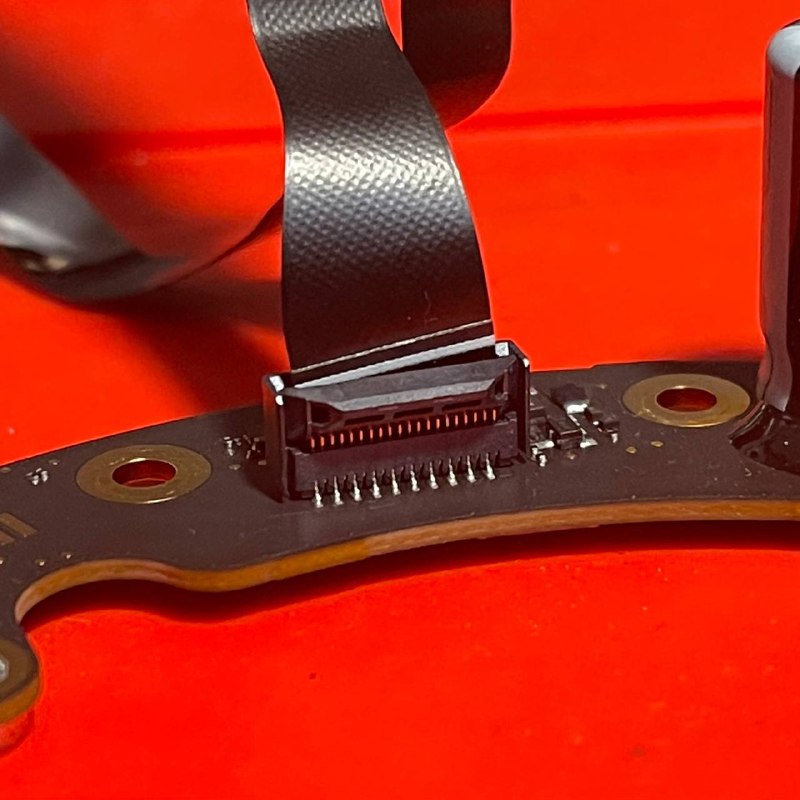
Unlocked, Crooked Cable
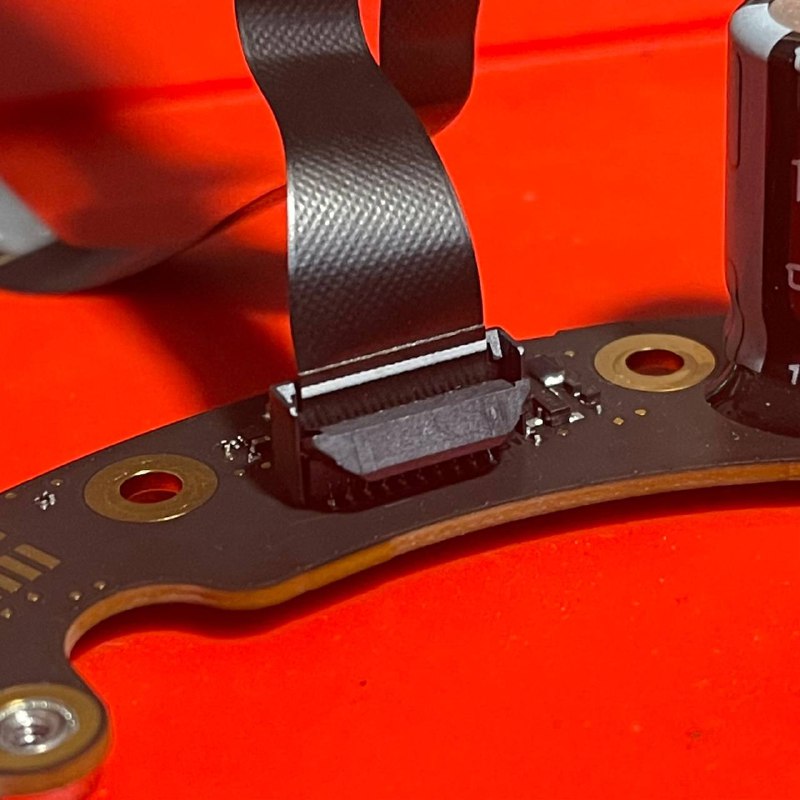
Locked, Level Cable
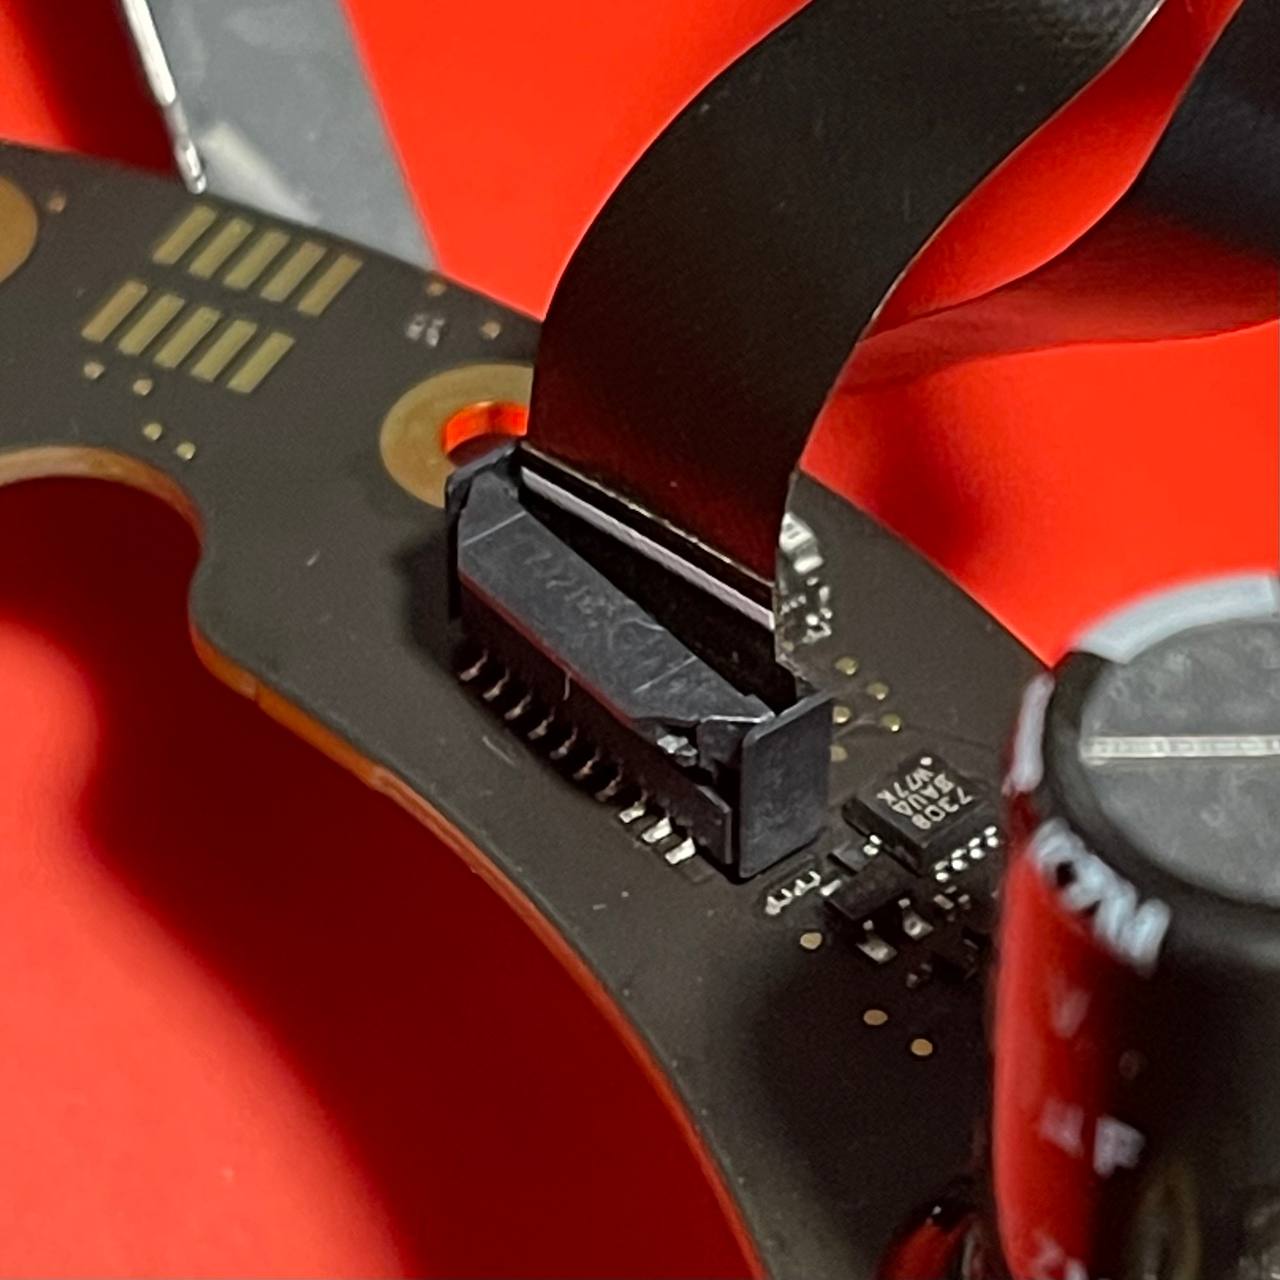
Don't Do This!
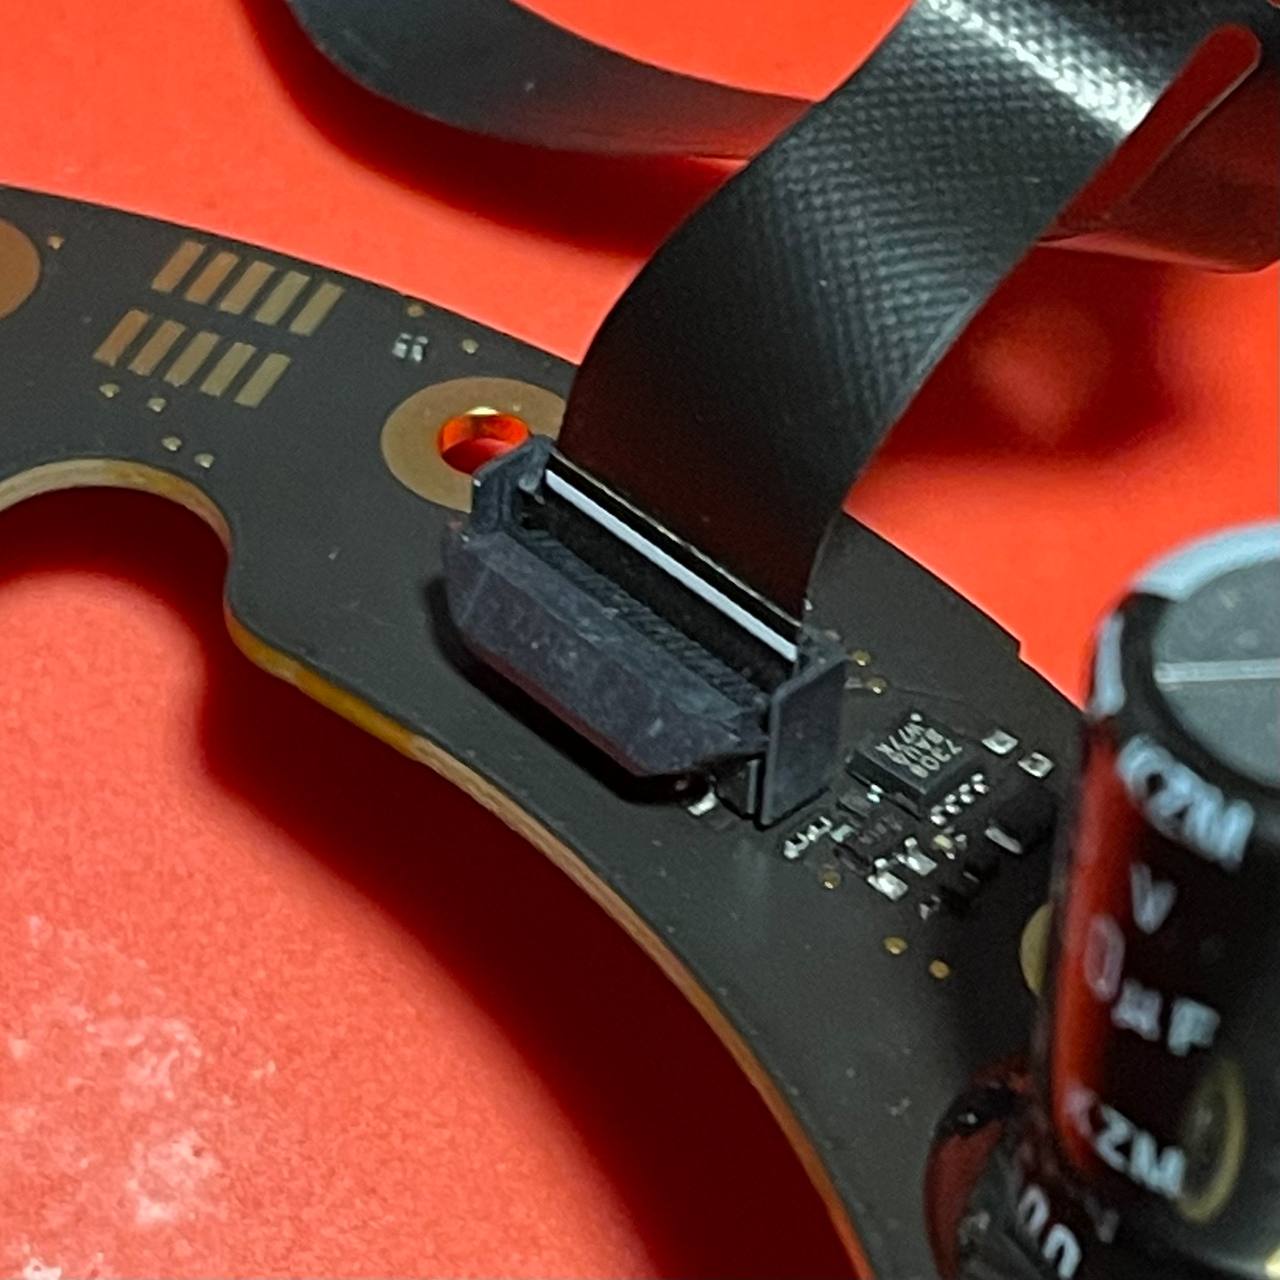
Do This!
Symptoms: Various symptoms like flickering volume buttons, power cycling, not turning on etc...
Diagnosis: Thoroughly inspect the mic board for any damage, especially around the chip pictured below.
Repair: Replace mic board. Unsure what part # the chip pictured below is...
Root Cause: Discord user "nighthawk_94191" has identified the likely cause of this coming from people over-tightening / rotating the black plastic ring (that sits just above the mic board) too far.
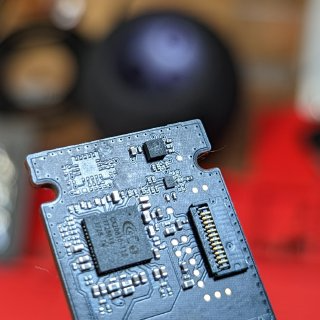
What the mic board should look like
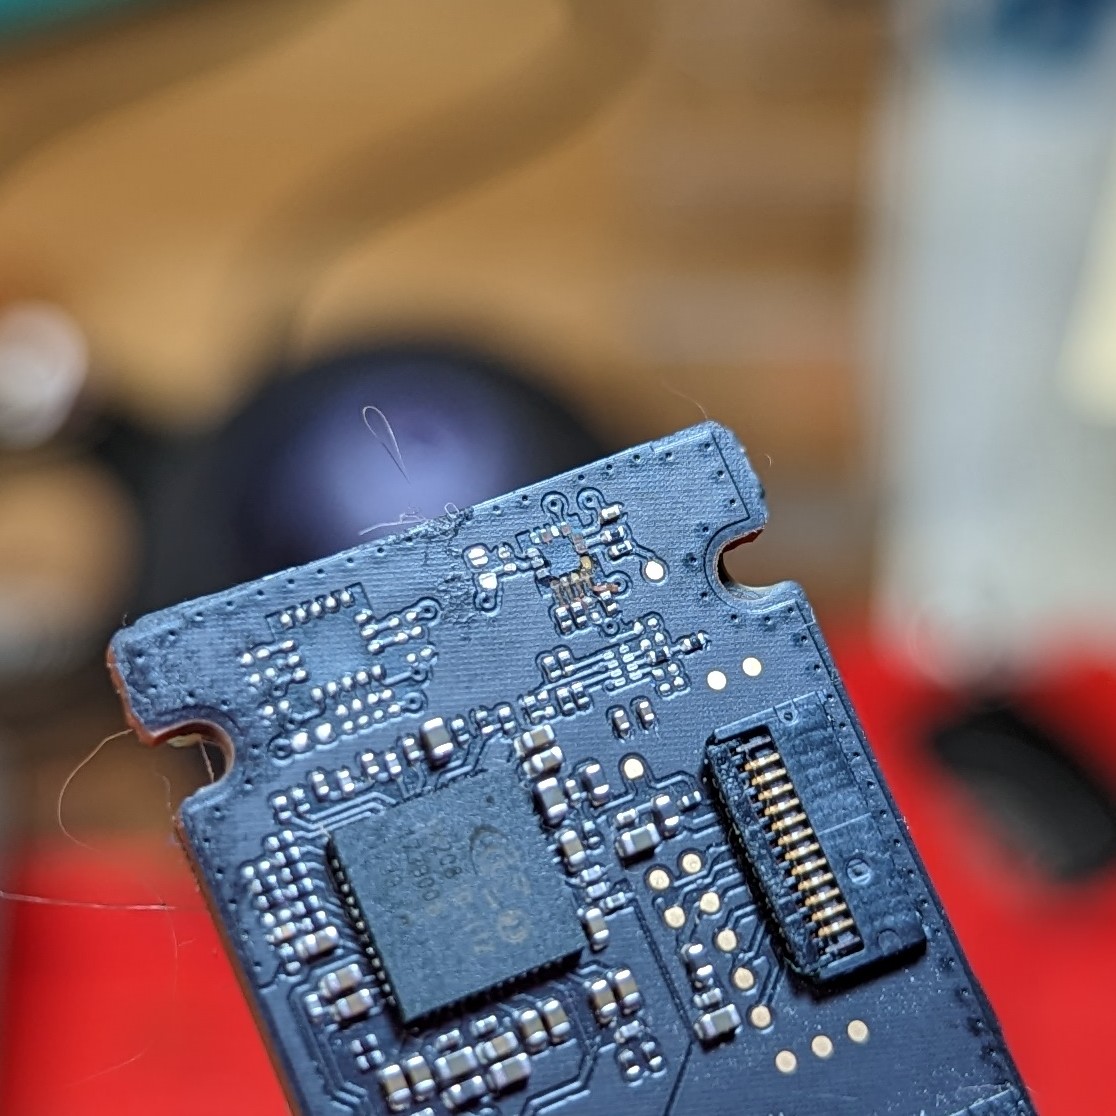
That one .gif of michael scott yelling "NO"
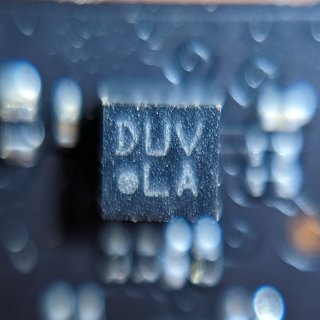
Unidentified Chip
If you are attempting your own repairs and need help identifying a particular part that is damaged / lost, feel free to ask!
The most commonly lost part is pictured below. If you are having issues replacing it, you can try the pictured workaround with trace wires and a physically larger capacitor. You NEED it for the HomePod to power on! It is a 0.1uF Size 0402 Capacitor. Anything rated 10v or better will work..
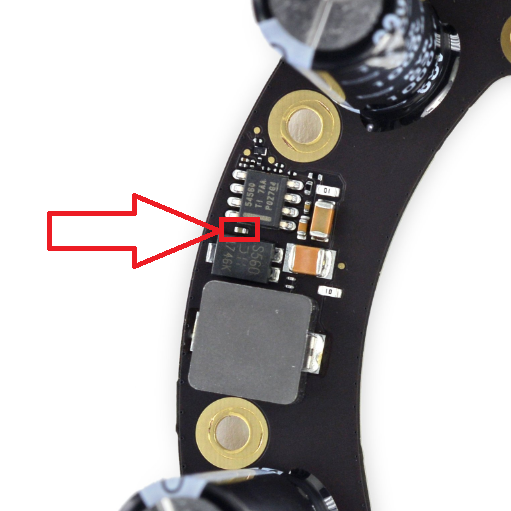
0.1uF Size 0402 Capacitor
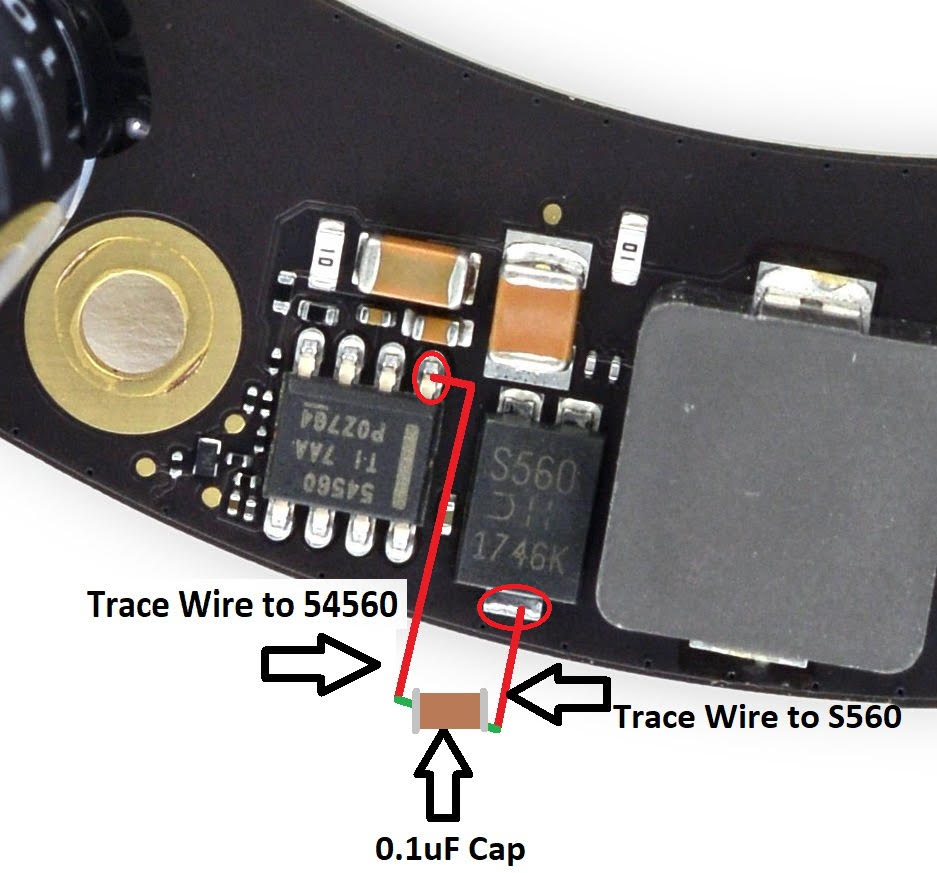
Goofy Ahh Workaround
What's That Sound?
Below are some examples of different issues / sounds HomePods make. Play them ON the HomePod to accurately compare!
Death Farts (BAD)
Dirty Bass (BAD)
Severe Popping
Acceptable Popping (Turn Volume Up)
Clean, Replace, or Customize Mesh
Want to replace your mesh? Perhaps give it a little color! If you want me to do it for you, see estimates for cost.
How to Clean Mesh: A white towel or cloth, or cotton swabs, and alcohol are great at cleaning most stains. Do not scrub with too much force or you will separate the mesh layers. For more intense cleaning, remove the mesh and wash with OxyClean (tip from myxomatosis#1766)
How to Replace Mesh: I have a video guide on removing and reinstalling the mesh here!
Customization: Rit's DyeMore for Synthetics gives great results with deep, rich colors on the white mesh, top plastic cover, and power cable. The rubber base does not take color well. The All-Purpose Dye also does not work well and results in a muted, washed-out look!
1: Remove your top cover, mesh, and power cable from the homepod.
2: Find something to slip the mesh on, ideally another empty homepod shell. Put weights in it to keep it from floating in the dye bath. Find something to sit it on in a pot so it's not directly in contact with the pot, but still able to fully submerge.
3: Bring pot of water to ~200f, mix in dye, then put mesh into dye bath. Stir for 15-30 minutes depending on desired shade / depth, then pull out mesh, rinse, and allow to dry before reinstallation.
4: For the top cover, wash it with clean water and soap, then dry, then put some tape on the adhesive side to dunk it into your dye bath a few times. Rinse off with water and repeat until desired shade is achieved.
5: For the power cable, you can dunk the length of the cable into the dye bath excluding the plugs on each end. Rinse and repeat until desired shade is achieved. Allow a few days to dry before use!
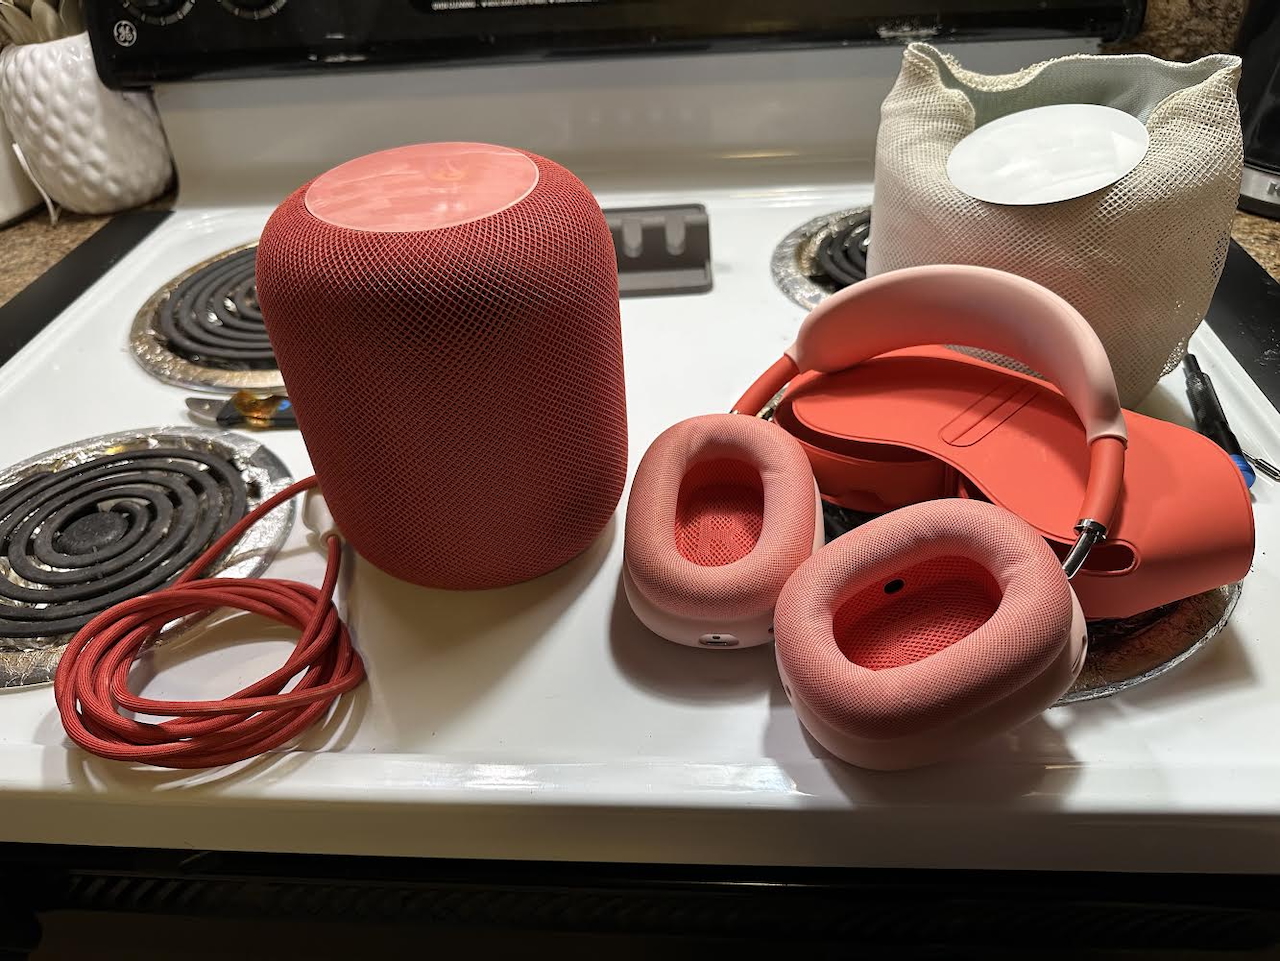
What If Product Red Pod?
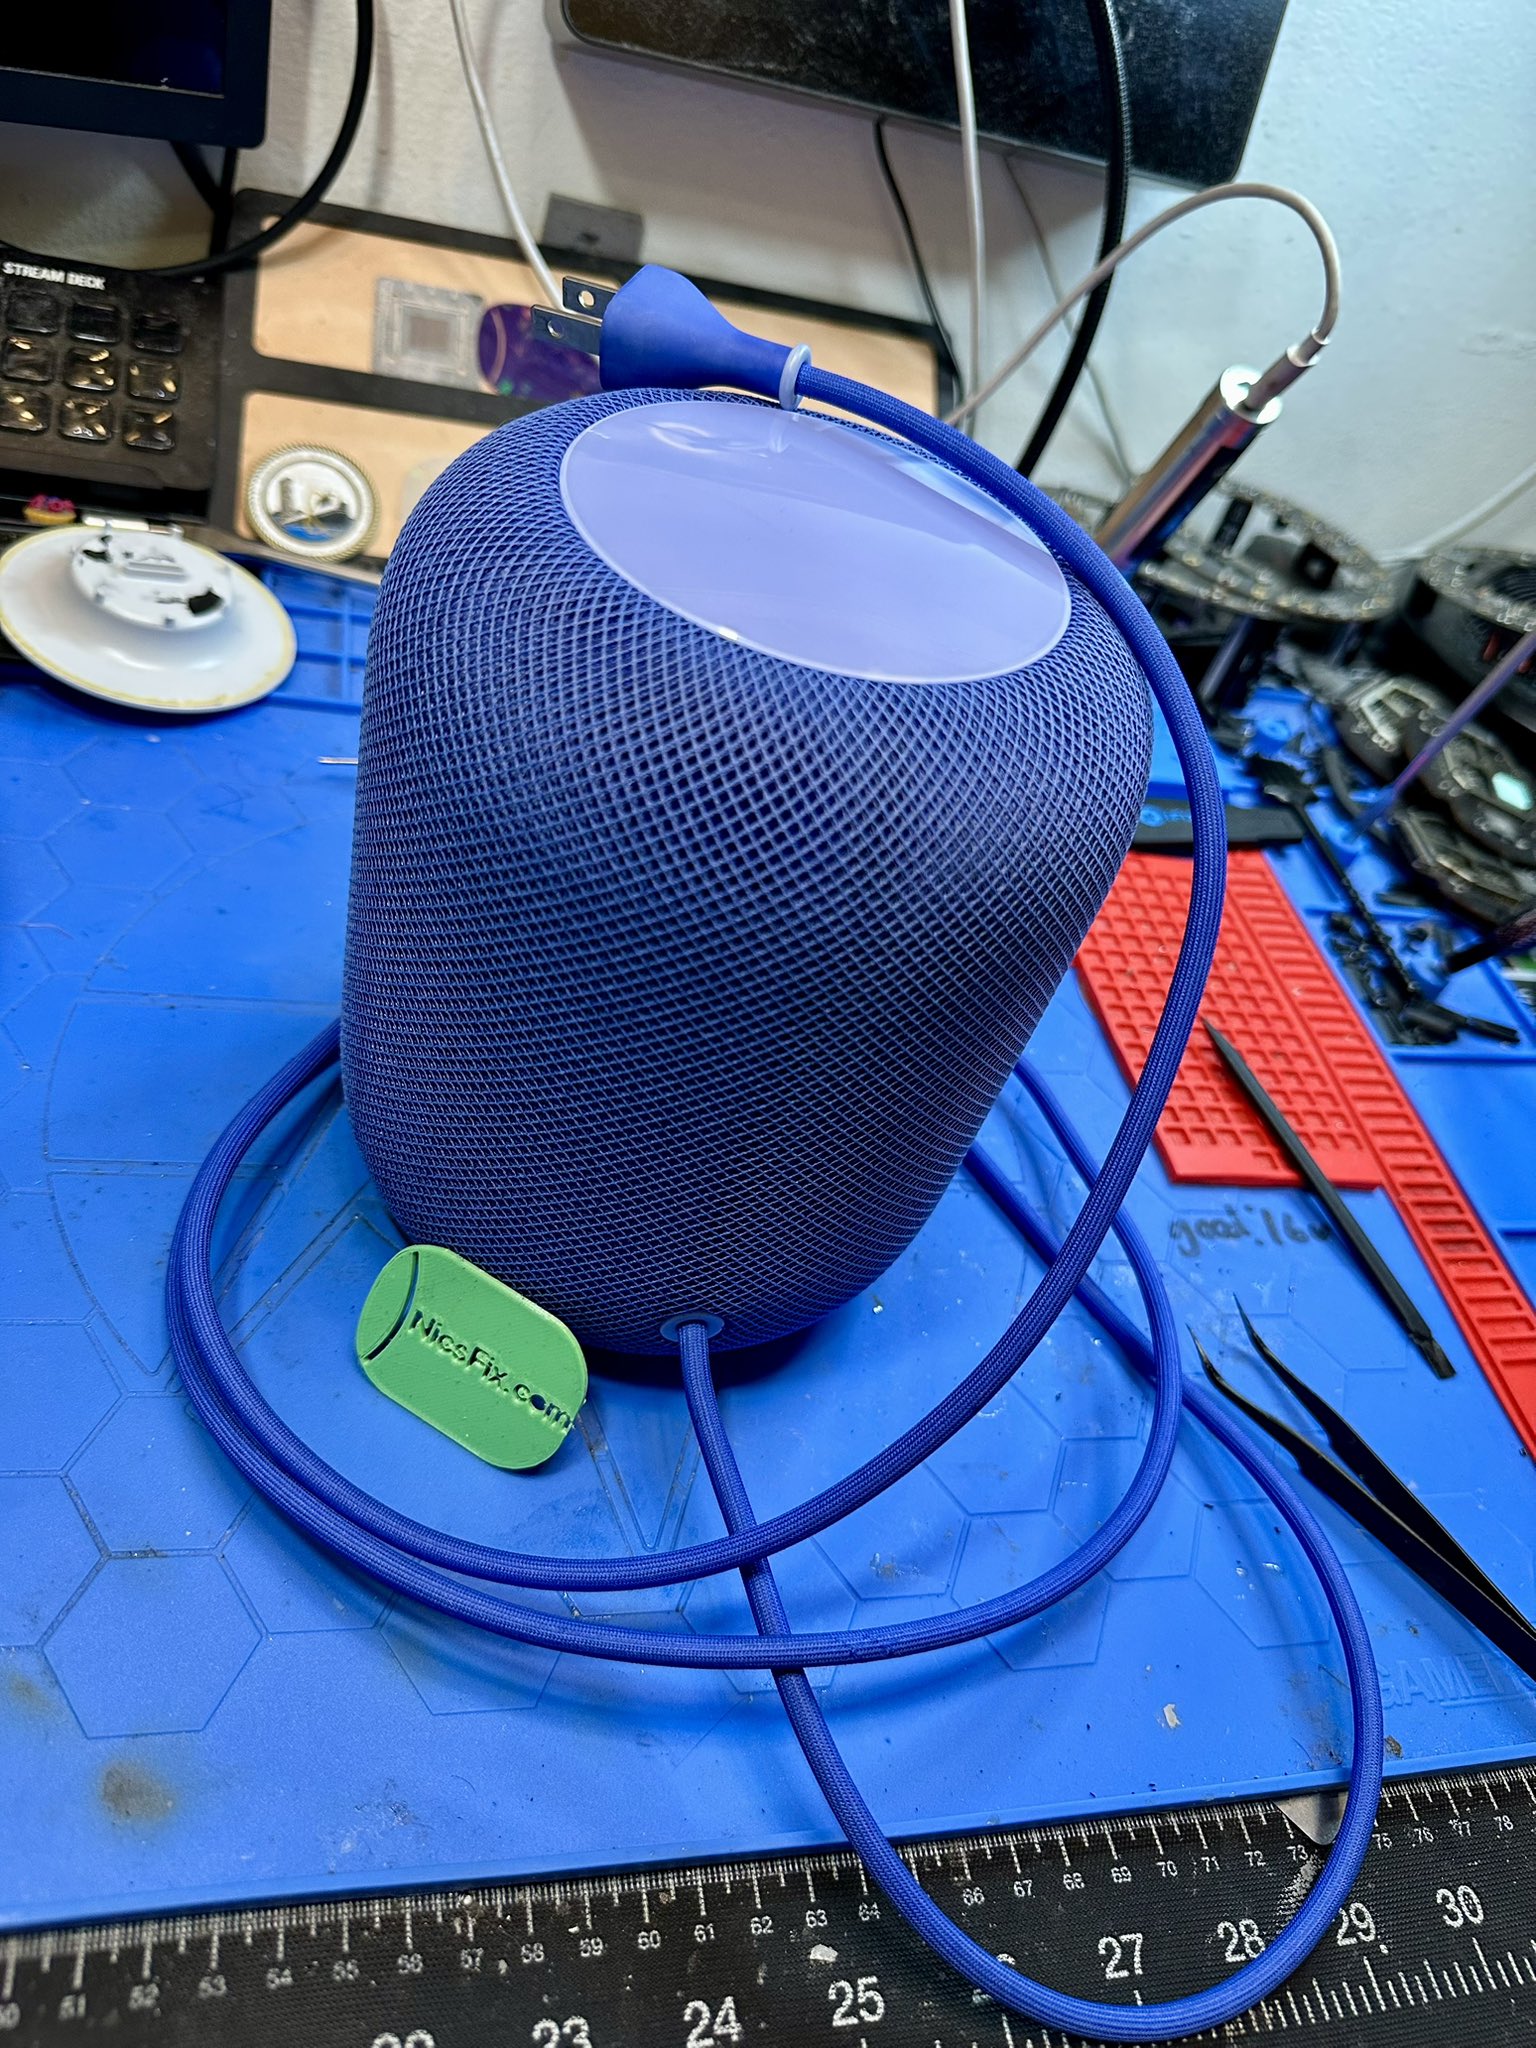
Sapphire Blue
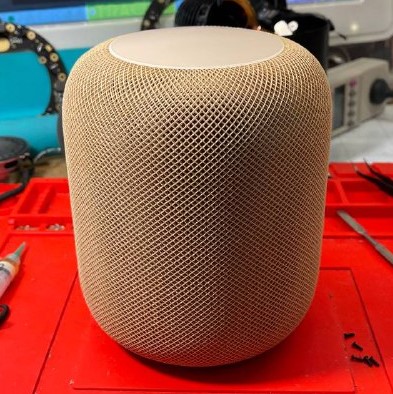
Sandstorm by Darude
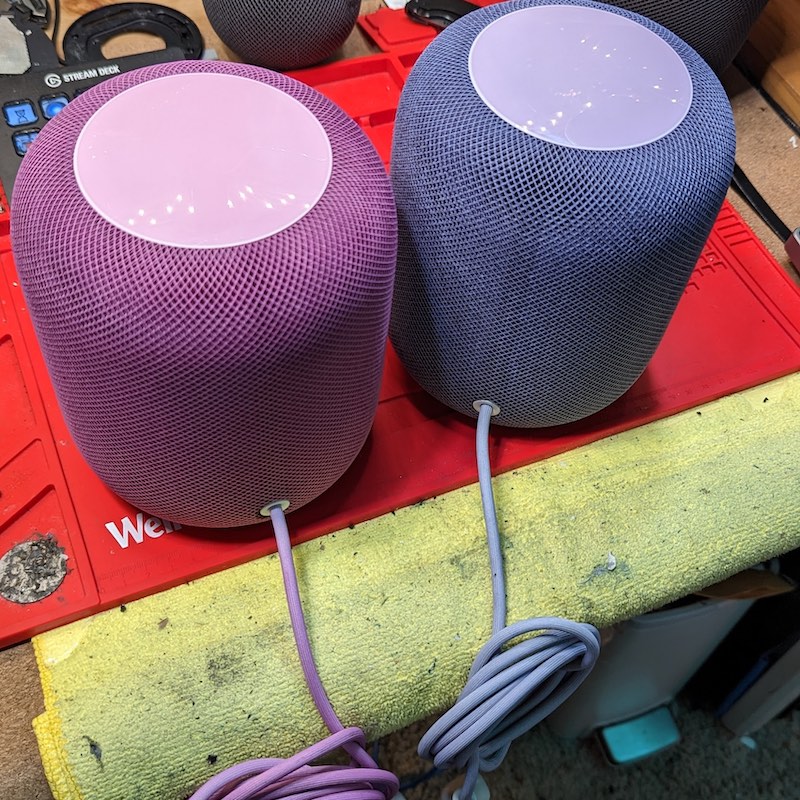
Purple and Navy Blue

Orangey

Green

Daffodil Done by celadonie.fr
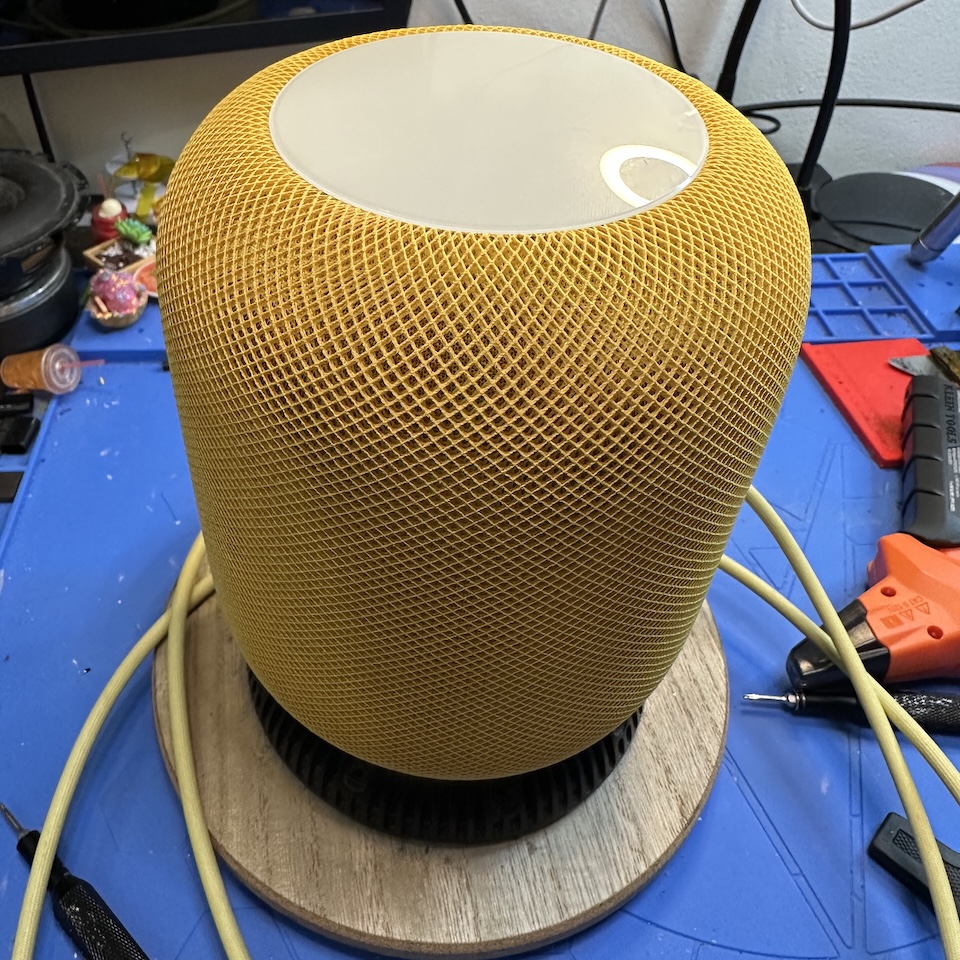
Pure Yellow
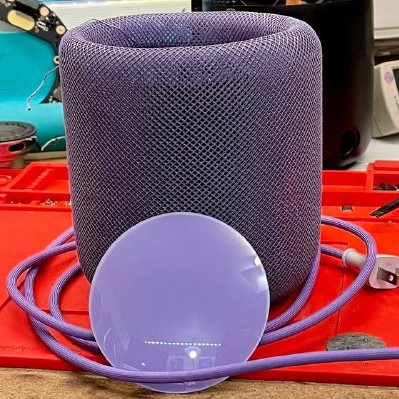
Purple
"You ever wonder why we're here?"
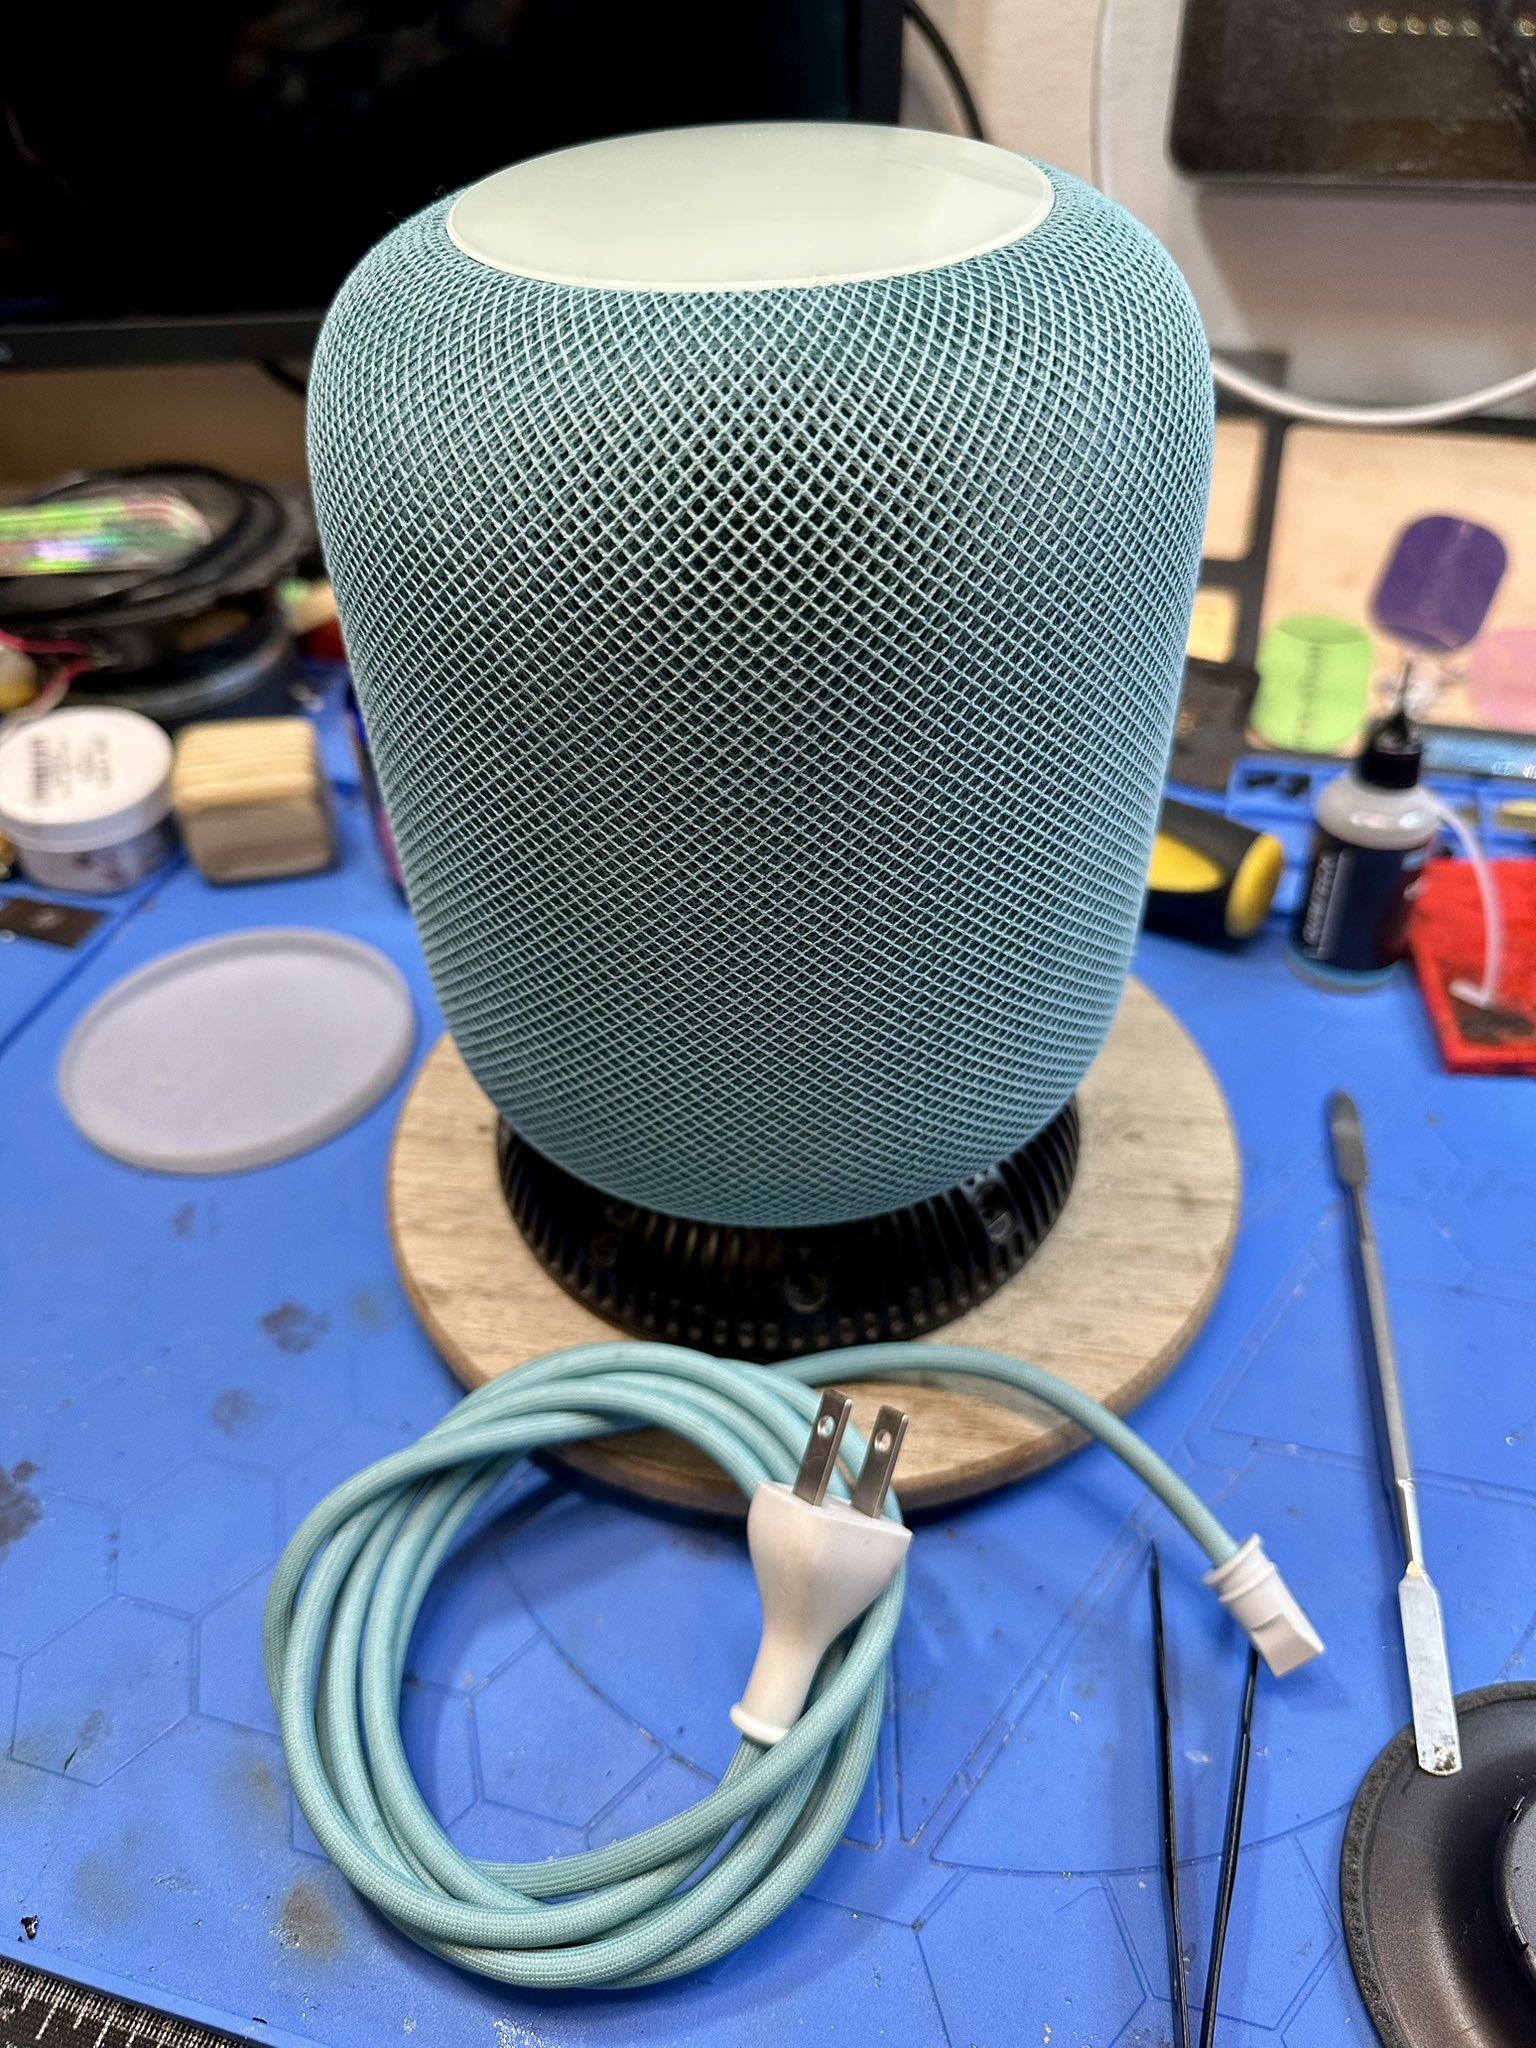
Feelin Teal

PINK!
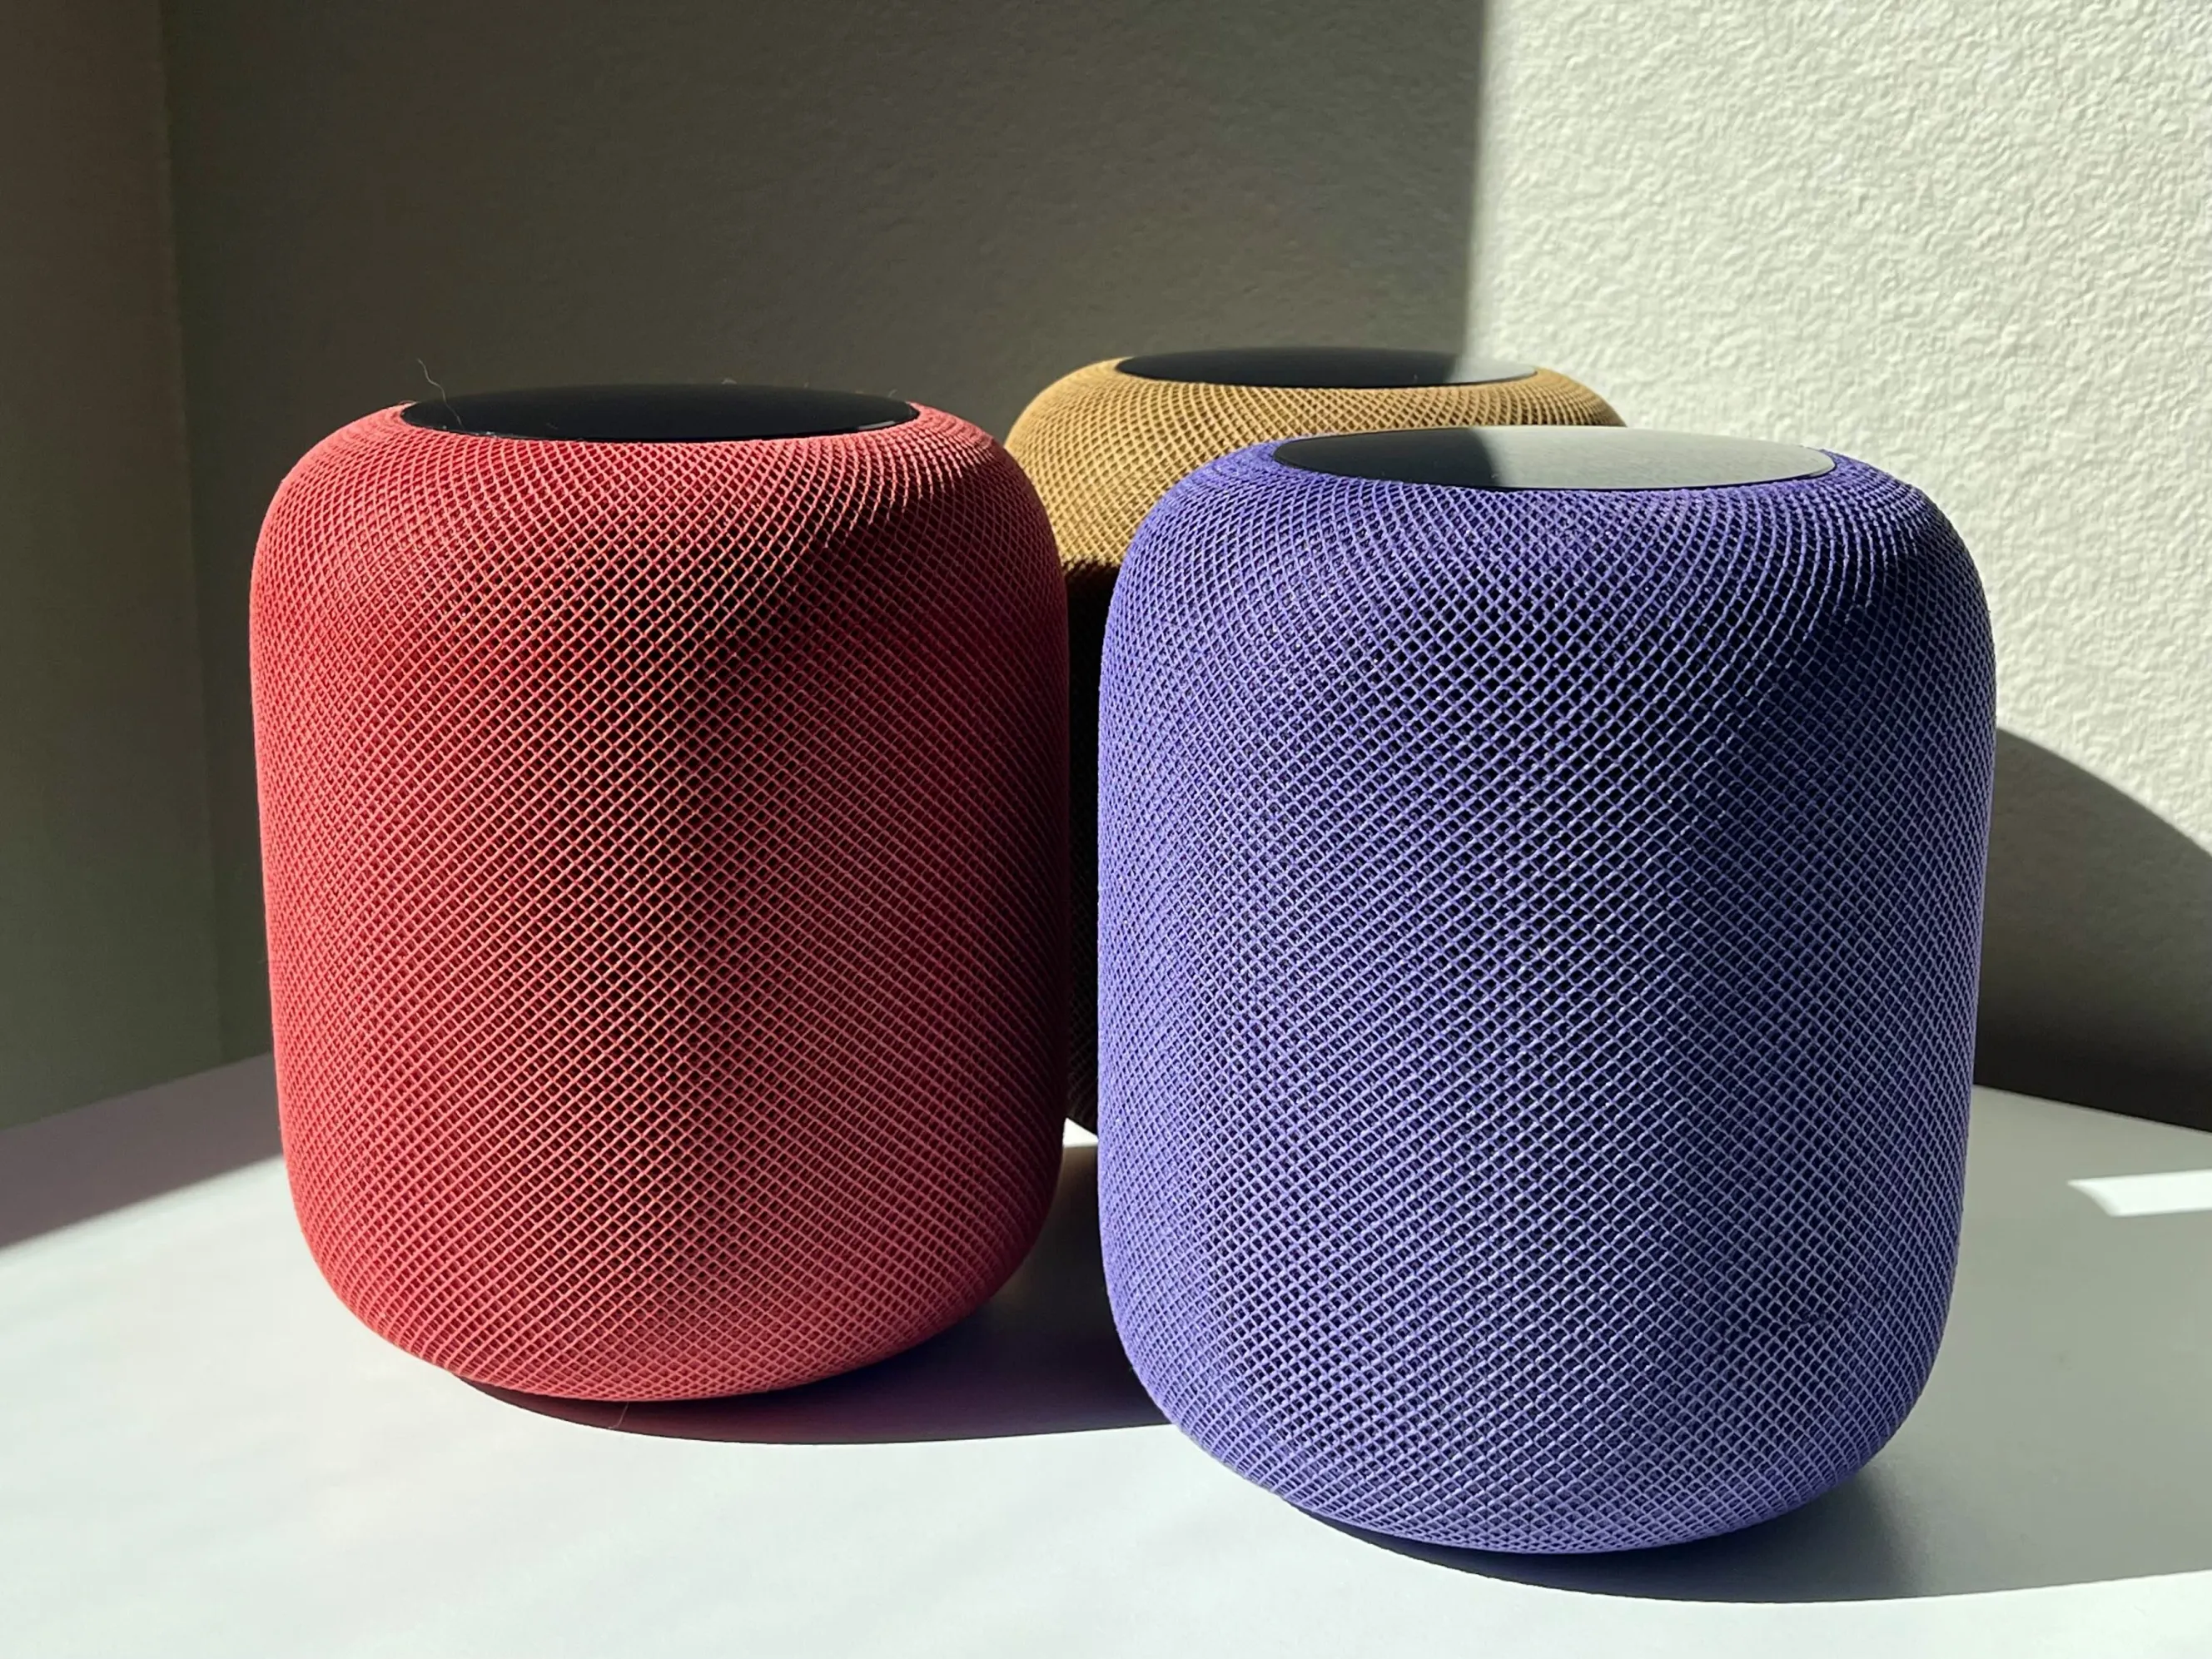
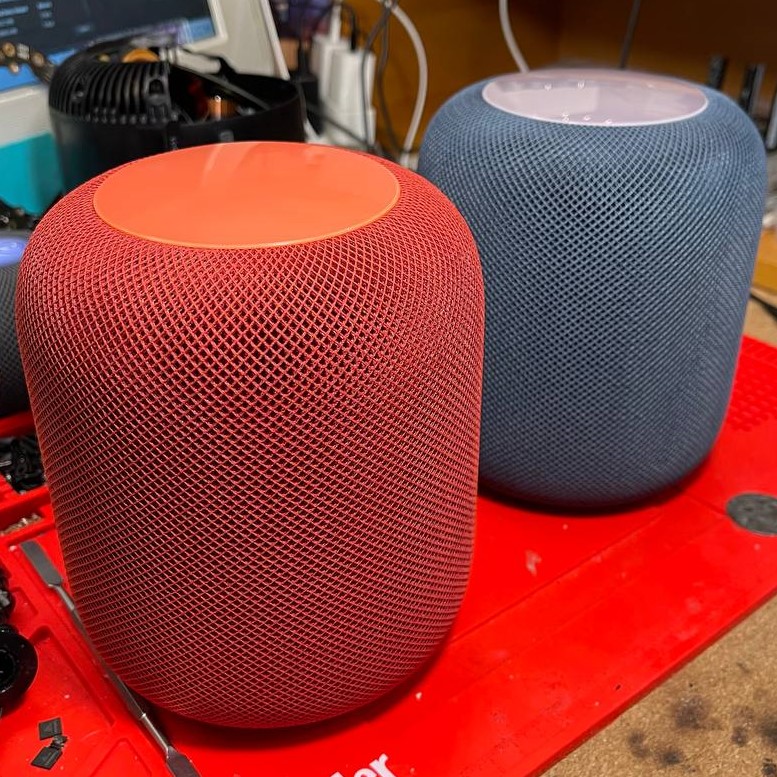
Red, Blue, and Burnt Orange
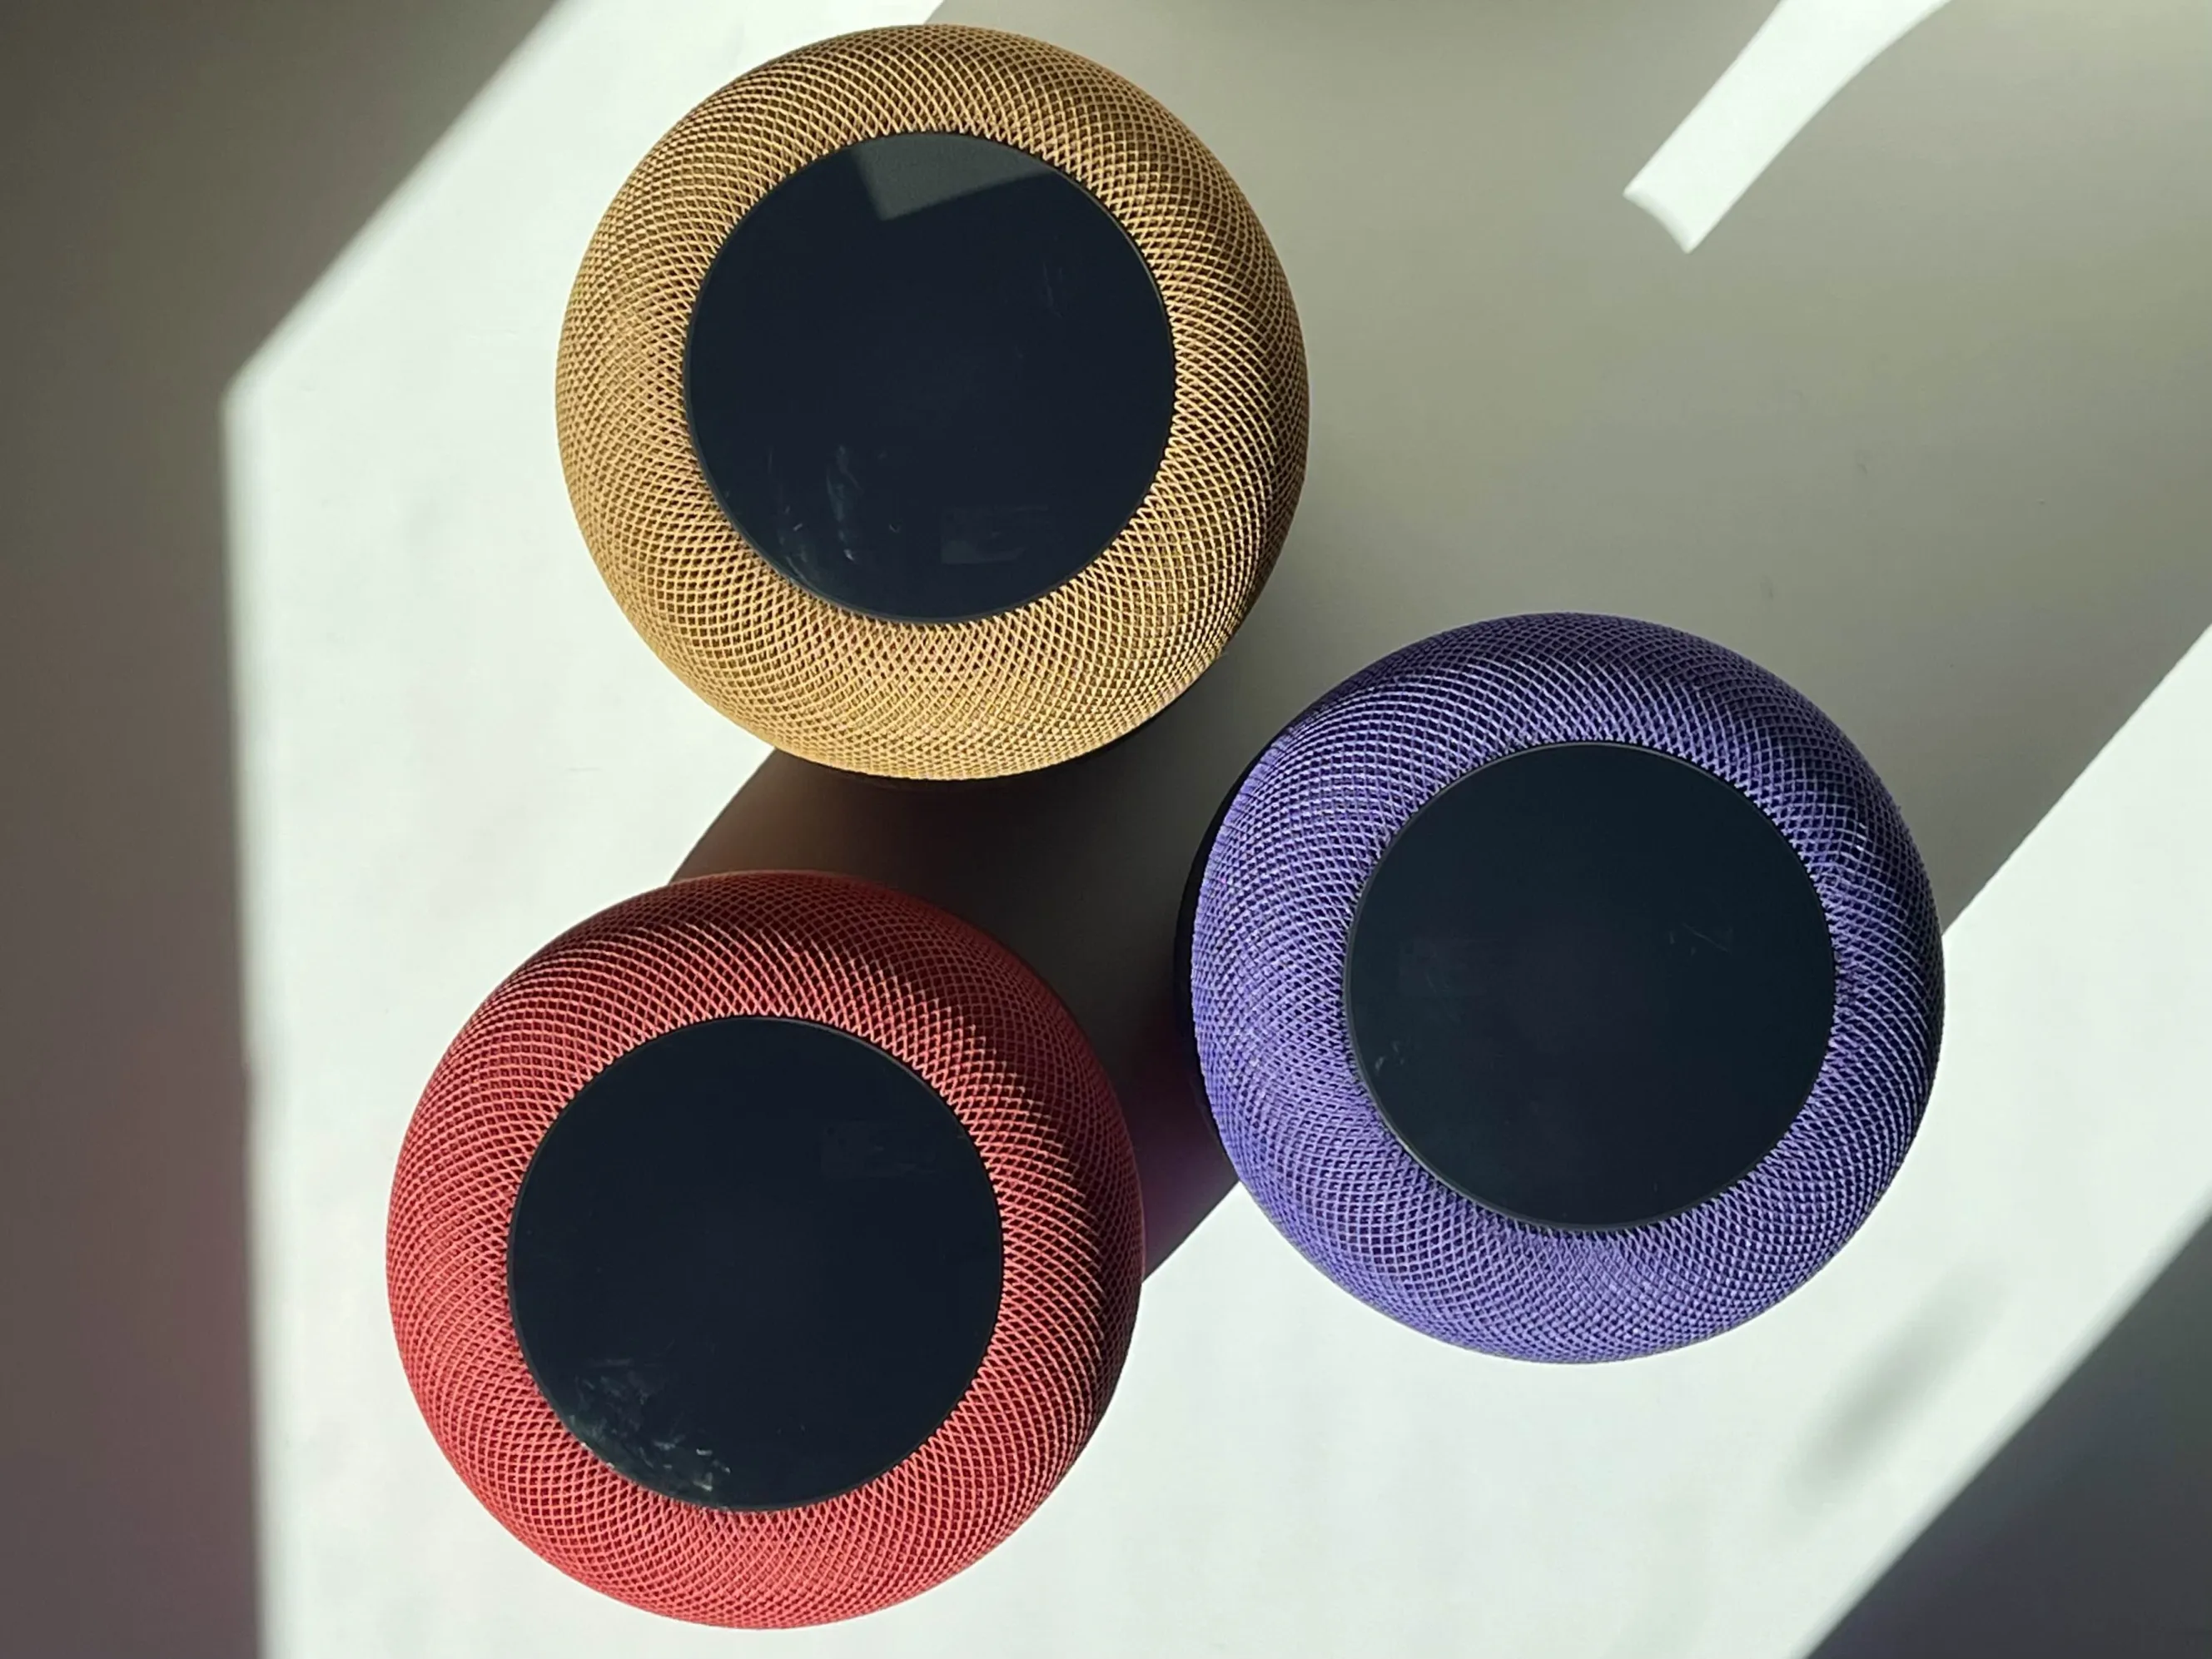
Some Fine Photography by Mike
Repair Estimates
The original, live-streamed, Apple HomePod repair service! Most repairs run $70, including shipping both ways. You only pay after it's fixed, tested, and ready to go. You can always opt for no repair for no charge, and either donate your HomePod or cover shipping to get it back.
All repairs include my unbeatable 1+ year warranty, including free U.S. shipping back and forth if issues arise within the first year, and discounts on future repairs, even if issues aren't related!
Shipping / Discounts
Estimates include USA shipping both ways. Take $10 off any repair if you want to drop it off or handle your own shipping each way, up to $20 both ways.
For $15, you can get a kit to ship your HomePod including a box, packing material, tape, and a return label.
If you're outside the USA, check the list of worldwide repairers under my address first! If you can pay for the shipping, I'll take repairs from anyone, anywhere!
HomePods that were previously repaired by me, but are outside of the 1 year warranty, get discounts on future repairs!
Maintenance: $70
New DC Filters to prevent Death Farts and subsequent bass issues. Note that all capacitors eventually decay and need routine replacement every 5-15 years depending on use.
Replace s.b. diode that causes no power.
Foam subwoofer gasket replaced with nitrile rubber for a longer lasting, tighter bass response.
Internal and external power dusting, quick wipe down and 1 year warranty. Software can also be updated and reset on request, regardless of current configuration.
No Power: $70
The most common HomePod issue. Will diagnose and repair whatever is causing no power. Includes maintenance items!
Common causes are listed in the no power section.
Death Farts, Loud Popping, and/or Bass Issues: $70-$90
Repair for symptoms including; Loud buzzing sound and restart (AKA "Death Farts"), fast clicking, loud "pop" sound, and/or other bass issues. $70 if your subwoofer is still good, and amp is repairable. $90 if subwoofer and/or amp needs replaced. Includes maintenance items!
You do not need to get your HomePod repaired if you just have an occasional quiet popping sound and no other issues. This is normal behavior for brand new, old, or repaired pods. Even the 2nd gen homepods pop.
See below for sample audio to compare. Play them ON your HomePod for an accurate comparison. If yours doesn't match any of these, please capture a recording and send to me before shipping in for repairs.
Technical info in the popping section!
Death Farts (BAD)
Dirty Bass (BAD)
Severe Popping (BAD)
Acceptable Popping (Turn Volume Up!)
Flashing / Blinking Volume Lights, Boot Loops, Setup / Configuration Issues: $40 SW / $90 HW
These can be tricky to properly diagnose and repair, and in most cases it is impossible to tell what it needs without attempting a USB software restore and/or taking it apart.
If your issue is software only and fixed with a USB restore, you have the option of getting your HomePod back with no other repairs / modifications / warranty for $40. Or, you can opt for "Maintenance" to prevent more common issues like no power and death farts for $70. See the "Maintenance" estimate above for more details!
If your issue is caused by hardware that needs extra work / parts, it is a $90 repair. These will include "Maintenance."
Unfortunately there is usually no way to tell whether yours is hardware or software only without connecting to your pod via USB and testing. If you send your pod in for this repair, I'll check and let you decide whether you want to pursue hardware repairs or not first, unless you already wanted hardware maintenance.
The software to restore homepods is FREE. I sell adapters at my Shop (email me for purchase), or you can try building your own if you dare! More information in the blinking lights common issue section.
2nd Generation Apple HomePod Ghost / Phantom Touch Repair: $160
A common manufacturing defect present in 2nd Generation Apple HomePods causes unwanted touch inputs and/or dead spots on the touch panel. This can result in music pausing / playing, volume adjusting, and the voice assistant all triggering on it's own.
Replacement touch panels for DIY repairs are available on aliexpress.
Color Customization: $40
Want me to color your white HomePod something else? Pick any color from Rit's "DyeMore for Synthetics" line and I'll get it done for you! Please add an extra 1-2 days for customization. The mesh, power cable, and top can all be colored.
Photos and Do-it-Yourself info in the mesh section!
Just Board Repair: Contact Me
Want to take your own HomePod apart, but not sure about the board repair or restoring the software? I offer 50% off if you send in just the board that needs repair! *Boards with prior repair attempts may be charged extra.
No Fix: No Charge! Trade It In
Don't want to keep or fix your HomePod? I am proudly a no-fix no-charge operation!
-If you sent one in and want it back, I'll reassemble it as-is and you just need to provide return shipping
-You can also trade in a broken homepod for a free repair on another one
Got Something That's Not HomePod?
While I specialize in HomePod repairs, I've also done other electronics repairs such as a USB-C Port replacement on the Valve Steam Deck, LG Ultrafine Monitors, stick-drift repair for the XBox Elite Series 2 controller, battery replacement for the Joov Portable Red Light Therapy device, gpu reflowing for a GMK NUC PC, battery replacement for a Surface Laptop and more!
Contact me with what you have and we'll see if I can fix it. To keep repair turnaround times down, during busier seasons, it can take up to a week for me to get back to you. Feel free to send a follow up if you get no reply, and check your spam folder!
You can find my Youtube playlist of non-HomePod repairs here.
FAQ
For the questions asked more than once...
Can you fix my HomePod?
Yes! From no power, no sound, distorted audio, death farts, failing to setup or configure, blinking volume buttons, boot loops, custom colors, or just maintenance. I have all the parts needed to accomodate your original Apple HomePod!
What is your turnaround time?
0–3 business days depending on the queue and what your issue is. Most repairs are typically done the same or next day they arrive, and shipped out the next business day. Expect an extra day or so if you are getting customization done, or more time is needed to confirm a fix.
Do you guarantee / warranty your work?
Yes! I offer a 12-month warranty on my parts and workmanship. If issues arise within the first 12 months of repairs, I'll cover the repairs and shipping (shipping coverage applies to US customers only). International customers must figure out their own shipping. After 12 months, you are still eligible for discounted repairs.
How long do repairs last?
For most HomePod no-power repairs, failure is caused by a bad batch of diodes, so a replacement diode outside the known bad batch is a permanent fix. All capacitors weaken over time and eventually need replacing, especially DC filters. There is no permanent fix for this, but replacements should last 5–10 years. There was also a large number of these filters causing death farts as soon as 1 year after production, leading me to believe they're not all just dying from natural aging. Last, the rubber subwoofer gasket we replace the old foam with, will probably outlast everything else in the HomePod.
I sent you my HomePod, tracking says delivered — did you get it?
My UPS mailbox typically only tells me when I have packages, not who’s packages. Hang tight, I'll confirm with you by the end of the day that yours is delivered!
Do you sell pods or parts?
What I have available is on my shop here. Note that there are HomePod parts and services on eBay, but they are not associated with me, and are of unknown quality and standards. Use them at your own risk. Avoid used amplifier boards unless the DC filters have recently been replaced.
Can I buy a broken HomePod online and have it shipped directly to you?
Absolutely. First make sure it's repairable — you can send me a link first. If purchasing on eBay, be sure to enter my shipping address during checkout to retain your buyer protection. Do not message eBay sellers asking them to change the shipping address after checkout; this is against eBay policy and voids buyer and seller protection.
Is it a good idea to buy a used HomePod?
At least, you need to be able to test internet-connected, moderately bassy, audio at moderate volume for more than 10 minutes without issues. All first-gen HomePods were manufactured in late 2017–early 2018. That means the ceramic DC filtering capacitors are at least 6 years old. I am seeing many original filters failing now, even if they tested fine recently. This is why I now replace these filters as part of every repair. I strongly advise everyone else repairing HomePods to do the same.
Will you buy or take my broken HomePod?
I might! When I have the budget available for it, I offer up to $60 and cover shipping if you want to let it go. Or trade in your broken, unfixable HomePod for a free repair and return on a fixable one. You must provide both the broken unfixable, and broken fixable pods.
Can you fix my HomePod Mini?
Maybe! Depending on what's wrong with it, and current parts availability.
Can you fix my 2nd Gen HomePod?
Yes! Though some issues cost more to repair than 1st Gen HomePods.
Do you fix things other than HomePods?
Yes! If there is already a shop that specializes in your device, I will recommend you to them. But if you can't find anywhere willing to take it on, shoot me an email. Examples: Xbox Elite Series 2 controllers, Joov red light, Steam Deck, Z31 300ZX digital dashboard power supplies… See my playlist here.
Is this your job?
Nope. I do this in my “free” time.
Do repairs void my warranty?
No! Under federal law, the merchant must prove that a defect was caused by the alteration in order to void a written warranty. Sources: FindLaw.com and FTC.gov Magnuson Moss.
What tools do you use to fix HomePods?
You don't have to buy the same brands, though I highly recommend the ChipQuik flux!
About Nic's Fix
My mission is to provide a unique, transparent repair service for the "unfixable!"
When Apple first announced the HomePod in 2017, I thought not much of it. Everyone else thought it was irrepairable. It wasn't until 2019 when my boss brought one into work and I had a chance to listen to it that I was instantly blown away. How could such sound come from such a small speaker, and from all directions? I had to have one.
I picked up one at a discount from Best Buy for an early birthday present to myself. I started re-listening to all of my favorite music in a way I never heard before. Sure, there are bigger, better (more expensive) systems out there, but this is quite the value for the experience you get.
Then I thought to myself, I must get another one to try "Stereo Pair," but my budget said "maybe later." That is, until a few weeks after my first HomePod purchase, another one showed up at my door! Best Buy somehow did not register that I had already picked it up and shipped one to me.
You thought one HomePod was good? Two was even more amazing! What did Apple cook up here? I must have more of them! But how?
Already addicted to multi-room wireless audio, via a dozen Airport Express v2s and Apple HiFis / other random speakers throughout the house, I was practically foaming at the mouth to modernize my listening experience, but apprehensive to spend a bunch of money on a bunch of HomePods, if they are going to break with no known way to fix them.
What if I try to buy some broken ones and figure it out? That would be a cheap way to get myself a lot more of them! Has anyone else worked on these, found any issues, found any fixes?
Turns out, there was someone on YouTube that had been sent a HomePod in with no power. It looked like an arduous process, but they eventually diagnosed the issue and brought it back to life. So I hopped on eBay and bought myself a few pods in repair condition to try it out myself.
My first attempt was not pretty. It took me at least an hour to get the plastic top off. Then another hour to finally get the amp board out where the same diode was. Following ERS's video, I was elated to find the same diode was shorted! I was able to replace it, and was shocked to find it come right to life!
I started looking around for more broken ones to buy and fix for myself, and noticed a trend... A lot of broken HomePods out there, with more issues, no known fixes, and no one offering a repair service! Maybe I could solve some of these issues, and share the information for others?
Outmenick is another notable name. They documented a graceful way to open HomePods, and were on the right track towards diagnosing "Death Farts", another common issue that kills the amp and bass speaker. Everyone's conclusion however, was that this was an irreparable issue due to an irreplaceable part failing. I was skeptical, and frankly a bit motivated to prove someone wrong.
I decided to purchase more broken HomePods, specifically with these Death Farts, to definitively diagnose the issue. I broke a LOT of HomePods trying to figure this out. It got to the point where I was swapping every single component between a known good amp and known bad amp to try affecting the symptoms. I have an amp I was removing every component from to reverse engineer and create a schematic. I was taking measurements and posting all over electronics repair forums. Trial, error, trial, error, over and over again. I almost gave up. Then, I had my big break.
We knew Death Farts were caused by "DC Offset" or unwanted DC voltage getting through the amp and into the bass speaker, easily confirmed with a multimeter connected to the subwoofer. After a lot of googling, I came across this article talking about DC Offset. What stuck out to me was "DC offset gets worse with heat." I have an idea! What if I just point my heat gun at the amp and move it around until I find which area causes the biggest reaction in DC Offset?
Sure enough, as soon as I pointed the heat gun at those now infamous filters, the DC offset immediately spiked and the HomePod Death Farted! I found the culprit, but what do I replace it with? I can measure the DC voltage they see during operation, pull them off a good amp and measure the capacitance, and use common sense for their tolerance and rating.
We know the amp chip is a PowlRaudio 98-0431, part of the 43XX family of integrated amp chips. After some googling, I found that PowlRaudio sells an open sourced evaluation board that uses the same amp chip, and the datasheet / schematics confirmed that they were rated X7R at 10% tolerance. Bingo.
With most common issues figured out, and a good way to repair them, all that was left was to make a name for myself. How was I going to get people to trust me to send their $300+ speaker, let alone pay me for a repair?
Browsing forums where people were complaining about their broken HomePod, I was offering free repairs for people if all they did was cover shipping. I would do a private stream or upload to YouTube, until I felt confident enough to do public livestreams for every repair that came in. Then I launched my website, and officially offered a unique mail-in repair service for HomePods!
Fast forward to today, and thousands of HomePods have now passed through here for successful repairs, with an order of magnitude more fixed from documenting our findings!
The Verge Interview: https://www.theverge.com/2023/2/15/23600844/
PodFeet Podcast Interview: https://www.podfeet.com/blog/2022/12/ccatp-753/
World's First Look Inside a 2nd Gen HomePod: https://www.youtube.com/watch?v=toTWuUUbQjo
Buy Me More Bass!
Got an unwanted HomePod? Send it in to help me help others! I'll even send you a shipping label and a box. Anything helps towards the cost of tools, parts, and more broken homepods, to share new and higher quality repairs! You can also donate to my:
Become a Patreon contributor!
BTC: 334zQHs3aL3w5MfZrKAfXJYzAux7s9MRMs
ETH: 0xCa239E6A287eE302e1528788B89F506aEb41140f
CashApp: $NicsFix
Venmo: @NicsFix
PayPal: [email protected] or click the speaker below!
Congrats! You Are Visitor #