-
This rebuild walkthrough is for WH1C and WH1E turbochargers…older H1C and newer HX35/HX40 have SLIGHT variations but the whole process is pretty much the same from what I understand.
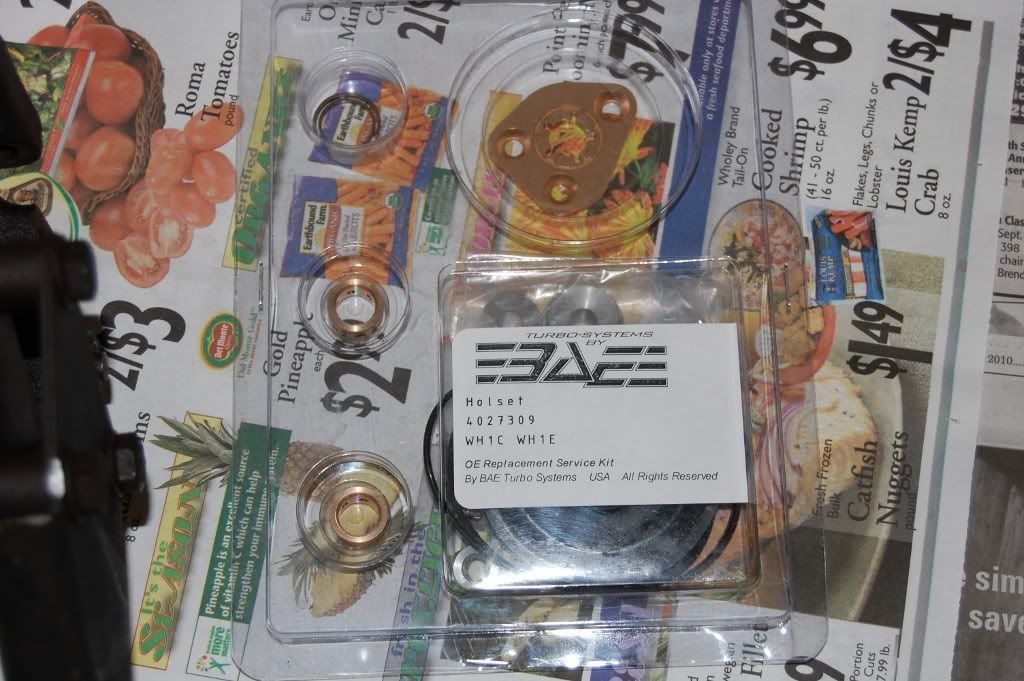
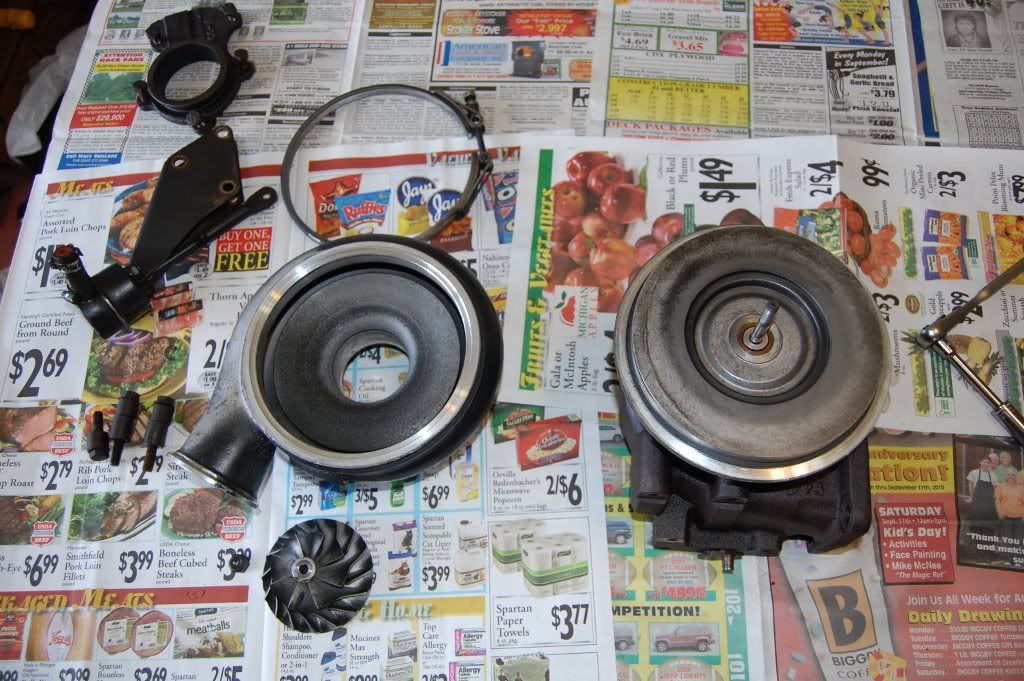
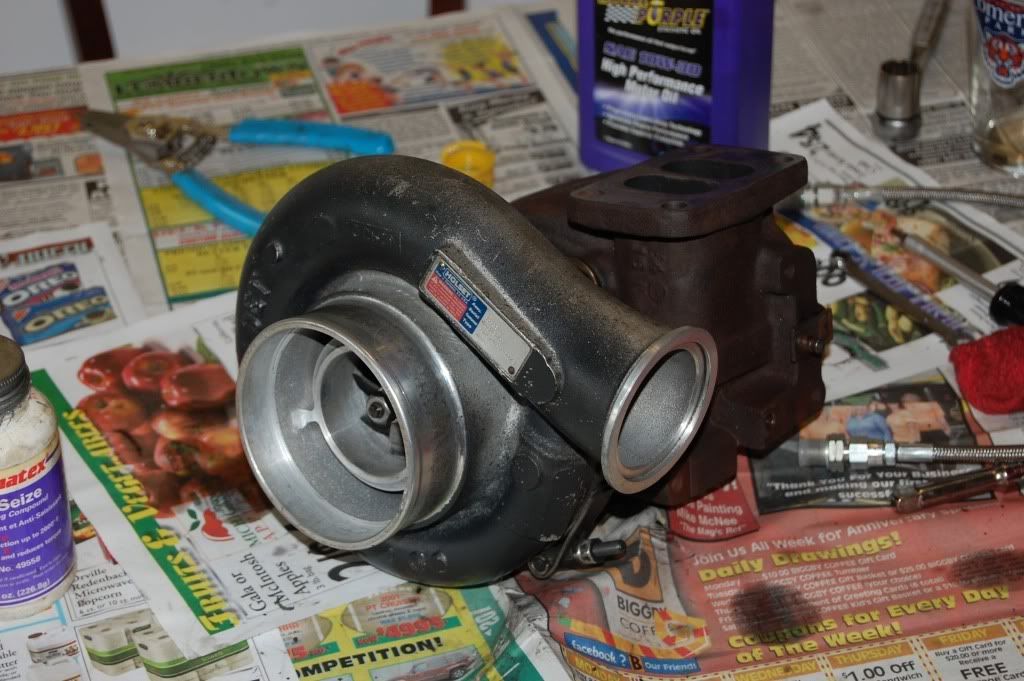
Holset WH1C and rebuild kit from BAE Turbo systems (this is a high quality kit with premium components), both purchased on Ebay. turbo=$350, rebuild kit=$70
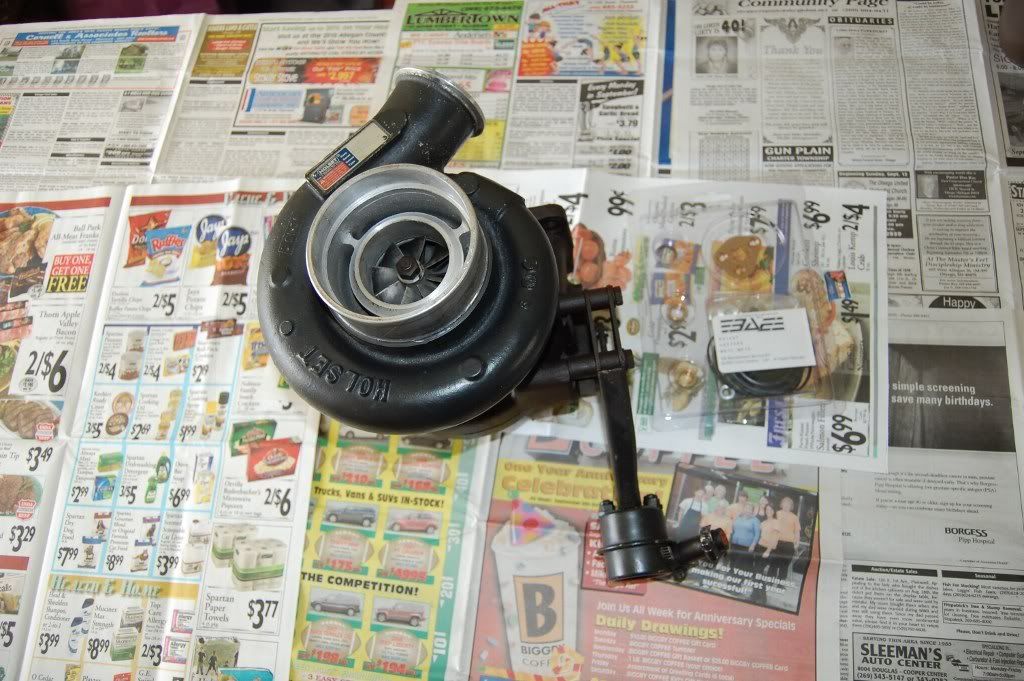
Kit includes new bearings, seals, plates, and fasteners.
Step 1
Remove wastegate actuator and turbine exit (downpipe) flange
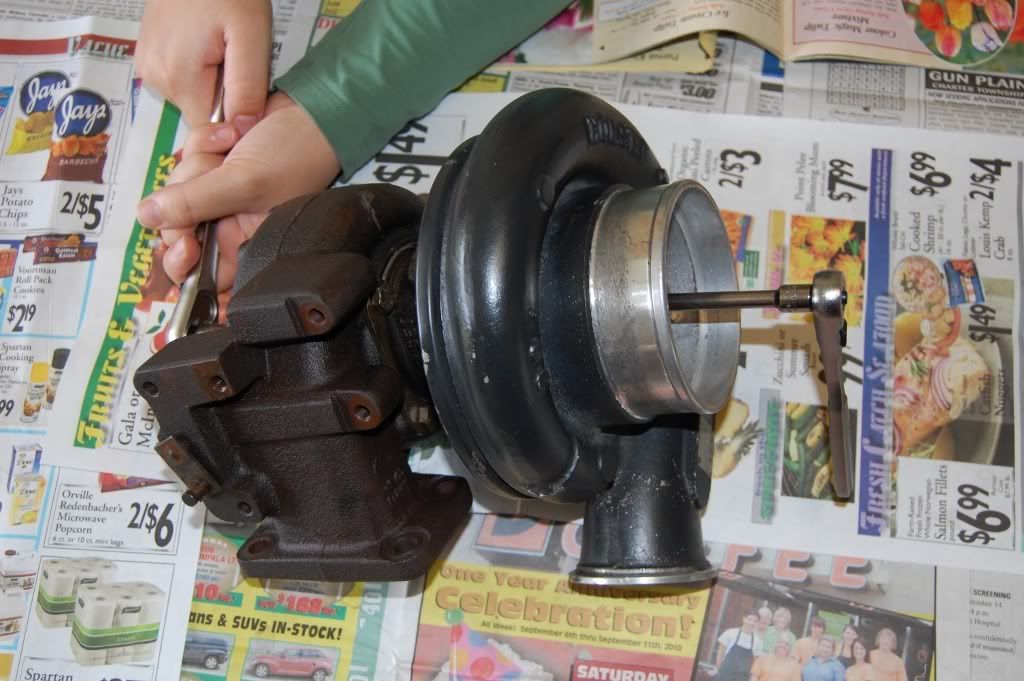
Step 2
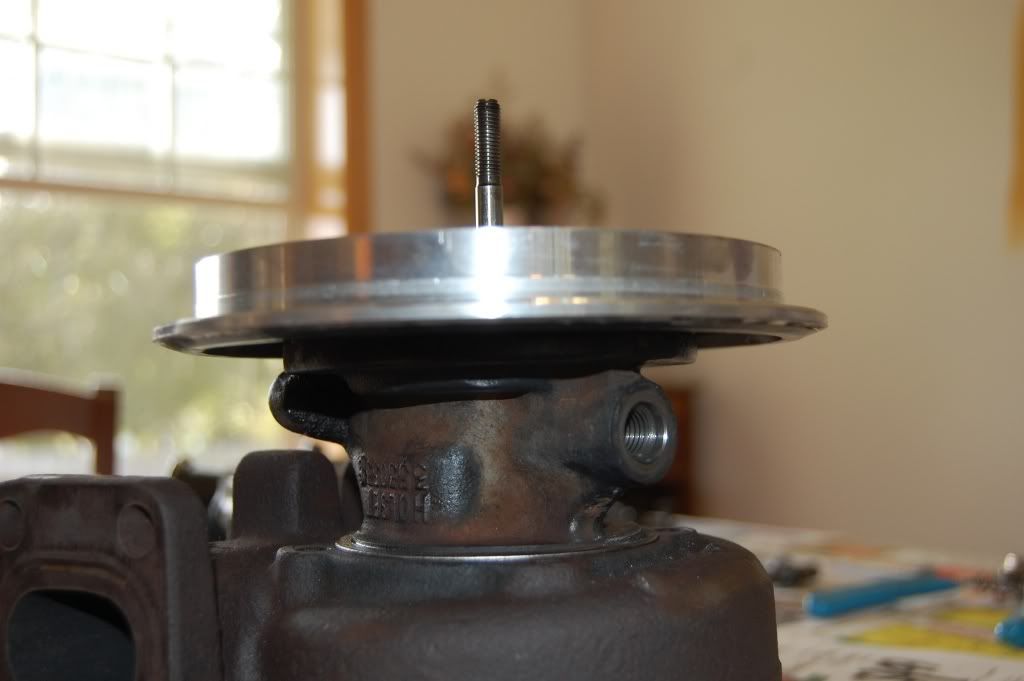
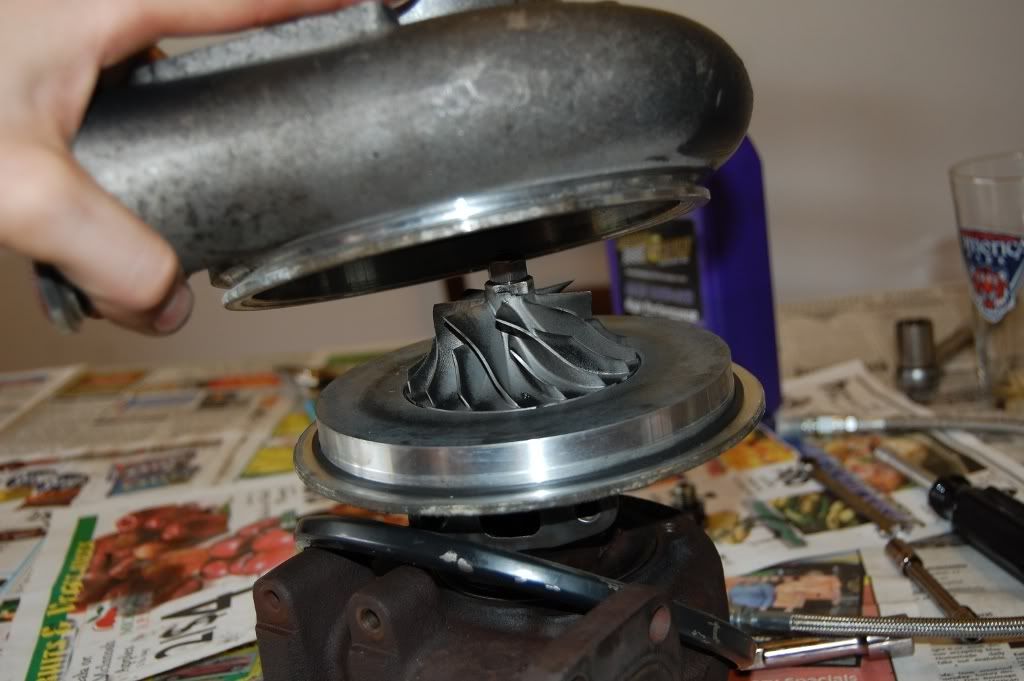
You will need a 12 point 19mm (3/4") socket to hold the turbine wheel while you loosen the nut on the compressor wheel (if your wheel and shaft are not indexed, mark them now so they do not need to be rebalanced)
The nut on the compressor side is a LEFT HAND THREAD..so you have to turn it to the right to loosen it unlike a normal nut. It helps to have a second person to hold the turbine shaft…my wife allowed her beautiful woman hands to be photographed for display purposes.
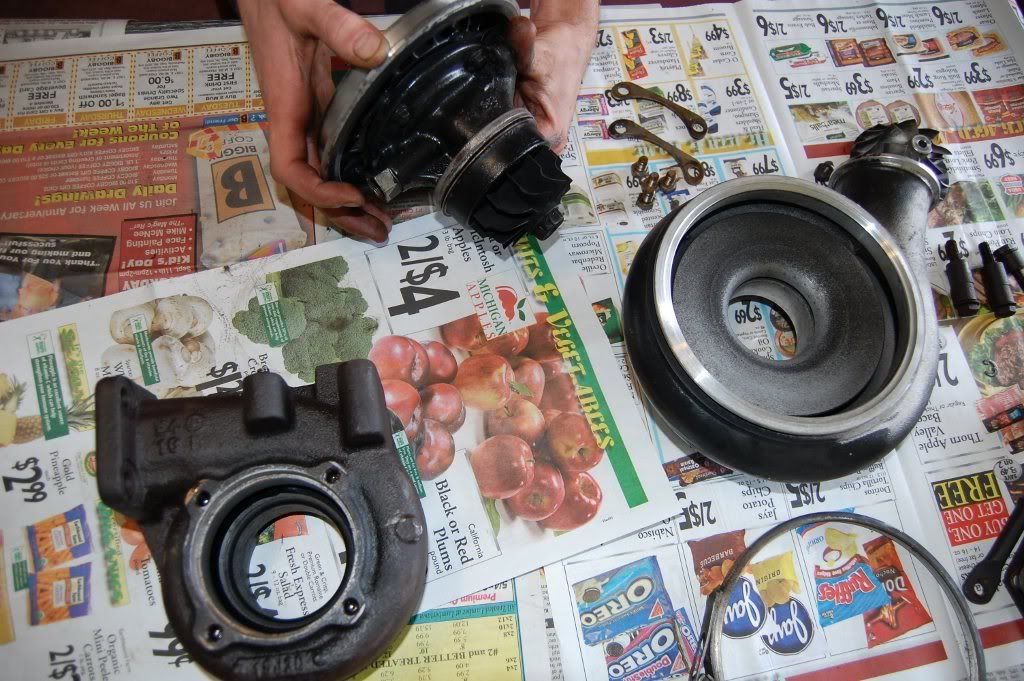
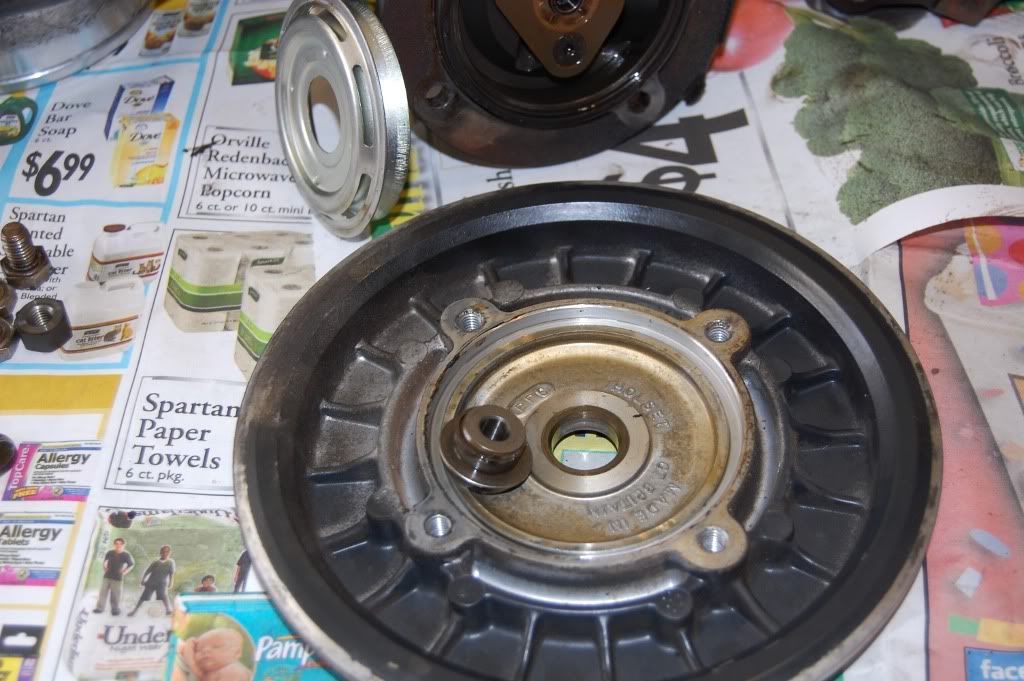
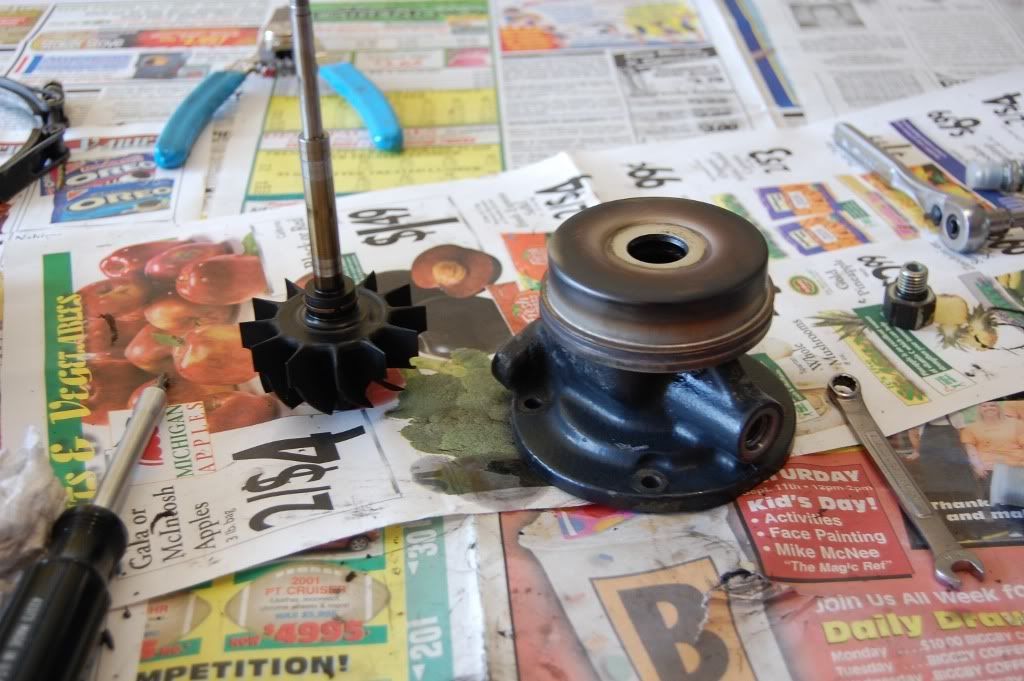
Step 3
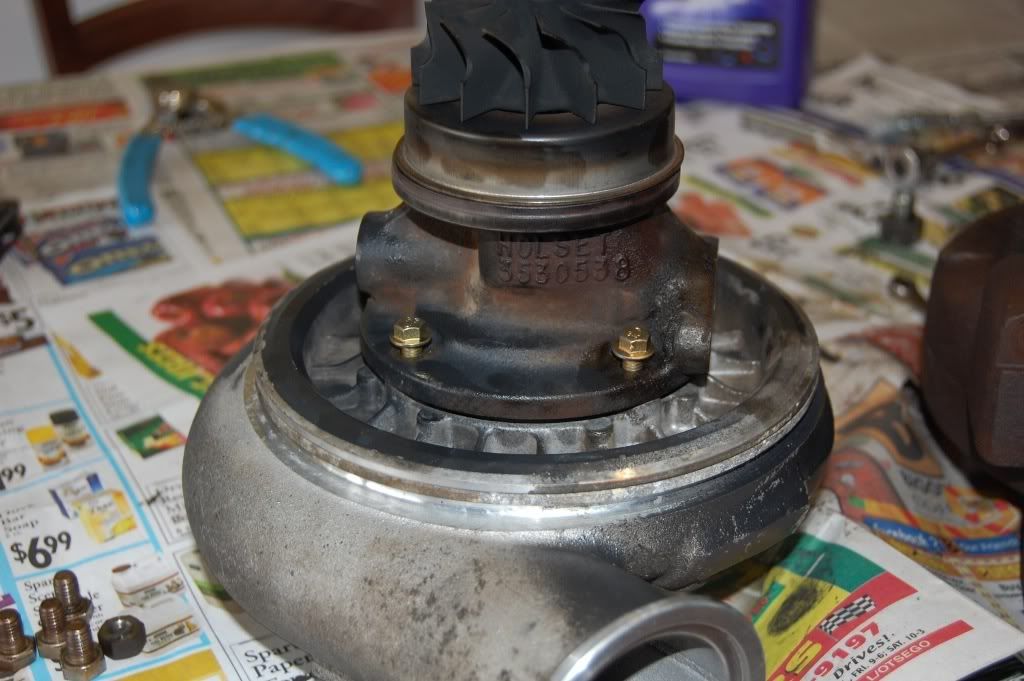
Once the nut is loose, remove the compressor housing by loosening up the V-band clamp and lifting it straight off the back plate. (Variation: HX series Turbochargers have bolts holding on the compressor outer housing.) Set the compressor housing upside down off to the side and remove the loose nut from the center shaft, then remove the compressor wheel.
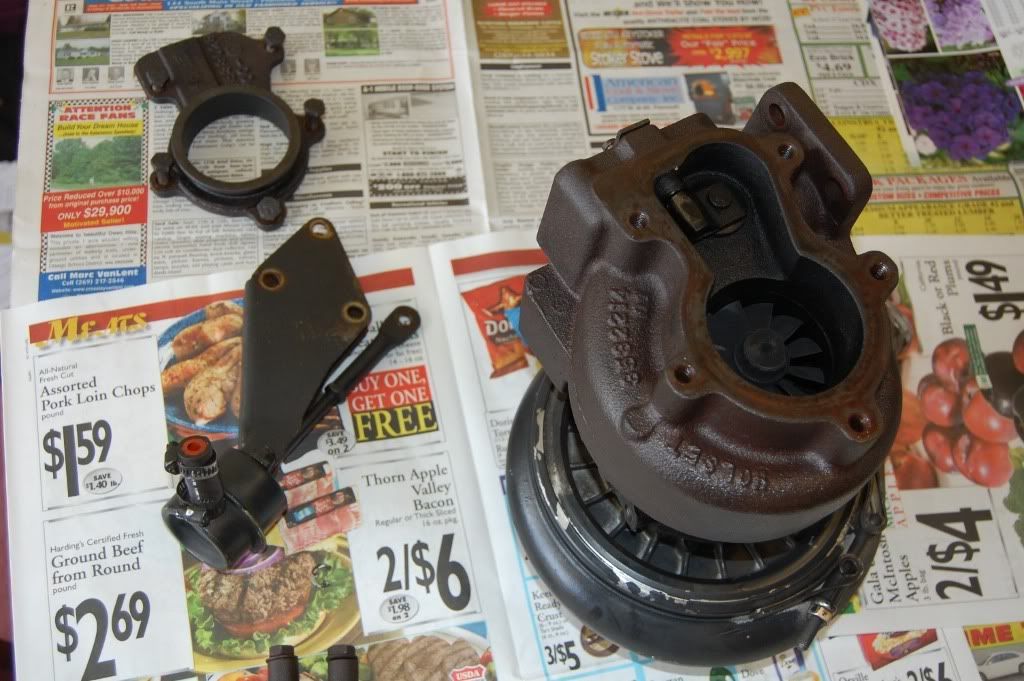
Step 4
Remove the 4 bolts (6 bolts on the HX series turbos) holding the turbine housing to the center section along the the little half clips, then remove the housing from the center section.
NOTE: housing and center section may be fused together from heat/rust. Use torch and hammer for coercion.
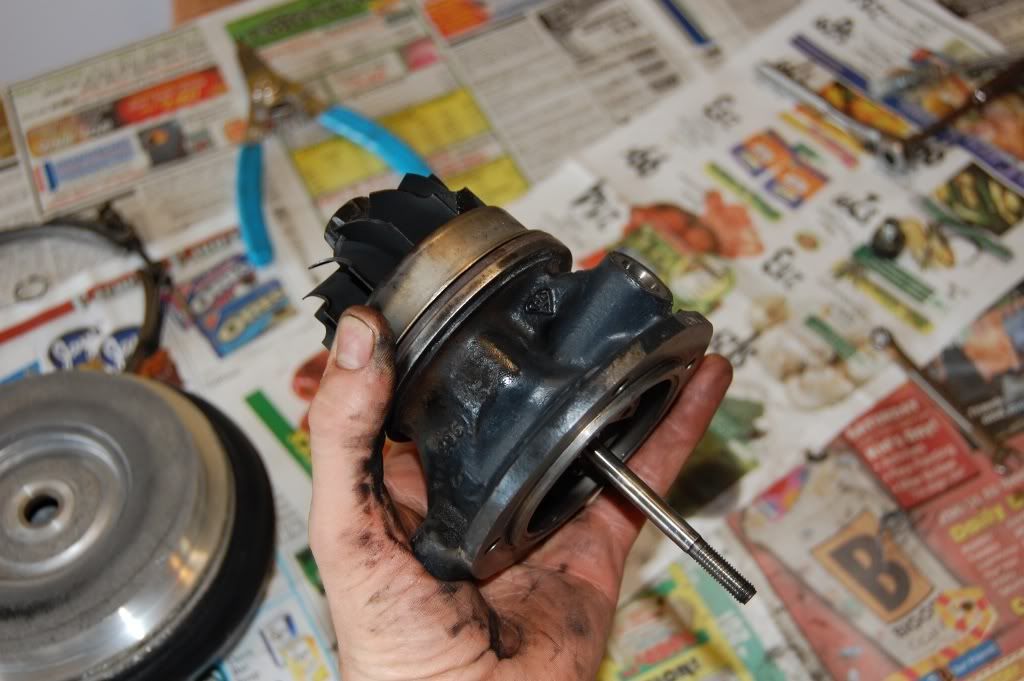
Step 5
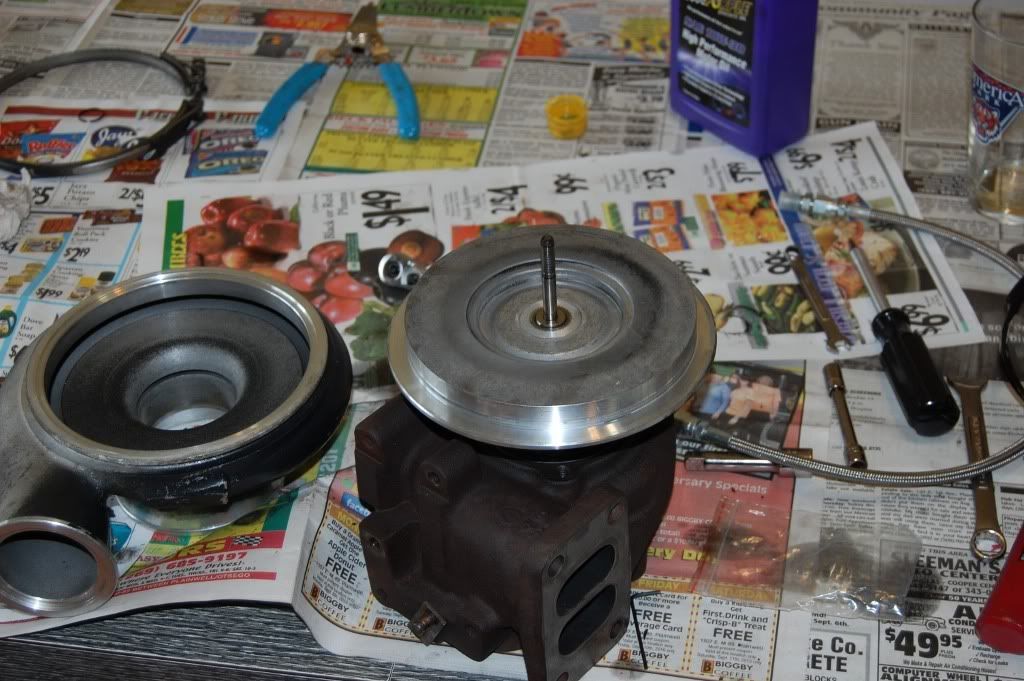
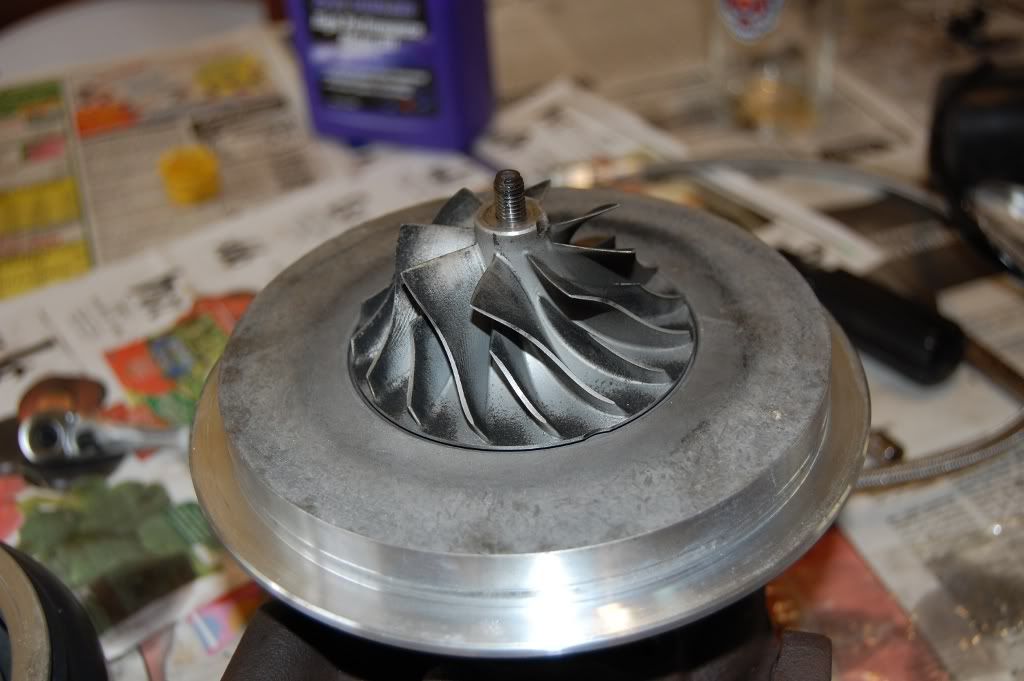
Now that you have the center section loose in your hands, take a soft rubber mallet and tap the threaded compressor end of the center shaft so that the turbine shaft slides out into your hand…this should require very minimal force…remove the turbine shaft/wheel and the round shield underneath the turbine wheel. Note the split ring style oil seal on the end of the shaft near the turbine wheel blades…this will need to be replaced with a seal included in the kit.
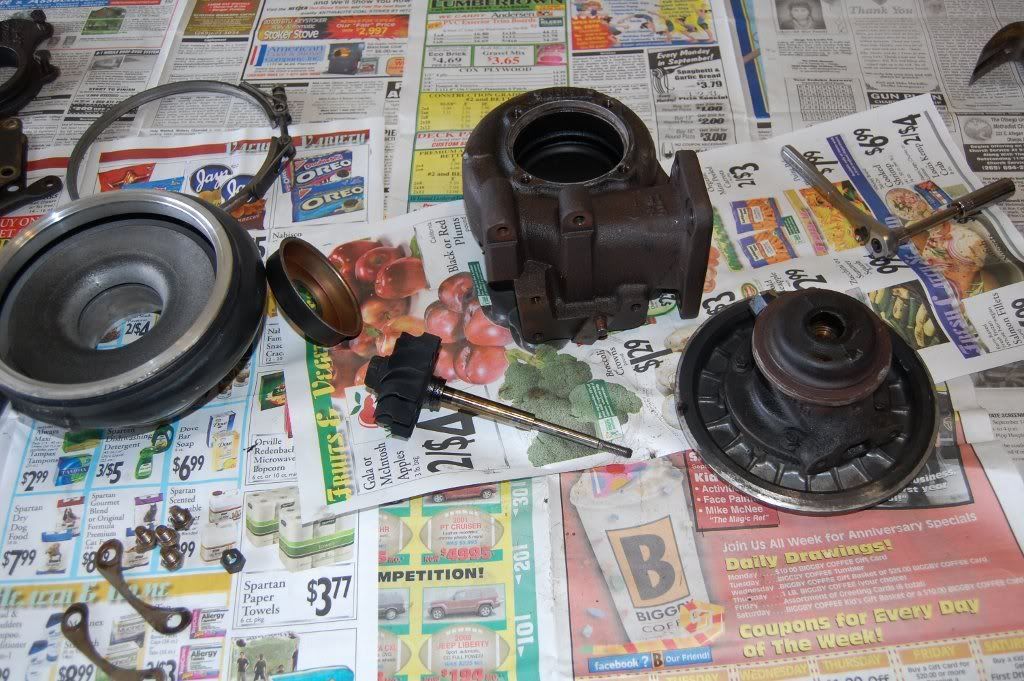
Step 6
Place the center section with the compressor side backing baffle plate face down…remove the 4 bolts holding this together and lift the center section off. (there may be a variation for an HX series turbo…possibly in number of bolts)
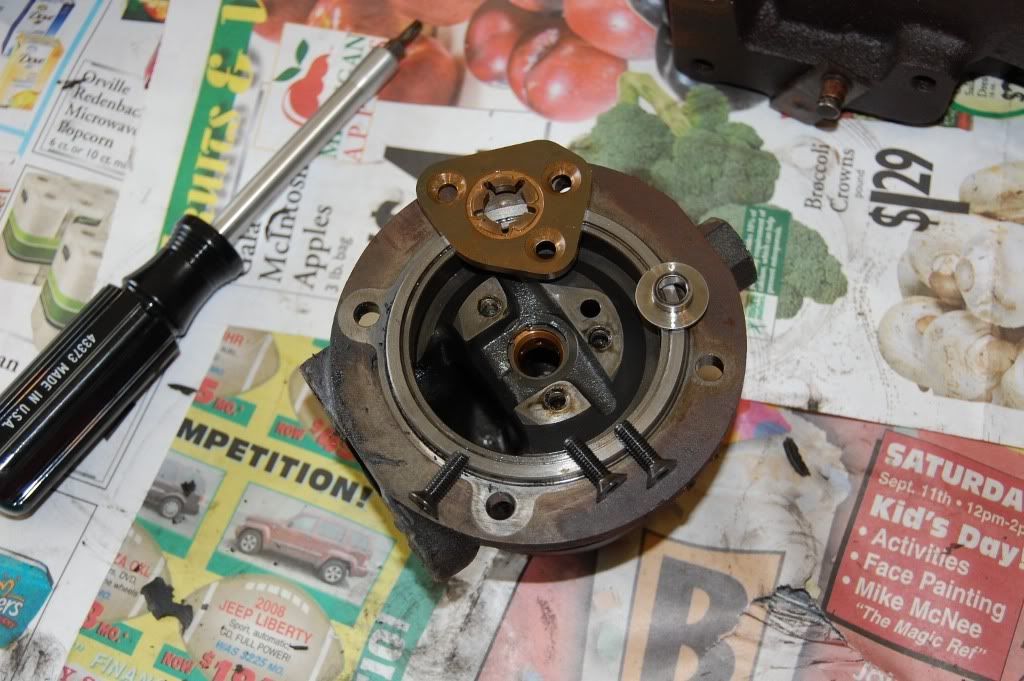
Step 7
Once you have the center section off to the side, look at the compressor backing plate…you'll need to remove the small plate to see the bushing underneath. Push the bushing out to reveal another split ring style oil seal.
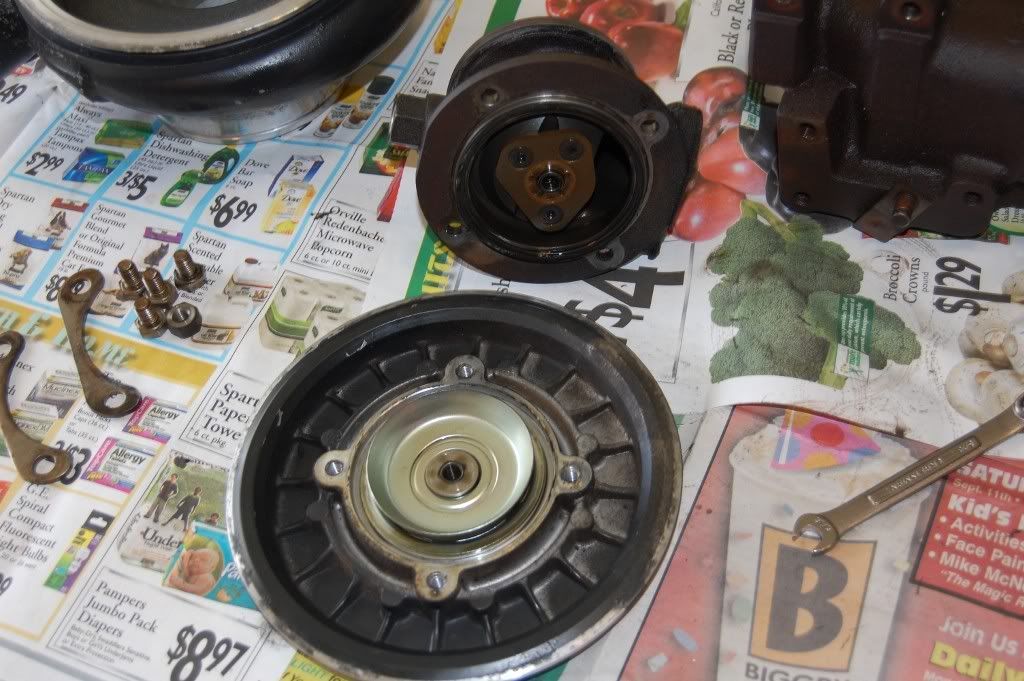
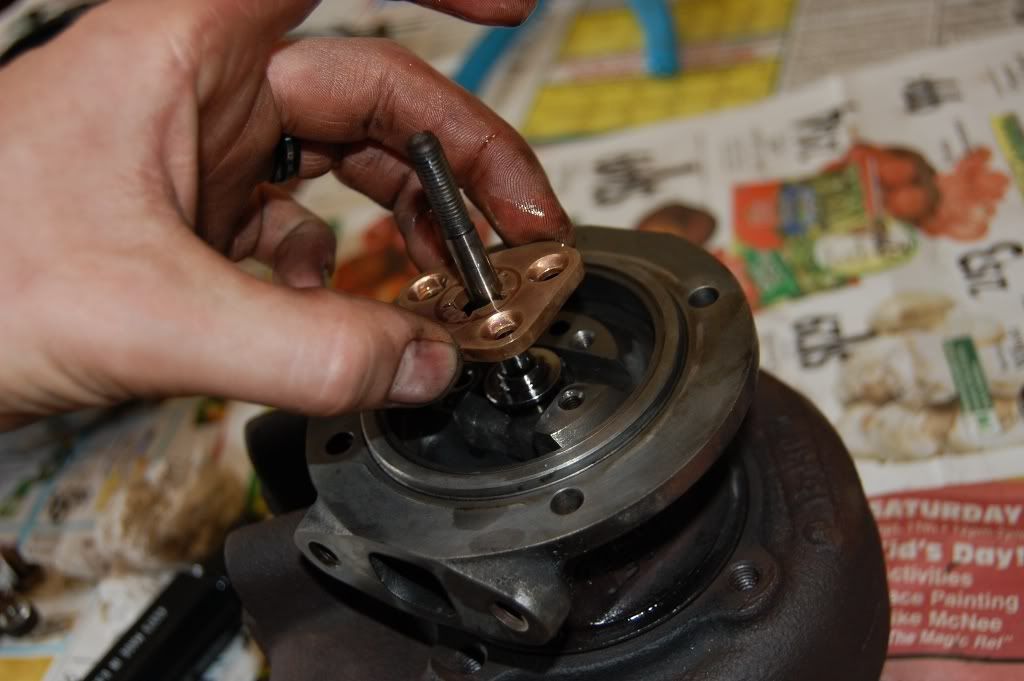
Step 8
Flip the center section to reveal the thrust plate and its 3 attachment bolts…remove these bolts to remove the plate, obviously, then remove the thrust bearing. Underneath, you'll see the journal bearings and the corresponding snap rings that hold the journal bearings in place.
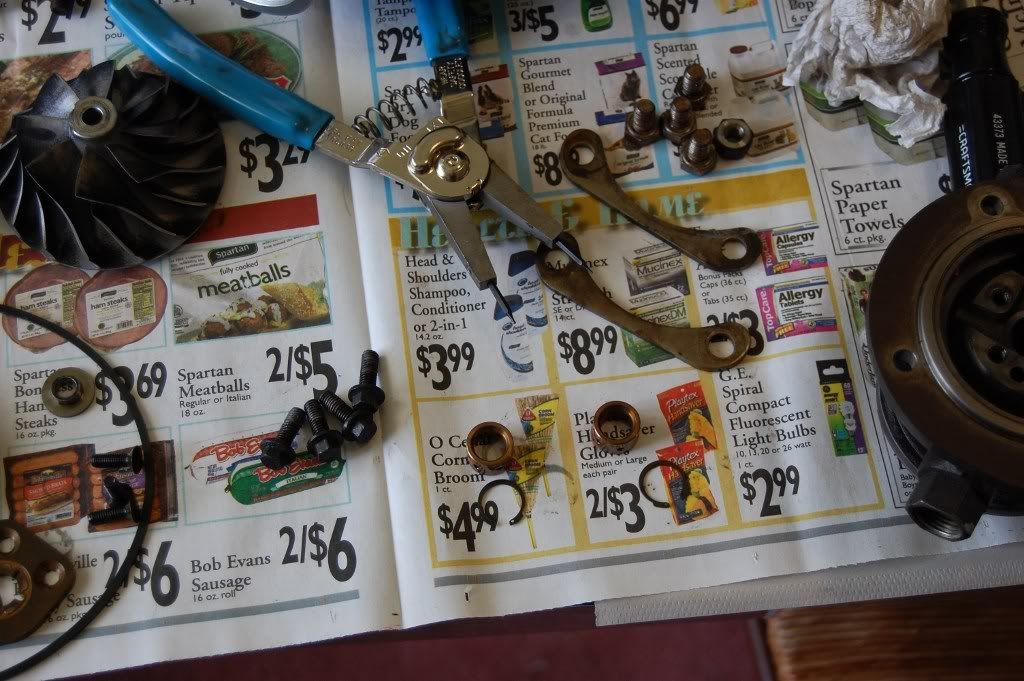
Step 9
Remove the snap ring on this side with snap ring pliers and then remove the journal bearing…then flip the center section over and do the same on the other side.
That's the entire tear down! Was that easy or what? If you weren't able to get this far, give up now because you are an idiot. The rest of you continue on…
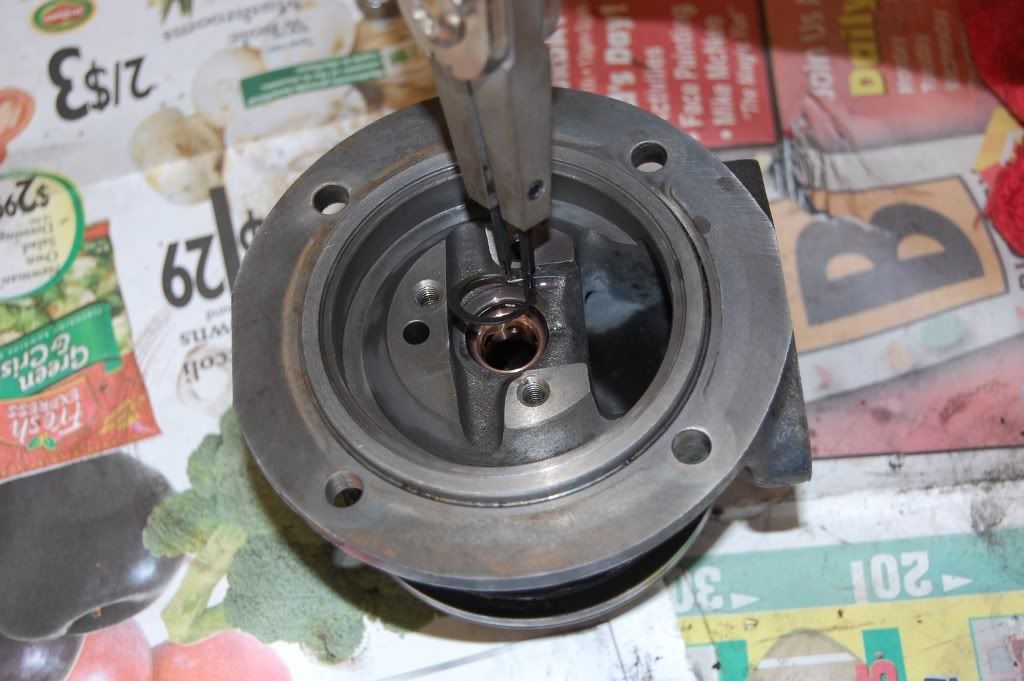
Step 10
Lubricate the new journal bearings from the kit with fresh engine oil, then install them with the new snap rings…make sure the smooth/rounded side of the snap ring faces the journal bearing to prevent premature failure.
Step 11
Replace the oil seal on the end of the turbine shaft with the new one from your kit, then place the *cleaned* circular shield on the turbine side of the center section.
Step 12
Slide the shaft back into the center section from the turbine side…in order to seat the new split ring seal you'll need to twist and wiggle the shaft with your palm being careful not to damage the turbine wheel blades…it will take a little pressure to get it back together, but it should result in a nice "click" when it finally pops into place. (DO NOT FORCE IT INTO PLACE AS THIS WILL DEFORM/DESTROY THE BRAND NEW SEAL).
Step 13
Place the corresponding side of the center section face down on top of the turbine housing to allow you to work on the compressor end of things. Here, you'll need to slide the thrust bearing and then the thrust bearing plate into place and tighten the 3 bolts…new bearing, new plate, and new bolts should be included in your kit.
Step 14
Now grab your compressor backing plate and locate the new bushing and oil seal from your kit and put them together, then put them in their place in the back of the compressor backing plate.

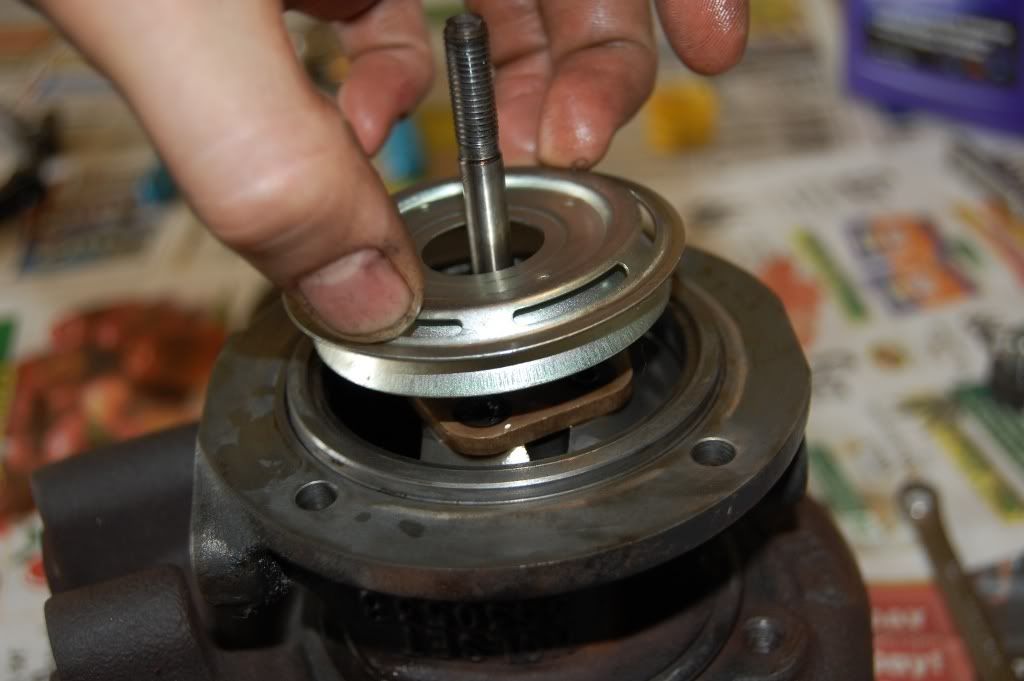
Step 15
Place the new circular plate in place on the center section, cup side down with the holes on the top side.
Step 16
Next, the compressor backing plate goes onto the center section using the new rubber gasket from your kit.
Step 17
Now grab the center section assembly with both hands, while holding the compressor backing plate in place, remove it from the turbine housing and flip it over so that you may set it into the compressor housing…once you do that, you can put in the new bolts that hold the backing plate to the center section and tighten accordingly.
Step 18
Flip the center section over again and put it back into the turbine housing.
Step 19
Slide the compressor wheel onto the shaft and align the index marks on the wheel and shaft…then hand tighten the new shaft nut…remember this is a LEFT HAND THREAD.
Step 20
Place the V-band clamp and compressor housing on the center section and tighten the clamp to finish the housing install.
Step 21
Pick up the center section out of the turbine housing and then clean up both corresponding mating surfaces, then apply a liberal amount of Anti-Seize compound on both surfaces. Reinstall the center section into the turbine housing and use the new bolts included in the kit along with the original half clips to attach them together.

Step 22
Get your helper to hold the turbine side of the shaft again while you put the final torque on the compressor wheel nut and you are done!
Hopefully this will inspire everyone to attempt their own Holset turbo rebuilds once they see how simple it is.
1987 Nissan 300ZX Turbo (Budget Supercar)
1987 Nissan 200SX SE (Old School FR)
1994 Nissan Sentra SE-R (Balls To The Wall Track Car)
2000 Nissan Maxima SE (Daily Driver)
2006 Scion tC (Wife Whip)
In an ideal world I would have all ten fingers on my left hand, so my right hand could just be a fist for punching. -
Not sure if you've noticed or not but BAE also has some service manuals for Holset turbos on their website. These might also be useful.
http://baeturbosystems.com/holsetrepairmanuals.aspx1987 N/A-to-Turbo
VG33ET
Holset WH1C
Stance Coils
viewtopic.php?f=13&t=15468 -
correct…I believe that Holset has service manuals on their site also…I mainly wanted to post this walkthrough because seeing manuals and pictures of real life objects are often different. using a combination of both is always the best method.
1987 Nissan 300ZX Turbo (Budget Supercar)
1987 Nissan 200SX SE (Old School FR)
1994 Nissan Sentra SE-R (Balls To The Wall Track Car)
2000 Nissan Maxima SE (Daily Driver)
2006 Scion tC (Wife Whip)
In an ideal world I would have all ten fingers on my left hand, so my right hand could just be a fist for punching. -
What about shaft/wheel balancing? should be performed with every turbo rebuild if within the budget. -
When you mark the compressor wheel to the shaft like Taris did they don't need re balanced because its being re assembled in the exact position it was beforehand so nothing has changed to make it out of balance.
The trick is making a really accurate mark and making sure it is EXACTLY where it was when it gets re assembled, i rebuilt a t3 today using pretty much this method and it was quite tricky to get the compressor wheel to stay in position when tightening the compressor nut, took me 3 goes to get it dead on.
If you change the compressor wheel or the there is a chunk broken off the turbine shaft then yeah it 100% needs rebalanced, but at that point you are getting away from preventive maintenance and getting into a custom rebuild.
I'm no engineer but unless your running it at the bleeding edge and really high turbine speeds the balance should stay spot on PROVIDING it was a good working unit to begin with that just needed a freshen up.
Really Nice write up Taris, keep up the good work85 Turbo Slick Top
__________________________________________________ _____ -
Excellent guide. I prefer this over the actual Holset manual.
My rebuild kit wasn't as complete as yours, but it still got the job done.Tinker Toy Equipped

-
I was a little hesitant to take my hx35 apart and rebuild it. Now I shouldn't have a problem. Thanks Taris!1988 na2t 300zx - Fully Forged VG30ET, Nistune, 60-1 Turbo, etc
2001 Nissan Pathfinder - DD
sigpic
Build Thread - http://z31performance.com/showthread…-K33bs-88-NA2T

Copyright © 2006–. All rights reserved. Privacy Policy